Simple corner radius jigs

Northernlight

Member
Joined
Dec 26, 2013
Messages
69
After being impressed by the woodpecker aluminum radius jigs I decided to make my own out of some scraps I had laying around the shop. And they work a treat.

These are to be used either with a router table or a hand held trim router.

Obviously these are a little delicate due to the thin walled fiber board being used as guiding blocks.

2egapyqa.jpg
 
Can you show some shots of them in use? Also why not use some flat aluminum instead of fiber board?
Thanks,
T
 
Hi guys. Sure I can shoot some pictures of them in use. I will do it today both with the plunge router and the router table.
 
If FOG could slow down so I have a chance to make all of these awesome ideas that'd be great. On second thought, you guys don't need to slow down, I need to speed up. The lady is t going to be happy about this.

Added to the weekend list
 
Northernlight said:
After being impressed by the woodpecker aluminum radius jigs I decided to make my own out of some scraps I had laying around the shop. And they work a treat.

These are to be used either with a router table or a hand held trim router.

Obviously these are a little delicate due to the thin walled fiber board being used as guiding blocks.

... but how did you make the nice radii on your jigs?

Thanks, Dick
 
dicktill said:
Northernlight said:
After being impressed by the woodpecker aluminum radius jigs I decided to make my own out of some scraps I had laying around the shop. And they work a treat.

These are to be used either with a router table or a hand held trim router.

Obviously these are a little delicate due to the thin walled fiber board being used as guiding blocks.

... but how did you make the nice radii on your jigs?

Thanks, Dick

+1 I'd like to know how you did it as well. Very nice  [thumbs up]
 
Another alternative to MFD would be 3/8" or 1/2" acrylic.
 
Sign Guy said:
am i missing something?
He probably used circles templates?
Thought most fellers on here pushed lead at one time.

Wow, that picture takes me back!  [wink]
 
My question was how to he get the curve nice, smooth and true on the jig. I would use a piece of 1/4" stock draw out the curve, cut on the waste side then finish with a spokeshave until I had a fair curve that I was happy with, then use this with a flush trimming  router bit to cut out the curve on my work piece. I was interested on how the op achieved his jigs which look perfect, as it always seems to take me ages until I am happy with the curve.
 
My guess is that he had a friend with the Woodpecker templates (or something similar), used a bearing bit and made them himself.  That is what I would do... on that note, anyone want to rent me a set of Woodpecker blocks?!?!

[wink]
 
Nice job. :-)

I thought the same thing when I saw the woodpecker version and also made my own. Mine is closer to the woodpecker versuon; square with a different radius on each corner. The body is made of 3/4" baltic birch plywood. I drilled and tapped two holes on each side and use 3/8" polycarbonate stops, and two thumbscrews to hold them in place. The center hole helps a lot with holding the jig in place while I rout the corners at the router table. If I made another one I'd probably increase the size a bit.
394064-438x.jpg

394068-438x.jpg
 
NiteWalkerGR said:
Nice job. :-)

I thought the same thing when I saw the woodpecker version and also made my own. Mine is closer to the woodpecker versuon; square with a different radius on each corner. The body is made of 3/4" baltic birch plywood. I drilled and tapped two holes on each side and use 3/8" polycarbonate stops, and two thumbscrews to hold them in place. The center hole helps a lot with holding the jig in place while I rout the corners at the router table. If I made another one I'd probably increase the size a bit.
394064-438x.jpg

394068-438x.jpg
I know this is a really old thread but was wondering how did you create the radii on the corners? Rough cut and sand or something more precise?
 
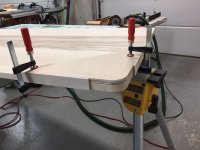
When I made my latest desk top and table top, I needed to make a fairly large radius corner.  I found an appropriate size can to give me the arc I wanted, then made a similar jig for use with the OF1400.  I have a good bit with top and bottom bearings, and it worked super.  I traced the arc on the corner, removed most of the material with the Carvex, then clamped and routed the corner smooth.  Here's a pic of the jig in use.
 

Attachments

  • IMG_0681.JPG
    IMG_0681.JPG
    583.9 KB · Views: 1,096
Back
Top