six-point socket's tidbits of Home Improvement, small projects and other stuff.

  • Thread starter Thread starter six-point socket
  • Start date Start date
Status
Not open for further replies.
Curious to see that blade then if you have one left. It's incredible what is "out there" and available if you know it. Makes life so much easier. :)

Kind regards,
Oliver
 
Hi!

A couple of pictures from today.

The feet for the new pedestal (washing machine and dryer) were built/laid, the old one component plastic coating/paint was removed from the concrete floor. Primer was applied, some superficial cracks were covered with some "webbing" type stuff - those will be filled tomorrow. Additionally the pedestal will be finished, maybe the tiles will also be applied. Next week the new two component epoxy flooring will be done.

38705203va.jpeg


38705204ed.jpg


38705205je.jpg


38705206qt.jpeg


38705207om.jpeg


Kind regards,
Oliver
 
Oliver, it looks like you're building a commercial laundry facility!  [big grin]
 
There is actually a story behind this:

Back in the day we had a large Bauknecht washing machine that was basically marketed as "US"-modell because it was one of the very few models that could handle 8kg of laundry back then. This was important to us for washing cushions and similar stuff. That machine came with a pedestal and we learned to love that. Fast forward that machine died at some point and suddenly the 8kg was nothing special anymore. So we bought another machine, and a new pedestal. On a Monday afternoon in March, we had just learned about possible Covid-19 restrictions, that machine died. So we rushed to a store, bought a machine, set delivery for Wednesday because we didn't want to ride out, whatever was coming at us, without a washing machine. The machine got delivered that Wednesday, and the delivery guys told us: last delivery, indefinitely. Later that day, I wanted to put it on the pedestal. Of course, it didn't fit. We now had the old Bauknecht pedestal, the pedestal from the current machine that died two days earlier, and our dryer, sitting on his own pedestal. All of them feature a drawer that is very practical. First reaction was to try and order another pedestal. I cringed when I saw the 250,- Euro price tag, for yet a fourth pedestal. I held off ordering it because I couldn't add it to my basket. That was good, because I then called the manufacturer and they told me it wouldn't fit our new machine, anyway. ...

I said enough. Now we have this pedestal build, the machines go on top, and two of the old pedestals, because of the drawers, go inside those bays you can already see. So no matter what new machine we will get in future - it will just sit on top. And since that is & will be perfectly leveled, no more fumbling with those pesky adjustable washing machine and dryer feet thingies. :)

Kind regards,
Oliver
 
Hey Rob, Milwaukee sells those blades as Sawzall pruning blades in a couple of different lengths. They’re painted a dark green for quick identification.
 
Hi Cheese

Yes, that's what is in the link I posted.

Those things could tear thru studs and floor joists !

 
FWIW...the first time I saw one of these blades was about 30 years ago. It was sold under the Skil product banner and it was known as the "The Ugly Blade".

Then they disappeared for about 5+ years until Milwaukee introduced them again. Milwaukee marketed them as a solution for cutting "green wood", thus the color of the blade.

They are fantastic for pruning purposes, however, the longer variants do tend to bend easily because of their form factor. Because of this I've never used one for demo purposes and have used the thicker/wider/stiffer Milwaukee AX series blades instead for demo.

[attachimg=1]
 

Attachments

  • 8985.jpg
    8985.jpg
    322.7 KB · Views: 722
Enough blade porn for my taste.

But, in a futile attempt to have the last word: you might want to watch


and reconsider  [big grin]
 
Gregor said:
Enough blade porn for my taste.

But, in a futile attempt to have the last word: you might want to watch and reconsider.  [big grin]

The cutting of the 2" solid round stock with a Sawzall at the 7:30 mark is pretty impressive.  [smile]

And Oliver, I love the cow and the calf...kind of the farm version of the pink flamingo's.  [tongue]
 
Hi!

Today's progress. Applying cement lime plaster/cement calcareous plaster. Then the necessary plywood was dropped off. 40mm thickness. 2500x1250 mm (one sheet) had to be bought. Quality: BB/CP, we had it cut pre delivery. Then the cement lime plaster had to be "rubbed" - Can someone tell me the correct english term for when you use a wet sponge to smoothen the plaster surface.

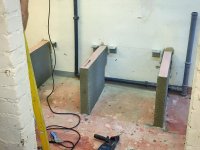
A cut out was made so the drain pipe would fit through and the drain pipe was installed. Brackets were installed.

The plywood board was mounted to the "legs" and additionally secured to the wall via the brackets I mentioned above. One component polyurethane adhesive (Würth Bond & Seal via 300ml cartrdige)  screws & wall plugs were used for this.

PCI Wadian was used as primer on the plywood. After a short drying period, tiling started. To make tiling the front-end/ face side as painless as possible, some scraps were screwed to the board from the underside. So the tiles can rest on spacers put in between.

The floor was then "plastered" with PCI Repafix.

Applying cement lime plaster.
38711368ux.jpeg


"Wateredge"
38711370cs.jpeg


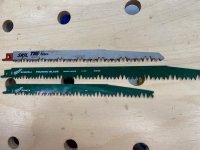
40mm plywood "scraps" (BB side)
38711374wm.jpeg


CP side
38711371ks.jpeg


Stamp
38711372yc.jpeg


Installing drain pipe, brackets and rubbing the cement lime plaster.
38711375rm.jpeg


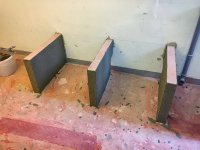
"Wateredge" cement lime plaster rubbed.
38711376mc.jpeg


Plywood board installed.
38711377rx.jpeg


Primer applied to plywood board.
38711379ai.jpeg


Tiling, upper side.
38711380km.jpeg


38711381kh.jpeg


Scraps installed to help with tiling face side.
38711384iv.jpeg


Tiles on face side.
38711385tp.jpeg


38711386zg.jpeg


"Plastering" the floor with PCI Repafix.
38711387rd.jpeg


End of day two.
38711388cg.jpeg


38711390ko.jpeg


Kind regards,
Oliver
 
six-point socket II said:
Hi!

Then the cement lime plaster had to be "rubbed" - Can someone tell me the correct english term for when you use a wet sponge to smoothen the plaster surface.

Kind regards,
Oliver

I call it "wet sanding" anytime a damp sponge is used on plaster or drywall compound.
 
Oliver

40 mm plywood is 1.57"  [eek] no wonder you don't want to handle a full sheet. I've seen 1 1/8" plywood (~28mm) and that is plenty beefy.

Minor variation from Scott's version: the brickies here would call that "sponging".  Not very imaginative, is it?  [big grin]

Cool project.
 
Looks awesome.

I believe the correct industry term in the States is called "floating".

The tool is called a sponge float. Traditionally they are made of rubber, but poly ones are starting to appear now.
 
Thanks everyone!

So today was a rather short day.

The pedestal/tiles was/were grouted today and the floor got it's last thin layer of Repafix, wich is the last mineral containing layer before the epoxy will be applied, hopefully at some point next week.

38715717cd.jpeg


38715718ay.jpeg


38715719da.jpeg


38715720ho.jpeg


I ordered and paid for the epoxy on Thursday, but the manufacturer will only start making my, currently out of stock, 10kg set once they have my payment allocated in/to their books. ... So hopefully the stuff will be delivered next week. Funny thing is they'd rather trust a global company, that's not even a bank, and that almost always sides with the buyer in case of trouble/problems than a gentleman. My "loss" not using that global company as payment processor, I guess.  [tongue] [wink] [cool]

As you might be able to see, the tiles for the pedestal are the same we used for some of the basement flooring. The flooring of the laundry room will be RAL 7032 "pebble grey" colored - that should make for a nice contrast and together with the now complete "wateredge" should give it a look that reminds of a bin/basin.

Tomorrow I will be painting the walls, give the pedestal it's final cleaning and put the machines on it.

Kind regards,
Oliver
 
The tile & grouting looks good Oliver....[big grin]..was the floor epoxy a custom color or did they just not have enough on hand to fill your order?  If it was a standard color it's odd that they just wouldn't go ahead and manufacture some more automatically without running you through the money changer scenario?

Question...how does this work? Does this piping have o'rings inside so that you can easily reposition fittings?

Tee facing forwards

[attachimg=1]

Tee turned left 90º

[attachimg=2]

That 40 mm plywood is awesome. Very  [cool]
 

Attachments

  • Oliver 1.jpg
    Oliver 1.jpg
    90.2 KB · Views: 491
  • Oliver 2.jpg
    Oliver 2.jpg
    85.4 KB · Views: 466
Very nice work Oliver. You seem to get a lot done.

You definately motivate me to get busy. Ive been messing around with some laundry room cabinets that I havent finished yet could be done an me on to the next project by now.

My wife would love you.  [big grin]

You must have quite a tool budget  [tongue]
 
Hi Cheese,

Thanks!

yes, the piping has o-rings inside. It's "plug and play" in the truest meaning. Since there is no pressure, just draining washing machine and dryer, there is no problem. It's called "HT Rohr" in German. (high temperature piping) ->https://www.stabilo-sanitaer.de/was...hre-abflussrohre/ht-pp-rohre-kunststoffrohre/

Sadly it's Wikipedia site is not translated. ->https://de.wikipedia.org/wiki/Hochtemperaturrohr

It's only to be used inside buildings. Not outside or buried in soil. For such use, there is "KG-Rohr" Which stands for "Kanalgrundrohr" in english it would translate to "basic sewage piping". But only to connect your building to the utilities real sewer. ->https://www.stabilo-sanitaer.de/wasser-installation/abwasserrohre-abflussrohre/kg-rohre-kanalrohre/

Sadly it's Wikipedia site is not translated. ->https://de.wikipedia.org/wiki/Kanalgrundrohr

The color is standard, and they have plenty of the stuff. Currently just not "packaged" as 10kg set. You receive two buckets: One with the resin, one with the hardener/curing agent. Both together account for 10kg of flooring material. The idea is, you don't have to mess around with weighing/measuring for exactly upholding the 78:22 ratio. You basically just dump the small bucket into the larger bucket and make sure it's completely emptied. (We still will "mess" with it, because we need 3.5kg for the first/primer layer, and 2.5kg for the finishing layer over two days) I especially bought a scale for this, and they have a very cool app, I will show on this thread when I post about the flooring. :) )

Kind regards,
Oliver
 
jobsworth said:
Very nice work Oliver. You seem to get a lot done.

You definately motivate me to get busy. Ive been messing around with some laundry room cabinets that I havent finished yet could be done an me on to the next project by now.

My wife would love you.  [big grin]

You must have quite a tool budget  [tongue]

Thanks!

I'm trying to stay as positive as I can, especially here on the FOG. But because of my overall health situation, which by now is more or less unproblematic as long as it is treated/medicated, we had to re-think our plans for the future. And now that it is clear that we will stay, we can spend whatever we want to spend on all this stuff and further improve this fantastic home for us, without thinking about what was once our and to some extent also largely my plan(s) for the future.

One door closes, another one opens. Life happens.  [smile]

Kind regards,
Oliver
 
Status
Not open for further replies.
Back
Top