You are using an out of date browser. It may not display this or other websites correctly.
You should upgrade or use an alternative browser.
You should upgrade or use an alternative browser.
Small shop/modular work surfaces (AKA how to cram 10# in a 5# sack...)
- Thread starter Richard/RMW
- Start date
I've been playin' in the snow all day. I'll think about all that playin' with a dutch oven later. [popcorn] As for correcting my mistooks, you no i nvr mak mstaks. 
i don't have to think twice about the pork loin and beer tho. [thumbs up]
I like german dark
Tinker
i don't have to think twice about the pork loin and beer tho. [thumbs up]
I like german dark
Tinker
rvieceli
Member
Me me me [big grin]
Richard/RMW
Member
- Joined
- Jul 11, 2010
- Messages
- 2,947
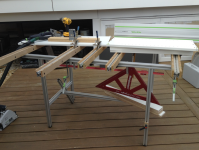
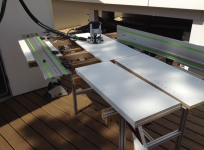
Spring arrived in Brigantine yesterday, at least for me it was the first day this year where I had (a) clear weather (b) no snow on the ground and (c) time. Took advantage of the situation to clear out enough piled up junk to make the shop quasi functional and play a bit.
The next big house project (after finishing the shop) will be new cabinets in the laundry/utility area, probably 3-4 months from now. When we moved in we reused the old junk kitchen cabinets from the original house in the utility area, they are cheap 5/8" particle board hot-glued/stapled construction. Last week one wall cabinet gave up the battle and started falling off the wall so I needed a quickie cabinet to get us by until the re-do, it gave me a chance to practice cabinet-making.
First I sized the material using the woodpecker rule/stop to mark length, woodpecker square to align the guide rail @ 90 degrees and rip guides to cut to width width, using the 80/20 knock down table:
[attachthumb=1]
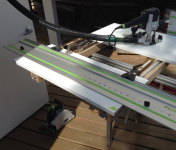
I use green masking tape to mark reference surfaces, top/outside corner. My LR32 is pieced together, I don't have the guides so I used a short set of rip guides instead:
[attachthumb=2]
[attachthumb=3]
[attachthumb=4]
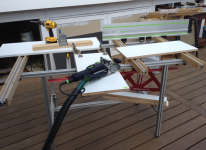
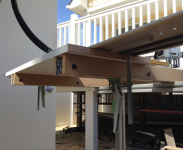
Clamping to the 80/20 extension arms is really flexible where they overhang the table frame, in this case the clamp secures the guide rail and material to the arm:
[attachthumb=5]
Domino's for alignment and strength:
[attachthumb=6]
[attachthumb=7]
Pocket holes for assembly:
[attachthumb=8]
Overall it worked out great, it was the first time I used the LR32 and the results were perfect. I didn't even mess anything up until I managed to pocket-hole the wrong side of the top...
Best part was just getting outside and making some sawdust, and getting to use the TS/CT/LR32/Domino as a system, as it is designed to be used. Not a crumb of sawdust until I got the the pocket holes.
RMW
The next big house project (after finishing the shop) will be new cabinets in the laundry/utility area, probably 3-4 months from now. When we moved in we reused the old junk kitchen cabinets from the original house in the utility area, they are cheap 5/8" particle board hot-glued/stapled construction. Last week one wall cabinet gave up the battle and started falling off the wall so I needed a quickie cabinet to get us by until the re-do, it gave me a chance to practice cabinet-making.
First I sized the material using the woodpecker rule/stop to mark length, woodpecker square to align the guide rail @ 90 degrees and rip guides to cut to width width, using the 80/20 knock down table:
[attachthumb=1]
I use green masking tape to mark reference surfaces, top/outside corner. My LR32 is pieced together, I don't have the guides so I used a short set of rip guides instead:
[attachthumb=2]
[attachthumb=3]
[attachthumb=4]
Clamping to the 80/20 extension arms is really flexible where they overhang the table frame, in this case the clamp secures the guide rail and material to the arm:
[attachthumb=5]
Domino's for alignment and strength:
[attachthumb=6]
[attachthumb=7]
Pocket holes for assembly:
[attachthumb=8]
Overall it worked out great, it was the first time I used the LR32 and the results were perfect. I didn't even mess anything up until I managed to pocket-hole the wrong side of the top...
Best part was just getting outside and making some sawdust, and getting to use the TS/CT/LR32/Domino as a system, as it is designed to be used. Not a crumb of sawdust until I got the the pocket holes.
RMW
Attachments


Cheese
Member
Richard/RMW said:Spring arrived in Brigantine yesterday, at least for me it was the first day this year where I had (a) clear weather (b) no snow on the ground and (c) time. Took advantage of the situation to clear out enough piled up junk to make the shop quasi functional and play a bit.
Nice to just get outside and work in the fresh air & sunshine after the snow leaves.
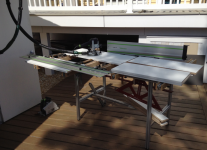
Really love your 80/20 table. How long does it take to set up?
Do you use the regular socket head cap screws to hold it together or do you have some sort of quick clamping system instead?
Richard/RMW
Member
- Joined
- Jul 11, 2010
- Messages
- 2,947
Cheese said:Richard/RMW said:Spring arrived in Brigantine yesterday, at least for me it was the first day this year where I had (a) clear weather (b) no snow on the ground and (c) time. Took advantage of the situation to clear out enough piled up junk to make the shop quasi functional and play a bit.
Nice to just get outside and work in the fresh air & sunshine after the snow leaves.
Really love your 80/20 table. How long does it take to set up?
Do you use the regular socket head cap screws to hold it together or do you have some sort of quick clamping system instead?
Cheese - it takes about 10 minutes to setup, I mostly use the 80/20 standard end fasteners. They require threading the hole in the end of the extrusion, then drilling an access hole in the slot of the piece you want to mate to it. Quick and easy.
Here's a video showing the setup sped up 4X:
http://www.youtube.com/watch?feature=player_embedded&v=sXcVt9dxnH8
RMW
rvieceli
Member
Richard - didn't you have a few pics of your table build and those pieces of 8020 with the mdf sides?
I can't seem to find them?
thanks - ron
I can't seem to find them?
thanks - ron
Richard/RMW
Member
- Joined
- Jul 11, 2010
- Messages
- 2,947
rvieceli
Member
Thanks Richard
Richard/RMW
Member
- Joined
- Jul 11, 2010
- Messages
- 2,947
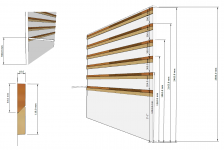
Steering this thread back to the original topic, i.e. my shop update, my next task is to finish the insulation (~2 hours) then start drywall installation wall-by-wall. The plan is to do a wall, then install french cleats, move stuff from another wall, then do that wall, etc. I', finally forced to focus on the details of the cleats, so I am looking for any input.
This drawing (first attempt at using Layout in Sketchup) shows the current idea:
[attachthumb=1]
Pardon the messy dimensions, I design in metric but still think in Imperial.
Input is welcomed.
RMW
This drawing (first attempt at using Layout in Sketchup) shows the current idea:
- OAL wall height is just over 98"
- My standard height for work surfaces is 37"/940mm
- Bottom cleat finishes off at 940mm OAL height
- Upper cleat finishes off at 97" - may come down a tad for clearance if necessary
- Intermediate cleats are set in 300mm increments from the top down
[attachthumb=1]
Pardon the messy dimensions, I design in metric but still think in Imperial.
Input is welcomed.
RMW
Attachments
rvieceli
Member
As you mentioned, you might have some clearance issues with the top row. Maybe mock up something and try it out before committing.
I'm also concerned about the first row at your worktop height. Will you want to push a cart or worktable up against the wall to get it out of the way?
I'm also of the opinion that maybe the whole French cleat system might be a bit of overkill for your space. And might end up making more work for what ever problems it solves. The main advantage of the system is the ability to make easily make changes in the racking and storage system. From looking at your photos from the before side, you seem to be very organized and have a good method for organizing. I really like the rods and the pegs system you have. Also in a small space there are only certain spots that things fit and also fit into your work flow.
Having to add a cleat on the back of your already seemingly good approach to storage seems like just extra work. Sort of like all those shelf pin holes that every one puts in, but most folks never change the position of the shelves.
Matthias Wandel has a system that works for him. He must like it since he has continued using it after moving to a new shop.
http://woodgears.ca/tool_holders/
http://woodgears.ca/tool_holders/making.html
http://woodgears.ca/tool_holders/
http://woodgears.ca/tool_holders/making.html
I like Mattias's tool wall setup. Very neat and able to get a lot of small tools into small space. I have bookmarked but I still like the idea of frnch cleats. I have moved things around too many times to even think in my dreams that any setup might be permanent. I have started reorganizing my shop this weekend (finally) for what should be the last time. i am only 39, so still young and impetuous. Things will get moved probably many more times. My grandson gave me a hand moving the heavy stuff on saturday. On Sunday, i started clearing the floor and hidden corners, cutting all the scraps with my SCMS for kindling wood. Some of the scraps were straight and large enough to be used for cutting boards, trays and other small projects. Those will end up in ........ Oh, i guess i will stop speculating on where they will go. for now, i can actually see the floor of my shop. You guys have inspired me.
back to Mattias's wall: I like the setup, but like FC system as I can move small shelves and boxes around to different locations. For now, i am trying to set up to make best use of two MFT's MFT/3 for main bench and center of work area. The smaller 800 is against the wall so all i have to do is turn around from the /3. All of my Festoy clamps and almost all of tools I use with MFT's, TS 55 and the Festoy router table will be grouped with under the two tables or on the wall within easy reach.
I have two solid wood work benches that are along wall areas with heavy tools such as hammers, mallets, chisels, planes, heavier clamps and other tools not used on the MFT's
Since the two benches are at opposite sides of the shop, i am hoping that i can work out a system with the french cleats where I can select the tools needed and just move a panel from one side of shop to the other. With rearranging of the benches, stationary sanders and SCMS, i now can walk around the shop with room to spare. Well, not a lot of room. Just more. My GS and I are both quite slim but we could not walk, or even slide past on another in working around the /3. We now can get around without sucking in our breaths. It is great and I am sure it will be far more enjoyable for Andrew.
Tinker
Richard/RMW
Member
- Joined
- Jul 11, 2010
- Messages
- 2,947
Matthias puts out an amazing amount of work, I really respect the way he built a business around his videos, lots of great & clever ideas.
Personally, I don't care to have hand tools hanging on the walls, they live in cabinet drawers. My exposed wall storage will be limited to tools that don't fit in drawers, handsaws, layout squares, straight edges, clamps, guide rails and my 80/20 knock-down table. These are things I will probably rearrange at times, hence the F/C lend themselves to them.
Anything else such as finishes, infrequently used bench tools (Drill Doctor/Arbor Press/Hand Tapper/Metal Chop Saw), shop supplies will go in cabinets. The F/C give me the option to move the cabinets during a reorganization.
Some tools like the chop saw and drum sander will have their own F/C platform, idea being I can pull the whole thing down from an upper position to the working height cleat, use it and then return to the upper storage area.
Lastly, I am thinking things like a router table or shelf for the TS55 can be moved around as needed, then stored out of the way when not in use. To fit all this stuff I need to have some things at ceiling height when not in use, so the F/C seems like a flexible system.
We'll see how it all works out.
RMW
Richard/RMW
Member
- Joined
- Jul 11, 2010
- Messages
- 2,947
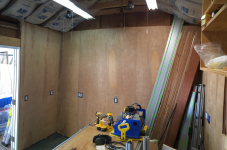
Holy Cow! It's been nearly a year since I made any significant progress on my shop rehab. Thanks to a gentle prod by [member=3192]rvieceli[/member] on another thread (thanks Ron!), and with one of the nicest days any February can be asked to serve up, I got about 1/2 the shop walls insulated and buttoned up.
I had planned to use T1-11 but conveniently my HD did not stock the thin stuff I wanted, but they did have a lift of pretty nice 5mm underlayment @ $11 bucks a sheet, so I made do:
[attachimg=1]
I also got some ~ 5/16" T&G cedar for the ceiling. Hope to get the walls buttoned up tomorrow, and possibly make some progress on the ceiling or french cleats.
RMW
Attachments
rvieceli
Member
Looking good Richard. [thumbs up] [thumbs up]
Picktool
Member
- Joined
- Apr 2, 2014
- Messages
- 172
Very nice, coming along well.
[member=8712]Richard/RMW[/member]
I had 1/2" plywood on garage walls for a few years and stumbled
along this siding @ Lowes and put it right over it
http://www.lowes.com/pd_15601-132-27905___?productId=3051241&pl=1&Ntt=siding+mdf+panel#img
$21/4x8 @ 7/16"th - It has a pleasing wood grain pressed into this stuff.
You could cut this in half and use it the upper parts of the walls
and finish the lower section w/ some wainscot/plywood to break up the
wood crate look. I have a ways to go with finishing my shop but lil here
lil there its coming along.
Painting it may be a chore, im probably going to spray it.
Sort of like a masonite material to say or dark ass mdf
that cuts well and has a few patterns you can alternate.
Richard; when you insulated the ceiling, did you put anything between the plywood and the insulation? I am thinking of those trough like things. Also are the walls insulated? My shop is similar to yours and I have been thinking of insulating, mainly so I can use it year round.
I have to put a new roof on it as soon as the weather breaks, and think I will raise it up about 4" to make it seem larger.
Chris
I have to put a new roof on it as soon as the weather breaks, and think I will raise it up about 4" to make it seem larger.
Chris
Richard/RMW
Member
- Joined
- Jul 11, 2010
- Messages
- 2,947
Picktool said:Very nice, coming along well.
[member=8712]Richard/RMW[/member]
I had 1/2" plywood on garage walls for a few years and stumbled
along this siding @ Lowes and put it right over it
http://www.lowes.com/pd_15601-132-27905___?productId=3051241&pl=1&Ntt=siding+mdf+panel#img
$21/4x8 @ 7/16"th - It has a pleasing wood grain pressed into this stuff.
You could cut this in half and use it the upper parts of the walls
and finish the lower section w/ some wainscot/plywood to break up the
wood crate look. I have a ways to go with finishing my shop but lil here
lil there its coming along.
Painting it may be a chore, im probably going to spray it.
Sort of like a masonite material to say or dark mdf
that cuts well and has a few patterns you can alternate.
That is similar to what I want planning on using, until HD was out of it. I grabbed the underlayment so I could just get it done while the weather held. The plan is to give it a coat of satin poly & run a vertical strip around @ the level of the outlets to break it up and pack it out to ~1/2" so the cover plates fit properly. Also the french cleats will break things up a bit.
While a PITA having to unload all the cabinets and storage racks, it did convince me to relocate some shelves in order to open up the space a bit, still undetermined exactly how though. Using the cleats should let me rearrange stuff until satisfied.
Here's how thing stood midday yesterday before I loaded everything back inside for the night.
[attachimg=1]
RMW
Attachments
![ScreenClip [1].png](/data/attachments/25/25508-3c0fe90d61f3448cca76a82562e53bc8.jpg?hash=9A5cE3ZntE)
Similar threads
- Replies
- 1
- Views
- 787
- Replies
- 10
- Views
- 1K
- Replies
- 18
- Views
- 2K
- Replies
- 23
- Views
- 3K