Small shop/modular work surfaces (AKA how to cram 10# in a 5# sack...)

chris s said:
Richard; when you insulated the ceiling, did you put anything between the plywood and the insulation? I am thinking of those trough like things. Also are the walls insulated? My shop is similar to yours and I have been thinking of insulating, mainly so I can use it year round.
  I have to put a new roof on it as soon as the weather breaks, and think I will raise it up about 4" to make it seem larger.
                                                                                              Chris

Chris - I did not run anything under the plywood/above the insulation. That insulation is wrapped all the way around in poly. Are you thinking about condensation building up? The eaves are vented.

The walls are totally insulated, with the insulation in place and a 750 watt radiant panel I can leave the heat on @40 degrees and it costs dimes a day. I prefer to work around 50 degrees in the winter anyway, so heating it up a bit more does not take long.

RMW

 
Richard, that looks great. Does that just leave you the wall behind the bench to finish?

honestly, I was a bit concerned about the thickness of the stuff you are using. But then I remembered how much of that stuff will be covered by the cleats and I realized you'll be fine. In reality, that stuff is just protecting the insulation.

Is that a narrow crown stapler or a finish nailer you're putting it up with?

Ron
 
rvieceli said:
Richard, that looks great. Does that just leave you the wall behind the bench to finish?

honestly, I was a bit concerned about the thickness of the stuff you are using. But then I remembered how much of that stuff will be covered by the cleats and I realized you'll be fine. In reality, that stuff is just protecting the insulation.

Is that a narrow crown stapler or a finish nailer you're putting it up with?

Ron

Ron - it is a narrow crown stapler, mostly just enough fasteners to hold the stuff up until I get the cleats in place. I was tossed on the thickness also but I think it will work out fine. Hope to avoid screwing stuff all over the walls anyway, and this will force me to be deliberate.

RMW
 
Richard; I was thinking about condensation,however if the insulation is wrapped I think it is ok. Something I did not consider.
                                Chris
 
cutting aluminum extrusions: AMANA's non-ferrous blade worked fine for me extended period of time on a DeWalt cut-off saw
 
We had another unreal February day today, around 40 with blue skies and no breeze, a great day to work in the shop.

Today saw some progress getting the French cleats installed, relocating clamps and getting some stuff back onto the walls and out of the way.

[attachimg=1]

[attachimg=2]

[attachimg=3]

I was lucky to grab a bunch of Revo's when Amazon had one of their periodic sales that another Fogger posted earlier this winter, so there is a ample supply of clamps needing a home.

Tomorrow looks to be at least as beautiful as today, so I plan to get the last of the insulation and sheathing installed, and perhaps finish up the cleats.

RMW
 

Attachments

  • ScreenClip [10].png
    ScreenClip [10].png
    2.1 MB · Views: 6,787
  • ScreenClip [11].png
    ScreenClip [11].png
    2.3 MB · Views: 6,841
  • ScreenClip [12].png
    ScreenClip [12].png
    2.4 MB · Views: 6,913
Looking good Richard!!!

It was almost 60 here today. Do yourself a favor and before you throw any more stuff on the cleats etc., put up at least a couple of rows of cedar at the top of the walls so you don't have to unload stuff to do it.

Ron
 
Richard/RMW said:
7ca7d4d24634cf8cdd1ba802a3c0ccd9.jpg

Great progress.  Like how accessible things are.

What are the things hanging below the clamps/clamp rack?
 
I love the "tiny house meets compact workshop" thing going on here [big grin]

An interesting density measure would be tool investment $'s per cubic metre (ok, cubic foot if you like!)

I'm going to take a stab and guess you're about 1,500 cubic feet .. with about a $75USD per cubic foot tool investment average.

(no real science in this - I'm just having some fun with the model and a wild stab)

I had a friend that had a small fishing boat years ago .. he was mad about efficiency. Nothing went on that boat unless he'd ensured is was either of a critical primary nature or highly multifunctional. Really changes your thinking! 

 
Kev said:
I love the "tiny house meets compact workshop" thing going on here [big grin]

An interesting density measure would be tool investment $'s per cubic metre (ok, cubic foot if you like!)

I'm going to take a stab and guess you're about 1,500 cubic feet .. with about a $75USD per cubic foot tool investment average.

(no real science in this - I'm just having some fun with the model and a wild stab)

I had a friend that had a small fishing boat years ago .. he was mad about efficiency. Nothing went on that boat unless he'd ensured is was either of a critical primary nature or highly multifunctional. Really changes your thinking!

[member=13058]Kev[/member] - hadn't calced the cube, buuuut since you started it.... 874 cu/ft (11.5 by 9.5 by 8' I.D.)  [big grin] I won't even touch the $/PSF calc, my wife may stumble upon this someday.

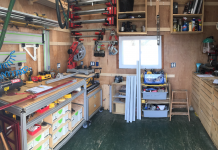
At our last home my shop was 24' by 32' and I had it crammed with crap I never used, this one makes me really evaluate everything, I like it better. Not that I would refuse another 4' off the front, that would make it about perfect.

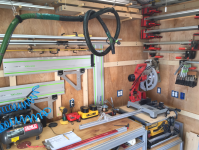
Funny thing is as I look at the clamp storage my immediate reaction is "there's a lot of wasted space here". Sometime soon I will make another set of those standards with the hole spacing calculated to leave 0.05mm between the clamps, THEN I will be satisfied.  [doh] It does become a bit of a sickness.

I have been jonesing for a larger air compressor, but to add it I would need to create a  weatherproof bump-out on the outside, and I keep drooling over the Kapex but it is a non-starter. One thing I need to add to the guiding principals (see bottom of original post) is that any commonly used bench tool needs to be able to be used without moving/setting it up. This cannot apply to things like the tablesaw, but should apply to drill press/grinders/sanders/etc. I have an idea of how to use the TS55 as a "chop saw" for small-ish stock, hope to get to that this spring sometime.

Anyway, it has been a fun challenge, although I just noted in the first post I labeled this my "winter project". In 2014. Oops.

RMW
 
Scorpion said:
Richard/RMW said:

Great progress.  Like how accessible things are.

What are the things hanging below the clamps/clamp rack?

[member=27782]Scorpion[/member] - those are the "standards" for lack of any better name, that hold the 14mm stainless rods that the clamps rest on. Those were positioned after that photo was taken, you can see them in use in the next photo or the one below.

[attachimg=1]

The holes are drilled at a 2 degree angle, they've worked out great.

RMW
 

Attachments

  • ScreenClip [13].png
    ScreenClip [13].png
    2.2 MB · Views: 6,544
I received some question via PM on the standards, so here's some more detail. They are 1" by 1.5" hard maple, the rods are 14mm stainless left over from our stair rail. Any 1/2" steel rod would work just as well.

The 2 degree holes were drilled on the little press, using this jig:

[attachimg=1]

I just screwed some sections of the FC to the back to adapt them to the cleats.

[attachimg=2]

Today I got the rest of the walls insulated and sheathed, and most of the FC installed.

[attachimg=3]

Lessons learned this weekend:

[list type=decimal]
[*]If you are going to use the Powerhead screws and want them flushed, buy the drill gadget. I sheared off the tips of 3 square drives yesterday trying the flush them with the impact, then ordered the drill from Amazon Sunday delivery and it showed up today before noon. Major difference.
[*]Set the FC heights at equal increments. Don't know why I didn't do this yesterday, but I am going to have to move my second row from the top on 2 walls to fix this.
[*]If you are building a shop from scratch, decide where you want the FC before running electrical. There are 2 rows of nail plates, one below the outlets and another above the door, I hit both of them dead on with my preferred FC heights & had to adjust. Ticked me off no end.
[/list]

And, for fun, this is what the shop looks like at the end of every day, although today is about 20% better than it has been since I started this phase.

[attachimg=4]

Oh, and I burned out my TS55 today, cutting 70mm rips of birch ply for the cleats. Sparks inside the housing and burning plastic, not sure if the dull-ish blade was responsible? Off to the tool-medic tomorrow.

All in all, a satisfying weekend but for the dead saw.

RMW
 

Attachments

  • ScreenClip [17].png
    ScreenClip [17].png
    2.4 MB · Views: 6,502
  • ScreenClip [16].png
    ScreenClip [16].png
    1.8 MB · Views: 5,793
  • ScreenClip [15].png
    ScreenClip [15].png
    1 MB · Views: 6,050
  • ScreenClip [14].png
    ScreenClip [14].png
    1.4 MB · Views: 5,838
[member=8712]Richard/RMW[/member]

You make me sick!  [big grin] It really is amazing how organized you are and the work you have done to this point is awesome!

 
I love the pulls on the drawers! You never know when you are going to need to pop the top on a fresh construction soda.
 
After taking last weekend off to welcome The Boss home I had my first chance to work in the semi-complete shop - it only took 10 minute to drag the still-homeless stuff outside and I could get to the benches and tools:

[attachimg=1]

[attachimg=2]

Today's project is the revamped material cart, which will also be home to the small (Shapeoko 3) CNC. Gang tapping the ends of the extrusions:

[attachimg=3]

Drilling the access holes:

[attachimg=4]

Assembly:

[attachimg=5]

Loading it up (partially completed) for the night:

[attachimg=6]

Hope to finish this tomorrow and perhaps get some more stuff on the walls semi-permanently.

Beautiful early spring, 60's this weekend!

RMW
 

Attachments

  • Shop.png
    Shop.png
    3 MB · Views: 6,552
  • Working.png
    Working.png
    1.8 MB · Views: 5,707
  • Tapping.png
    Tapping.png
    2.5 MB · Views: 5,954
  • Drilling.png
    Drilling.png
    2.3 MB · Views: 5,831
  • Assembly.png
    Assembly.png
    1.1 MB · Views: 5,437
  • Material.png
    Material.png
    1.4 MB · Views: 5,313
This thing is really going to suck... snicker.

[attachimg=1]

RMW
 

Attachments

  • ScreenClip [4].png
    ScreenClip [4].png
    1.9 MB · Views: 5,178
Spent about 6 hours working on this today, mostly re-positioning some of the French cleats because spacing was not well thought out originally, then getting some more stuff off the floor and back onto the walls/cleats.

Originally I used a laser to set the cleats level, but for whatever reason (most likely operator-error) there was 2-3 MM of difference in places in the spacing between rows. Decided to take an analog approach and, what the heck, use some 80/20.

[attachimg=1]

[attachimg=2]

[attachimg=3]

Around 3:00 I threw in the towel, lit a cigar, mixed a see-thru and put on an audio book. Here's the south wall:

[attachimg=4]

West wall:

[attachimg=5]

North wall:

[attachimg=6]

East lie the doors. Next I break down the excess carts, evict anything that does not really need to be in the shop, and get the layout tools arranged. At that point I should be nearly as functional as I was before starting the project & I can make some decent wall cabinets & start optimizing the use of the cleats.

Oh yea, and shoveling snow. Nor'easter on the way. There must be some Daffodils that poked their heads up somewhere in the yard.

G'night all.

RMW
 

Attachments

  • ScreenClip [5].png
    ScreenClip [5].png
    1.4 MB · Views: 5,099
  • ScreenClip [6].png
    ScreenClip [6].png
    1.3 MB · Views: 5,046
  • ScreenClip [7].png
    ScreenClip [7].png
    1,012.3 KB · Views: 5,079
  • ScreenClip [8].png
    ScreenClip [8].png
    1.3 MB · Views: 5,036
  • ScreenClip [9].png
    ScreenClip [9].png
    1.5 MB · Views: 5,081
  • ScreenClip [10].png
    ScreenClip [10].png
    1.6 MB · Views: 5,012
Today was fun, if you consider spending a day hanging stuff on your shop walls and grilling pork to be "fun". I do.  [big grin]

Started the day full-steam ahead towards making a bunch of french cleat dingus with pegs to hang stuff when it occurred to me there was a simpler way to do it still keep it adjustable (i.e. not screwing stuff to the walls). Instead I made a jig to drill holes in the cleats @ a 2-3 degree angle and space them regularly:

[attachimg=1]

[attachimg=2]

[attachimg=3]

[attachimg=4]

[attachimg=5]

[attachimg=6]

Holes are 1/4", pins are stainless between 2-7" long, spacing is 25mm+ on 12.5mm centers, takes seconds to add a new hole.

[attachimg=7]

On the grilling side I started with char-grilled-char-siu-sous-vide. Trimmed the snot out of a pork shoulder, consulted the Oracle for the marinade, bagged/sealed/sous vide for 3 hours & then finished on the egg. Followed this up with 10# of sausage & 2 pork tenderloins, then vacuum bagged 90% of it and tossed it in the freezer.

Like I said, fun.

RMW
 

Attachments

  • ScreenClip [7].png
    ScreenClip [7].png
    2.4 MB · Views: 4,925
  • ScreenClip [6].png
    ScreenClip [6].png
    1.1 MB · Views: 4,358
  • ScreenClip [5].png
    ScreenClip [5].png
    2.4 MB · Views: 4,646
  • ScreenClip [4].png
    ScreenClip [4].png
    1.3 MB · Views: 4,657
  • ScreenClip [3].png
    ScreenClip [3].png
    1.8 MB · Views: 4,478
  • ScreenClip [2].png
    ScreenClip [2].png
    2.1 MB · Views: 4,987
  • ScreenClip [8].png
    ScreenClip [8].png
    1.3 MB · Views: 4,564
Back
Top