Smoothing plane question

ear3

Member
Joined
Jul 24, 2014
Messages
4,341
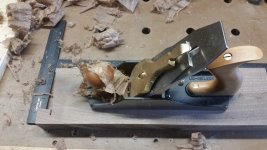
I haven't done a lot of smoothing work with a plane yet, and what I've done I've just used my jack plane set to take a very thin shaving, but I think I'm ready to get a proper smoothing plane.

So basic question -- since you want to minimize the risk of tearout on all plane work, but especially at the final stage, why wouldn't you just always have a high angle frog mounted on the smoothing plane?  Since you are taking such thin shavings anyway, it would seem like you are not making the work any more difficult with the extra force normally needed to push a blade bedded at a high angle through the wood.  I ask because with LN you get to specify the frog angle, and as I already have the no. 7 jointer, I would be able to swap frogs with the no. 4 1/2 smoothing plane I'm looking to get.   
 
A higher frog will reduce tear out.  But your right the higher angle will require more force .  The 4 1/2 is a great smoother.  With the extra mass of the plane and a thin shaving I don't think you will have any issues. 
 
I do, and it's very common to have a high angle frog on a smoothing  plane. My wooden smoother is bedded at 50 degrees and I keep a 50 degree in my 5 1/2 as well most of the time.

You can also leave a 45 degree frog in the plane, and have an extra blade sharpened with a back bevel and a smaller camber for use as a smoother.

A third way is to just go after the troublesome spots with a card scraper, and plane the rest with a regular 45 degree frog and blade.
 
Hi Edward,
I purchased the 4-1/2 smoother from LN a couple years ago with the high angle frog based on Deneb's recommendation.  Tyler is correct that it takes a little more force but does a great job. Wood species I normally use it on are red oak, black walnut, cherry, and hard maple.  When I purchased it, I had the same thought as you- get a No 7 with regular frog and 4-1/2 with the high angle and be able to switch if necessary- I haven't as yet purchased a no 7 but it's on the wish list and would love to hear your feedback on it.

The 4-1/2 is a great plane and no regrets getting it with the high angle frog.

Regards,
Gerald
 
[member=20329]Gerald_D[/member] Did you get the 50 degree or the 55 degree frog?

I love the no. 7, but I'm probably the wrong person to ask, as it is my first jointer plane, so I have nothing to compare it to.

Gerald_D said:
Hi Edward,
I purchased the 4-1/2 smoother from LN a couple years ago with the high angle frog based on Deneb's recommendation.  Tyler is correct that it takes a little more force but does a great job. Wood species I normally use it on are red oak, black walnut, cherry, and hard maple.  When I purchased it, I had the same thought as you- get a No 7 with regular frog and 4-1/2 with the high angle and be able to switch if necessary- I haven't as yet purchased a no 7 but it's on the wish list and would love to hear your feedback on it.

The 4-1/2 is a great plane and no regrets getting it with the high angle frog.

Regards,
Gerald
 
I got the 50.  I should clarify too that I use mine for planing the edges of boards and rarely use it on the face.  I can still have some slight tear-out with burl/knots in hard maple and black walnut but not all the time.

I looked back and I've actually had it longer than I thought- I purchased it back in 2013.  Time flies when you're having fun!  :)
 
Thanks -- that helps.  I'll probably get the 55 degree frog then, as my intention would be to use it for finishing particularly figured woods like walnut and curly maple.

Gerald_D said:
I got the 50.  I should clarify too that I use mine for planing the edges of boards and rarely use it on the face.  I can still have some slight tear-out with burl/knots in hard maple and black walnut but not all the time.

I looked back and I've actually had it longer than I thought- I purchased it back in 2013.  Time flies when you're having fun!  :)
 
Smoothing planes because of their nature are subject to very little tear out. It is usually the last plane to touch the flat surface (not talking edges here) so the blade is slowly brought to full ribbon. Full ribbon on a finishing plane should be full thickness in middle to thinner ghost like edges. If there is tear out on a finishing plane it is almost always because the blade is not sharpened to a very slight camber. Garrett Hack on sharpening to a camber  chttps://www.youtube.com/watch?v=Lp9XEnvmJzgamber and not frog angle.
 
[member=40343]Tyler Ernsberger[/member] Is that because 50 degrees is more than sufficient to handle most situations?  Or are there tradeoffs once you push it up to 55?

Tyler Ernsberger said:
From every thing I have had experience with and read over the years,  I would personally go with the 50°.
 
Edward A Reno III said:
[member=40343]Tyler Ernsberger[/member] Is that because 50 degrees is more than sufficient to handle most situations?  Or are there tradeoffs once you push it up to 55? 

I built my work bench out of black locust(huge mistake at the time) and decided I was going to hand plane the top flat.  Black locust is very hard and has interlocking grain that is crazy to work with.  I got a infill plane with a 50° bed and it was able to plane the top with out any issues. 

Tyler Ernsberger said:
From every thing I have had experience with and read over the years,  I would personally go with the 50°.

With my use of English infill planes that are bedded at 50° and my research,  a 50° was used for hardwoods with interlocking grain.  Typically 55° beds were common with molding planes.  I have never used a 55° bed and have had great results with a 50° bed. 
 
After reading a bit more I decided to go with the 55 degree bed.  I have the 45 degree frog on the jointer, so I figure I can get maximum coverage of contingencies if I have the 10 degree swing.  Who knows -- maybe I'll end up in the near future with a 50 degree frog for a bronze body no. 4?!

This is gonna sound kind of douchey, but it's kind of the truth -- a friend of mine asked me a year or so ago why I didn't have hand planes and do more hand plane work, and my response was that I was waiting, in part on the evolution of my skills, but also because I knew that once I started getting hand planes, I wouldn't stop.
 
Edward A Reno III said:
After reading a bit more I decided to go with the 55 degree bed.  I have the 45 degree frog on the jointer, so I figure I can get maximum coverage of contingencies if I have the 10 degree swing.  Who knows -- maybe I'll end up in the near future with a 50 degree frog for a bronze body no. 4?!

This is gonna sound kind of douchey, but it's kind of the truth -- a friend of mine asked me a year or so ago why I didn't have hand planes and do more hand plane work, and my response was that I was waiting, in part on the evolution of my skills, but also because I knew that once I started getting hand planes, I wouldn't stop.

Let me know how it works.  I have never had the opportunity to use a 55° bed. 
 
Been test driving the 4 1/2. So far so good - whisper thin shavings and excellent stability. I like how the handles are positioned at the very end of both front and back.  I can see what people meant though by the resistance at a higher angle -- it's definitely more of a workout. Even then, though, I got some tear out on an extremely fifured piece of Sapele. I guess I'll have to only use a scraper on that.  Gonna put on the 45 degree frog and see how that works.

Question though about sharpening.  I have the camber ed roller for the veritas honing guide, and so I honed the blade with that to relieve the corners. It's fine to do the camber ing on the secondary bevel, as opposed to the primary bevel, yes? Or do people grind a camber even on a smoothing plane blade? I did about 30 strokes on either side after the straight hone on all the stones, but found even then the camber was not sufficient. It was enough to eliminate plane tracks, but not enough to create the scalloped finish you're supposed to be able to make with the plane.


Attachments

  • 20160811_182517.jpg
    20160811_182517.jpg
    1.5 MB · Views: 547
  • 20160811_104626.jpg
    20160811_104626.jpg
    1.5 MB · Views: 439
Hi Edward

Use candle wax on the sole of your smoother. Just squiggle it along the length. This will make it easier to push the plane.

The LN #4 1/2 is a large plane. I have a bronze version, the LN Anniversary #4 1/2. This came with a 50 degree frog (about 10 years ago now). That was too low to prevent tearout on the woods I use, and eventually I "upgraded" this to a 55 degree frog. The higher angle still was not enough to prevent tearout - our interlocked Australian woods are very difficult to work. I also found the plane too much hard work, and it ended up on the shelf.

Many years later I learned to set the chipbreaker to prevent tearout. This opened up a whole new world with Bailey planes. The LN #3 received a 45 degree (as it, too, had a 55 degree frog), and the #4 1/2 went down this route as well. The advantage here is the plane is easier to push.

The high angle planes force one to take fine shavings only. Deeper shavings are just too much effort in hard woods. A whole generation grew up on the Internet with the idea that fine shavings are the way to go because this method was not taught. I still like to plane them thin, but sometimes you need to get on with it without jeopardising the surface. Lower angle frogs/beds/cutting angles leave a clearer surface on the wood.

I have not stopped using high angle planes - whether BU or BD - but the lower angle, chipbreakered smoothers (and jointers) work so well. My Veritas Custom #4 has a 42 degree frog, while my Custom #7 has a 40 degree frog.

Here is a bronze LN Anniversary #4 1/2 smoothing with a 45 degree frog. Notice the shaving is straight, not curly - that is the result of the chipbreaker being closed up ..

1_zps5lkqhl7e.jpg


Regards fro Perth

Derek
 
Thanks [member=4358]derekcohen[/member] Can I ask what you mean by setting the chipbreaker to prevent tearout?  Does that mean closer to or further away from the blade edge?

derekcohen said:
Hi Edward

Use candle wax on the sole of your smoother. Just squiggle it along the length. This will make it easier to push the plane.

The LN #4 1/2 is a large plane. I have a bronze version, the LN Anniversary #4 1/2. This came with a 50 degree frog (about 10 years ago now). That was too low to prevent tearout on the woods I use, and eventually I "upgraded" this to a 55 degree frog. The higher angle still was not enough to prevent tearout - our interlocked Australian woods are very difficult to work. I also found the plane too much hard work, and it ended up on the shelf.

Many years later I learned to set the chipbreaker to prevent tearout. This opened up a whole new world with Bailey planes. The LN #3 received a 45 degree (as it, too, had a 55 degree frog), and the #4 1/2 went down this route as well. The advantage here is the plane is easier to push.

The high angle planes force one to take fine shavings only. Deeper shavings are just too much effort in hard woods. A whole generation grew up on the Internet with the idea that fine shavings are the way to go because this method was not taught. I still like to plane them thin, but sometimes you need to get on with it without jeopardising the surface. Lower angle frogs/beds/cutting angles leave a clearer surface on the wood.

I have not stopped using high angle planes - whether BU or BD - but the lower angle, chipbreakered smoothers (and jointers) work so well. My Veritas Custom #4 has a 42 degree frog, while my Custom #7 has a 40 degree frog.

Here is a bronze LN Anniversary #4 1/2 smoothing with a 45 degree frog. Notice the shaving is straight, not curly - that is the result of the chipbreaker being closed up ..

1_zps5lkqhl7e.jpg


Regards fro Perth

Derek
 
Setting the chipbreaker is a technique that has been around for centuries. For some reason, it disappeared from most textbooks and teaching from the late 60s through until a few years ago, when it re-emerged into internet prominence following much discussion on Wood Central around 2012. Influencing the discussions was this video by Professor Kato ...
https://vimeo.com/158558759

Basically, the technique involves moving the chipbreaker very close to the edge of the blade. This is around 0.3 - 0.4mm. A bit too close and the shavings will crinkle up like an accordion. Just right, and the shavings become straight (as in the picture above - although it does depend on the wood). The chipbreaker does need some preparation in that the leading edge is honed to a small 45 - 50 degree secondary bevel. Stanley chipbreakers do not require this treatment as they are already at this angle.

This is an unconfigured chipbreaker on interlocked grain ...

VeritasCustomPlanes4_html_271fc784.jpg


This is a configured chipbreaker on the same wood ...

VeritasCustomPlanes4_html_m1af9f7d9.jpg


Here is a short pictorial on setting the chipbreaker:
http://www.inthewoodshop.com/WoodworkTechniques/SettingTheChipbreaker.html

Regards from Perth

Derek
 
Excellent advice.  Thanks [member=4358]derekcohen[/member] If I could ask btw, do you do this with all your BD planes, or just the smoother?
 
Back
Top