Souber door lock mortise jig

[member=44099]Cheese[/member] I suddenly understand why you’re concerned. I looked at a chart and realised that a US #8 x 1.25” screw is a UK 4mm x 30mm. I don’t want to be ‘that guy on the internet who says …..” but I use bigger screws than that when I’m hanging featherweight bargain-basement 50-buck hollow-cores. The only job I ever use a lot of 4 x 30’s for is on kitchen installs - 4 x 30’s are used to fix the cabinets together to maintain frontal alignment whilst they’re being screwed to the wall, so they’re under no real load or tension. For reference, I’ll be using 5mm x 50mm screws to hang these fire doors = that’s close to a US #10 x 2”. These are going into 2” thick hardwood frames which are secured to the studs from the rear with more 5mm x 50mm fixings - so the screws actually penetrate the entire thickness of the frame. You could anchor a battleship to them.

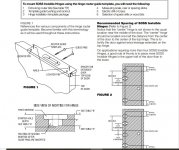
Toms post above explains the logic behind hinge spacing very comprehensively. My go-to is the bottom picture, bottom right. 2 at the top, 1 in the middle, 1 at the bottom. A total of 32 screws per door/frame.

Your call obviously - but I’d talk to your contractor.

 
I have used the porter cable version for door mortise construction and of course for mortise locks. I mounted maple strips on the clamping pads that allow me to mortise close to the end of a piece, and it also prevents marking the softer woods. You can mark the extent of the mortise length on the wood strips to help to locate the mortise.

It is a little awkward to set the width of the mortise, but they are durable and very accurate.
 

Attachments

  • porter cable mortiser.JPG
    porter cable mortiser.JPG
    492.1 KB · Views: 425
One nice feature of the Porter Cable is the automatic step down at the end of the travel in each direction. All you need to do once you have it mounted is turn the handle. I looked at the metadata on that picture I attached, and it was taken in 2000, and I had been using the mortiser for at least 5 years.

The Souber looks like a nice light weight, less complicated option.
 

Attachments

  • P0000208.JPG
    P0000208.JPG
    417.9 KB · Views: 397
[member=44099]Cheese[/member],

Seconding woodbutcherbower's advice, the screws closest to the stop on the top- and middle- hinges should ultimately be receiving a 2" or 2-1/2" screw so they're anchored into the framing. Optimally, there should be a U-shaped shim behind each hinge, with the screw passing through the open/middle part of the "U". That being said, if your door hanger is really struggling you may need to just let them do their best, then follow up afterwards to fine-tune. If possible, have them pre-assemble the door casing but don't let them install it until the door is fully fine-tuned. Certainly don't spray foam the jamb space until the doors are properly aligned. Trying to dial-in a door after the insulation and casing is installed will only make adjustments more difficult. If already cased and foamed, you may want to consider pulling the casing and extracting all of the foam so you can properly shim/fasten. I'm not sure what problems you're experiencing, so I'm just guessing what the issues might be.

[member=75780]woodbutcherbower[/member],

Yes I'm a big fan of adding that fourth hinge towards the top of a door. The catch is, making sure there's enough room between the top two hinges to remove the pin or lift the hinges off their mounts....

 
I generally do it with the proportions put forth by SOSS. Their hinges all come with very specific pattern, in the instructions, all based on supporting the weight of the door.
There is more to it, with SOSS anyway. The size of the hinges themselves is determined by the door (height, weight, and width)
It's somewhat like the ball-bearing leaf hinges. Those are recommended at a certain weight too. Normal hollow-core interior doors don't need that heavy of a hinge.
 

Attachments

  • SOSS pattern.jpg
    SOSS pattern.jpg
    133.3 KB · Views: 437
Tom Gensmer said:
[member=44099]Cheese[/member],

Seconding woodbutcherbower's advice, the screws closest to the stop on the top- and middle- hinges should ultimately be receiving a 2" or 2-1/2" screw so they're anchored into the framing. Optimally, there should be a U-shaped shim behind each hinge, with the screw passing through the open/middle part of the "U". That being said, if your door hanger is really struggling you may need to just let them do their best, then follow up afterwards to fine-tune. If possible, have them pre-assemble the door casing but don't let them install it until the door is fully fine-tuned. Certainly don't spray foam the jamb space until the doors are properly aligned. Trying to dial-in a door after the insulation and casing is installed will only make adjustments more difficult. If already cased and foamed, you may want to consider pulling the casing and extracting all of the foam so you can properly shim/fasten. I'm not sure what problems you're experiencing, so I'm just guessing what the issues might be.

And thank you Tom for those door hanging illustrations...those have been saved. [big grin]  I've not done any foaming yet per our earlier discussion about Denver foam backer rod and Marvin foaming suggestions. At this juncture I'll be making my own jamb shims, curious why to use a U-shaped shim rather than a solid shim?
I also noticed that several of the screws are stripped out in the jamb and the door jamb is not even 3/4" thick...it's only .700" thick fir. Certainly not the 2" thick hardwood frames Kevin refers to.  [sad]

Not to side track this thread, I'll bring up some more door jamb questions on my garage thread.  [smile]
 
Please feel free to keep it going on here [member=44099]Cheese[/member] - we’re pretty much done talking about the Souber. It’s probably best that all of this stuff is kept in one thread.

[member=2726]Tom Gensmer[/member] Hinges with removable pins (or lift-offs) are virtually unheard of over here nowadays. I honestly can’t remember the last time I even saw one !!
 
Back
Top