Split Top Roubo Bench Build

Ya want an idiot story?
Here's an idiot story....

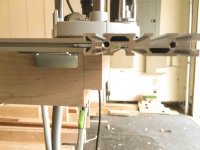
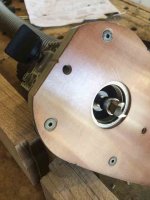
Yesterday after the locking ring spun off (picture) and I nearly smoked the new bit, I said to myself "Self, you just need to tighten that ring a little more"  Thinking it came off because it was loose.

So self tightened the ring real good.

Now this is very hard to do and should only be attempted by professionals...

I plunged the router into my work and it goes "YAANNG!! CLUNK!!!"  [eek] and the router seizes and stops in it's tracks.  Yup, I tighten that ring real good.  So good, in fact, that it took 45 minutes to unbind the collet from the guide ring.  Plunge, she no work.

I now know why the ring came out the first time.
 
FWIW, somewhere I read that the Porter Cable steel rings are prone to loosening up and that the brass rings are much better in this regard.
 
RLJ-Atl said:
FWIW, somewhere I read that the Porter Cable steel rings are prone to loosening up and that the brass rings are much better in this regard.

I think any set of ring would be prone to loosening up - that is why Porter Cable includes a rubber O-Ring.  Was it being used?
 
Richard/RMW said:
Tinker said:
I gave up using PC guide rings.  A year or so ago, i got a lot of good advice from here on the FOG about how to lock them without them coming undone.  I appreciated the advice, but have not tried using them since.  I have all of the 1400 inserts and several of the 1000 inserts and they are fool proof (Fool proof = even I cannot mess them up  ::))
Tinker

[member=550]Tinker[/member] you just need to try harder, my tools are only fool-resistant, I can still mess up if I work at it...  [poke]

RMW

@ RMW  I was just being kind to myself.  No body here knows how really dumb I am.  So let's keep it a secret.  [scared]
Tinker
 
John H said:
RLJ-Atl said:
FWIW, somewhere I read that the Porter Cable steel rings are prone to loosening up and that the brass rings are much better in this regard.

I think any set of ring would be prone to loosening up - that is why Porter Cable includes a rubber O-Ring.  Was it being used?

In my case, i have one set of steel rings and two sets of brass rings.  I have never seen any rubber "O" ring come with any of the sets.  Never thought of using one.  It is a moot idea since i got my Festoy routers and nearly all of their inserts.  I had the same thing happen to me when using the PC guides as Luke had happen.  the rings got chewed up really bad, but the carbide in the Festool bits did not even get scratched.
Tinker
 
Tinker said:
John H said:
RLJ-Atl said:
FWIW, somewhere I read that the Porter Cable steel rings are prone to loosening up and that the brass rings are much better in this regard.

I think any set of ring would be prone to loosening up - that is why Porter Cable includes a rubber O-Ring.  Was it being used?

In my case, i have one set of steel rings and two sets of brass rings.  I have never seen any rubber "O" ring come with any of the sets.  Never thought of using one.  It is a moot idea since i got my Festoy routers and nearly all of their inserts.  I had the same thing happen to me when using the PC guides as Luke had happen.  the rings got chewed up really bad, but the carbide in the Festool bits did not even get scratched.
Tinker

Even with high quality carbide bits... I would still only use brass inserts. Any metal against brass usually wins.

Cheers. Bryan.

PS: does Festool sell an entire metric or imperial copy ring set for the 1400 or are they all individually priced?

 
bkharman said:
PS: does Festool sell an entire metric or imperial copy ring set for the 1400 or are they all individually priced?

It's strange Bryan,
The router accessories page shows a link to "Template Guides, Imperial (8) " and "Template Guides, Metric (16)".  However when you click on the link it comes up with only 4 metric rings and on imperial link you just get the guide bushing adapter.
 
I don't know if anyone earlier mentioned this solution;  for a number of years now I've been using a "wavey" style washer between the lock nut and the guide bushing and the nut has never come loose from the guide bushing.  I bought mine from a woodworker catalog, perhaps Peachtree, but I don't remember.  I've also recently been told that you can get them from bicycle shops as they use them on bicycles.
 
Big day.
I completed the tenon on the front slab for the end cap / tail vise.  This was uncharted territory for me.  I've never made a tenon before.  I'm pleased with the result and the tenon, shoulders, and setback are to spec and everything is square.

I used the MSF 400 to guide my OF1400 and remove the necessary material.  I needed to use a block plane and shoulder plane to clean things up where the template was locked down off.  No more than half a mil though.

The spiral bit is very clean.  However I could only go 50mm deep and I needed to remove 83mm of material.  I used a  Japanese hand saw for that.  It got it done but I think I was near it's limits of use.  Down the road I'll pick up a nice large tenon saw.  I need a lot of practice following a straight line with any hand saw.

In his video Marc did exactly the same thing with a traditional large saw.  There's great footage paring with a chisel and using a rabbeting block plane. He mentioned softening the end gran with some mineral spirits.  In keeping with the Japanese theme I use camilla oil.  Worked great.  I use it to dress my irons after sharpening.

[attachimg=1]

[attachimg=2]

[attachimg=3]

[attachimg=4]

[attachimg=5]

[attachimg=6]
 

Attachments

  • Tenon-1.jpg
    Tenon-1.jpg
    58.8 KB · Views: 1,290
  • Tenon-6.jpg
    Tenon-6.jpg
    88.7 KB · Views: 1,300
  • Tenon-5.jpg
    Tenon-5.jpg
    57.5 KB · Views: 1,317
  • Tenon-4.jpg
    Tenon-4.jpg
    81.7 KB · Views: 1,252
  • Tenon-3.jpg
    Tenon-3.jpg
    64.6 KB · Views: 1,355
  • Tenon-2.jpg
    Tenon-2.jpg
    56.1 KB · Views: 1,291
MrGinCT said:
I don't know if anyone earlier mentioned this solution;  for a number of years now I've been using a "wavey" style washer between the lock nut and the guide bushing and the nut has never come loose from the guide bushing.  I bought mine from a woodworker catalog, perhaps Peachtree, but I don't remember.  I've also recently been told that you can get them from bicycle shops as they use them on bicycles.

My problem was I plunged too deep and locked up the router with the bushing.
Should I use the bushing in the future I'll look into your washer and an "O" ring.
I get that type of stuff from McMaster Carr  They have a near infinite selection.
 
I finished making the "Dog Hole" template.  I'm going with traditional square dog pegs that I'll make from babinga.

Now I'll lay out the dog locations and route out the material.

[attachimg=1]
 

Attachments

  • DogH-1.jpg
    DogH-1.jpg
    68.6 KB · Views: 1,237
I made good progress routing the dog hole strip.  I would have made more if the 1/2" x 1" flush cutter would have accepted the top bearing from the stubby flush bit.  Why it was an old (&)(@^@ Craftsman bit that had writing stamped on the shaft making it impossible to use a bearing.  It's in the trash.

It's a three step process.  1) hog out material with three passes using a 1/2" spiral bit in a template bushing.  I check the bushing often and I'm not near the bottom.  2) Use a top bearing bit to cut a flush shoulder below the template.  3) Remove the template and use a deep flush top bearing bit to finish the profile.  The bearing rides on the shoulder in step 2.

I use an OF 1400 for step 1 and a MFK700 for 2&3.
I will not be able to perform step 3 until I get the right bit.

[attachimg=1]

[attachimg=2]
 

Attachments

  • Dog_cut-1.jpg
    Dog_cut-1.jpg
    95.1 KB · Views: 1,151
  • Dog_cut-2.jpg
    Dog_cut-2.jpg
    51.5 KB · Views: 1,173
I hogged out the rest of the dog slots with the OF1400 and made two cleaning passes with the MFK700 and a stubby, straight, 1/2" top bearing bit.  The first pass on the template, the second without.  Monday I'll pick up a longer 1/2' straight bit and finish the sides. 

I like using the MFK for this because your hands are closer to the work, hence it's more stable.  I really need the stability because sometimes my hands shake from my meds.  The dog strip is fragile because of all the material that has been removed.  Once the routing has been completed the Dog Backing Strip will be applied.  This'll make it stout again.  The assembly will then be planed to spec and it's on to more mortises.

EDIT:  Note the slots are cut at 2 deg. per the template.

[attachimg=1]

[attachimg=2]

[attachimg=3]


Attachments

  • Dog_cut_2-3.jpg
    Dog_cut_2-3.jpg
    58.5 KB · Views: 1,156
  • Dog_cut_2-2.jpg
    Dog_cut_2-2.jpg
    81.4 KB · Views: 1,143
  • Dog_cut_2-1.jpg
    Dog_cut_2-1.jpg
    58.7 KB · Views: 1,133
I finished flush routing the dog slots, then I applied the backer strip and planed the assembly to spec.  44mm x 102mm.  A couple things could have come out better.  I started flush routing the slots with a 1/2" dia. x 3/8" deep Amana bit.  I picked up the 3/4" deep version of the same bit to finish the job.  I put the top bearing from the small bit on the deeper one.  Guess what?  They were off a tad.  I didn't notice until I was finished.

It took a bit of material at the entrance and exit of each slot.  Where you roll the bit in and out of the material.  In the end I think a plane will flatten it out.  Also, the backer board did not clamp as tight to the dog strip as I would have liked.  I was very concerned with not using too much glue or getting any glue in the dog slots.  It's a solid bond, I just wanted a tighter seam.

I glued up two hunks of Babinga that will become the End Cap.  That's the part with serious brain surgery.  I'm going to hold off on it until the Benchcrafted hardware arrives.  That's like an OF2200.  ouch.

In the meantime I'm going to make the dogs.  Also from Babinga. That makes sense to me since the dog strip isn't attached to anything and I can work on finessing each dog.  I still have not decided how long the bench will be when finished.

[attachimg=1]
 

Attachments

  • Dog_Strip-1.jpg
    Dog_Strip-1.jpg
    83.6 KB · Views: 1,109
I cut the babinga stock to size for the dogs.  I then attempted to "refine" them with planes.  I could not get a smooth surface no matter what I tried.  I re-sharpened my sharp irons.

They are square with ugly tear out.  I'm going to plan "B" which I think will look better too.  I'm going to rough cut the dogs from the soft maple.  Then I will apply a 3/8" thick babinga to the top as a "cap".  It will look better than the solid babinga because you will see long grain rather than end grain.  The glue should hold.

If not I will put a short peg through the top that will look like a 1/4" white maple dot.  I'll make a mock up. 

[attachimg=1]
 

Attachments

  • image.jpg
    image.jpg
    1.5 MB · Views: 1,147
I dimensioned a block of maple for the dogs and laminated the babinga to the top.  I think this approach will work well and look good.  When the dogs are recessed a nice babinga rectangle will be flush with the top.

When the block dries I'll smooth it a bit and slice it into the raw dogs.

Tomorrow I make the Dog Breeder jig, mill the dogs, and work on the springs.

NOTE:  All the Woodwhispererere Stills are screen captures from the instructional build videos.  There are 20 videos of 20-30 minutes each as part of the package.

[attachimg=1]

[attachimg=2]

[attachimg=3]

[attachimg=4]
 

Attachments

  • Babing-1.jpg
    Babing-1.jpg
    86.1 KB · Views: 958
  • DogBreed.jpg
    DogBreed.jpg
    115 KB · Views: 1,016
  • mill.jpg
    mill.jpg
    127 KB · Views: 991
  • DogBlk.jpg
    DogBlk.jpg
    70.1 KB · Views: 974
Luke, You are still running a good, er, GREAT class.
I am learning from your ideas and especially, from the problems you are running into and how you are solving.
Tinker
 
I had to slice one off  [big grin]

[attachimg=1]
 

Attachments

  • IMG_1782.JPG
    IMG_1782.JPG
    458.6 KB · Views: 1,008
Back
Top