iamnothim
Member
- Joined
- Feb 5, 2014
- Messages
- 1,435
RandyH2 said:Thanks for keeping us updated on your project. I am trying to get myself motivated to do the same, so please stop telling us about the mistakes! [eek] Just kidding, of course. I learn as much from the mistakes...
Best,
Randy
Murphy 1
Luke 0
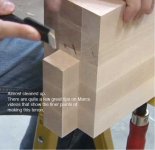
Gene Davis said:Paul Sellers would rip off the offending lamination, and clean up the cut face with his hand tools to a few thou under the planed surface that got the glue.
And all with his hand tools.
But you have a TS55 and a nice new blade. If you can plane the top surface to a high degree of flatness you can certainly get that new edge ready for doing the glue-up right.
It'll just cost you some time and one new piece of maple stock for the 3-piece edge.
Don't cut the corner. You're gonna have this bench a long time and be admiring your work every time you use it.
Gene
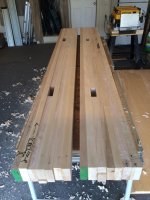
You are right about not cutting a corner. Especially one I will see every time I look at the top of the bench. Which will be often. My other choices would be to leave out that part of the joint and just have the top sit on the third leg plank as the middle one does. I'd give up some lateral strength. Or route out a rectangular slot for a tenon.
If I choose your suggestion it will be more of an adventure and I can rationalize getting One of These. BTW... I stepped up to a TS75 and Panther. All the more reason to give it a go. Time to soldier on.
Wayne,Tinker said:It turned out much too big for my present shop set up and i disassembled it. I kept the pipe clamps and the main supporting beam which i am thinking of shortening and rebuilding the bench on a smaller scale. I don't think I will go to quite the attention to accuracy on that bench as you are with your Roubo, but i think I will be looking back over my shoulder just in case you are watching. [unsure]
Tinker
Take a another look at David Barron's bench. It's 5' with a top that looks to be 5" thick. I love the proportions of his bench. The Leg Vise can be bought from Lake Erie Toolworks for $200 and you can make the tail vise.