You are using an out of date browser. It may not display this or other websites correctly.
You should upgrade or use an alternative browser.
You should upgrade or use an alternative browser.
Split Top Roubo Bench Build
- Thread starter iamnothim
- Start date
Gene Davis
Member
- Joined
- Jan 19, 2008
- Messages
- 95
OK, so now that you are in the home stretch on this bench, you gotta be planning to do something with it.
Amirite?
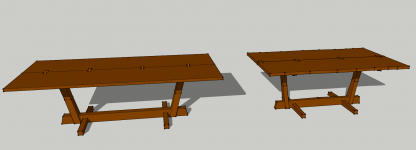
CS Woods in Denver has a nice collection of table-top slab wood in various species. I am thinking about doing a Nakashima table for our daughter. Here is a look at my SU modeling for two sizes, one at about 41 x 78, the other at 44 x 98.
Most every metro area has a biz selling table slabs. It was once just a thing for rustic ranch palaces and ski houses and camps, but now that it is the rage for corporate conference tables, everybody's a slabber.
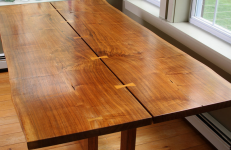
Nakashima tables have thinner tops than the 2-3/4 thickness done by CS, but they will saw me one a little thicker and I can get it resawn to about 1-1/2, then surface down to flat and smooth. To get a nice bookmatch with live edges, I will get a thickie, straighline rip one edge to get just past sapwood toward center, then straightline rip down center to yield two widths under 12 inches, and pay a guy with a big old bandsaw to resaw. Then I will join up again after.
This top (second pic) was done the way I am planning it. I like the gapped center. Each side board was sawn then rejoined. Can you see the joint? I can't.
Your new bench is for hand work, and this George Nakashima table has plenty of it.
Amirite?
CS Woods in Denver has a nice collection of table-top slab wood in various species. I am thinking about doing a Nakashima table for our daughter. Here is a look at my SU modeling for two sizes, one at about 41 x 78, the other at 44 x 98.
Most every metro area has a biz selling table slabs. It was once just a thing for rustic ranch palaces and ski houses and camps, but now that it is the rage for corporate conference tables, everybody's a slabber.
Nakashima tables have thinner tops than the 2-3/4 thickness done by CS, but they will saw me one a little thicker and I can get it resawn to about 1-1/2, then surface down to flat and smooth. To get a nice bookmatch with live edges, I will get a thickie, straighline rip one edge to get just past sapwood toward center, then straightline rip down center to yield two widths under 12 inches, and pay a guy with a big old bandsaw to resaw. Then I will join up again after.
This top (second pic) was done the way I am planning it. I like the gapped center. Each side board was sawn then rejoined. Can you see the joint? I can't.
Your new bench is for hand work, and this George Nakashima table has plenty of it.
Attachments
iamnothim
Member
- Joined
- Feb 5, 2014
- Messages
- 1,435
Gene Davis said:OK, so now that you are in the home stretch on this bench, you gotta be planning to do something with it.
Amirite?
I once bought a can of Amirite and it didn't work very well.
iamnothim
Member
- Joined
- Feb 5, 2014
- Messages
- 1,435
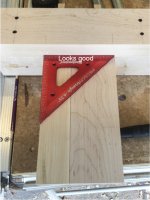
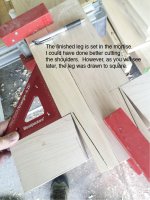
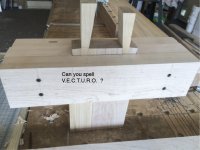
Lots of Leg tenon mockup pictures.
Thanks again Gene.
[attachimg=1]
[attachimg=2]
[attachimg=3]
[attachimg=4]
[attachimg=5]
[attachimg=6]
[attachimg=7]
[attachimg=8]
[attachimg=9]
[attachimg=10]
[attachimg=11]
[attachimg=12]
[attachimg=13]
[attachimg=14]
[attachimg=15]
[attachimg=16]
[attachimg=17]
[attachimg=18]
[attachimg=19]
Thanks again Gene.
[attachimg=1]
[attachimg=2]
[attachimg=3]
[attachimg=4]
[attachimg=5]
[attachimg=6]
[attachimg=7]
[attachimg=8]
[attachimg=9]
[attachimg=10]
[attachimg=11]
[attachimg=12]
[attachimg=13]
[attachimg=14]
[attachimg=15]
[attachimg=16]
[attachimg=17]
[attachimg=18]
[attachimg=19]
Attachments
-
 Leg_Tenon-13.jpg202.5 KB · Views: 1,011
 -
 Leg_Tenon-14.jpg498.2 KB · Views: 1,058
 -
 Leg_Tenon-15.jpg385.6 KB · Views: 1,047
 -
 Leg_Tenon-16.jpg354.4 KB · Views: 991
 -
 Leg_Tenon-17.jpg479.2 KB · Views: 1,034
 -
 Leg_Tenon-18.jpg458.5 KB · Views: 1,036
 -
 Leg_Tenon-20.jpg400.9 KB · Views: 1,102
 -
 Leg_Tenon-21.jpg286.3 KB · Views: 983
 -
 Leg_Tenon-12.jpg282.5 KB · Views: 1,010
 -
 Leg_Tenon-11.jpg333.8 KB · Views: 1,013
 -
 Leg_Tenon-10.jpg298.3 KB · Views: 1,022
 -
 Leg_Tenon-1.jpg508.6 KB · Views: 1,106
 -
 Leg_Tenon-2.jpg441.5 KB · Views: 1,060
 -
 Leg_Tenon-4.jpg435.6 KB · Views: 1,059
 -
 Leg_Tenon-5.jpg369.5 KB · Views: 1,061
 -
 Leg_Tenon-6.jpg393.8 KB · Views: 1,060
 -
 Leg_Tenon-7.jpg321.9 KB · Views: 1,044
 -
 Leg_Tenon-8.jpg300.4 KB · Views: 1,024
 -
 Leg_Tenon-9.jpg324.1 KB · Views: 1,028
iamnothim said:Gene Davis said:OK, so now that you are in the home stretch on this bench, you gotta be planning to do something with it.
Amirite?
I once bought a can of Amirite and it didn't work very well.
That's because you used the wrong container. You should have used an air hook to hold on to it.
Tinker
iamnothim
Member
- Joined
- Feb 5, 2014
- Messages
- 1,435
Gene Davis said:OK, so now that you are in the home stretch on this bench, you gotta be planning to do something with it.
Amirite?
CS Woods in Denver has a nice collection of table-top slab wood in various species. I am thinking about doing a Nakashima table for our daughter. Here is a look at my SU modeling for two sizes, one at about 41 x 78, the other at 44 x 98.
Most every metro area has a biz selling table slabs. It was once just a thing for rustic ranch palaces and ski houses and camps, but now that it is the rage for corporate conference tables, everybody's a slabber.
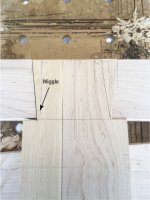
Nakashima tables have thinner tops than the 2-3/4 thickness done by CS, but they will saw me one a little thicker and I can get it resawn to about 1-1/2, then surface down to flat and smooth. To get a nice bookmatch with live edges, I will get a thickie, straighline rip one edge to get just past sapwood toward center, then straightline rip down center to yield two widths under 12 inches, and pay a guy with a big old bandsaw to resaw. Then I will join up again after.
This top (second pic) was done the way I am planning it. I like the gapped center. Each side board was sawn then rejoined. Can you see the joint? I can't.
Your new bench is for hand work, and this George Nakashima table has plenty of it.
Gene,
I love the book matched tops. I agree, the gap totally makes the piece! It's going to look magnificent.
I spotted a little dovetail to the left of the gap. I'm thinking it's joint.... just amazing.
Luke, in making and driving those wedges, is it possible you should have made the wedges a slightly ore obtuse angle. As soon as yo drive the wedge into the slot, the angle of the inside of the slot will change. I have never done that type of joint so I am only guessing. Should the wedgs angle on the spreading side be half the finished angle when the side becomes splayed?
Not sharpe shooting. just a big question for a future idea.
You have done a great job of teaching. I learn something every time I tune in to your class.
Tinker
Not sharpe shooting. just a big question for a future idea.
You have done a great job of teaching. I learn something every time I tune in to your class.
Tinker
iamnothim
Member
- Joined
- Feb 5, 2014
- Messages
- 1,435
[member=550]Tinker[/member]
My answer is... I have no idea....yet.
I literally fab'd, assembled, photographed, and went to my Mac.
David Barron says they should all match. I emailed him a Dropbox link with the photos.
I hope he will be able to check them out and comment.
This is his response to my questions on the joint.
Hi Luke,
Firstly the tenon needs to be 1/2" longer than the thickness of the top, this is important as the tenon looses height as it is splayed by the wedges.
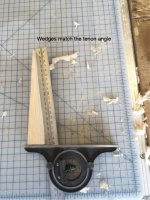
8 degrees is the classic optimum angle for the wedges, I think 7 degrees is close enough!
The wedges also need to be cut at 7 degrees and they must be identical in angle and length.
The angle of the cuts in the tenon is governed by the spacing you require on the end of the tenon. In practice if you want an even spacing with the wedge then this will be at 7 degrees as well.
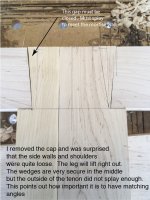
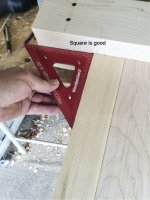
When you cut the tenon it's important to finish close to the edge so that it bends and the wedges can be easily dry fitted (the band saw is best for these cuts to keep them square). This allows you to measure the distance across the tenon at the height it will protrude through the top and you can check this distance against the mortice opening you have. Despite making the wedges very carefully I had to make some adjustments here to ensure the mortices were fully filled when the wedges go in for real.
The tenon cuts go right down to the shoulder and finish about 2 mm from the edge, be careful!
My answer is... I have no idea....yet.
I literally fab'd, assembled, photographed, and went to my Mac.
David Barron says they should all match. I emailed him a Dropbox link with the photos.
I hope he will be able to check them out and comment.
This is his response to my questions on the joint.
Hi Luke,
Firstly the tenon needs to be 1/2" longer than the thickness of the top, this is important as the tenon looses height as it is splayed by the wedges.
8 degrees is the classic optimum angle for the wedges, I think 7 degrees is close enough!
The wedges also need to be cut at 7 degrees and they must be identical in angle and length.
The angle of the cuts in the tenon is governed by the spacing you require on the end of the tenon. In practice if you want an even spacing with the wedge then this will be at 7 degrees as well.
When you cut the tenon it's important to finish close to the edge so that it bends and the wedges can be easily dry fitted (the band saw is best for these cuts to keep them square). This allows you to measure the distance across the tenon at the height it will protrude through the top and you can check this distance against the mortice opening you have. Despite making the wedges very carefully I had to make some adjustments here to ensure the mortices were fully filled when the wedges go in for real.
The tenon cuts go right down to the shoulder and finish about 2 mm from the edge, be careful!
iamnothim
Member
- Joined
- Feb 5, 2014
- Messages
- 1,435
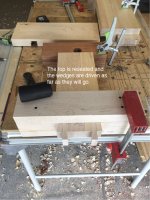
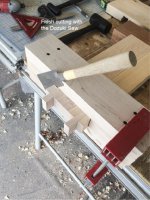
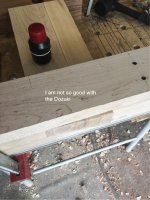
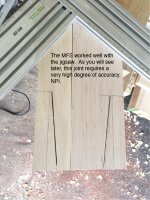
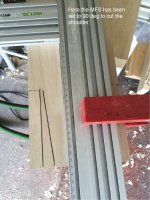
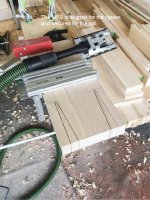
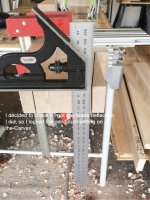
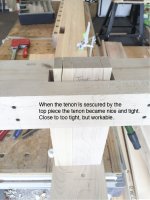
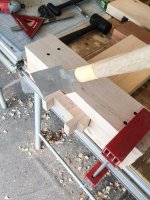
The second attempt was much stronger than the first.
The angle of the wedges and tenon is 8 degrees.
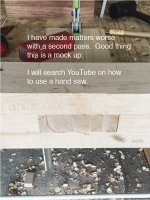
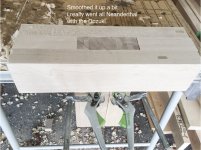
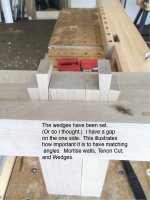
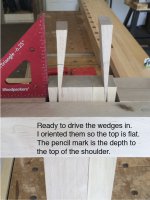
If the wedges don't go all the way down there will be a void as was the case here. In the photo the left wedge has another inch to go (pencil line) but the left spur is jammed against the side of the mortise. This leg isn't going anywhere. I plan on using babinga wedges. If there is an imbalance of the tenon spurs or the wedge lengths it will be more noticeable.
[attachimg=1]
[attachimg=2]
The angle of the wedges and tenon is 8 degrees.
If the wedges don't go all the way down there will be a void as was the case here. In the photo the left wedge has another inch to go (pencil line) but the left spur is jammed against the side of the mortise. This leg isn't going anywhere. I plan on using babinga wedges. If there is an imbalance of the tenon spurs or the wedge lengths it will be more noticeable.
[attachimg=1]
[attachimg=2]
Attachments
Gene Davis
Member
- Joined
- Jan 19, 2008
- Messages
- 95
Just cut off the protrusion with a chain saw, and trim flush with a router. Or trim it a few thou proud with the router and whack the rest with one of those pricey block planes you have.
http://www.startwoodworking.com/post/build-flush-trim-base-your-router
http://www.startwoodworking.com/post/build-flush-trim-base-your-router
Gene Davis said:Just cut off the protrusion with a chain saw, and trim flush with a router. Or trim it a few thou proud with the router and whack the rest with one of those pricey block planes you have.
http://www.startwoodworking.com/post/build-flush-trim-base-your-router
I like the chainsaw method. [thumbs up]
I run into the same problems with my Japanese pull saw as Luke. I never get the hang (pull) of it. When I try flush cutting, I seem to end up going the opposite way from what Luke shows. I end up going into the piece i am trying to flush cut against. [scared]
Tinker
waho6o9
Member
http://www.leevalley.com/US/Wood/page.aspx?p=32932&cat=1,42884
This Japanese flush-cutting saw is used for a variety of jobs, from trimming through tenons to dressing dovetails and trimming plugs flush with a surface (anywhere a flush cut is needed next to a finished surface).
[attachthumb=1]
This Japanese flush-cutting saw is used for a variety of jobs, from trimming through tenons to dressing dovetails and trimming plugs flush with a surface (anywhere a flush cut is needed next to a finished surface).
[attachthumb=1]
Attachments
![60t1901s1b[1].jpg](/data/attachments/17/17609-24086931e565f7c3dd0e5bf122597863.jpg?hash=RQrNs3Ezve)
iamnothim
Member
- Joined
- Feb 5, 2014
- Messages
- 1,435
Gene Davis said:
That's cool. I could use an MFK700 for that.
iamnothim
Member
- Joined
- Feb 5, 2014
- Messages
- 1,435
If you've read my "What's wrong with this picture" thread a year ago you know I like a good contest. So here's a new one.
Once again it's a "Where's Waldo?" type of contest. Placed within an image posted in the last five pages of this thread is a subtle hidden joke. Maybe someone saw it and didn't post or not. Contest..... First one to find it gets a $10 Amazon gift code that I will PM.
Happy hunting.
Tommy B knows the joke and is thusly excluded from the competition.
iamnothim
Member
- Joined
- Feb 5, 2014
- Messages
- 1,435
Tim Raleigh said:Luke:
This has been a very entertaining if not educational thread.
Thanks for all the time you put into it.
Tim
Thankfully I have the time and I enjoy the banter with my virtual friends.
It's helpful to me as well.
iamnothim
Member
- Joined
- Feb 5, 2014
- Messages
- 1,435
Gene Davis said:Just cut off the protrusion with a chain saw, and trim flush with a router. Or trim it a few thou proud with the router and whack the rest with one of those pricey block planes you have.
I dun figured out my problem and went out and got me a Texas Dozuki
[attachimg=1]
Attachments
Similar threads
- Replies
- 33
- Views
- 3K