Step Cut Question

Mike Goetzke

Member
Joined
Jul 12, 2008
Messages
1,133
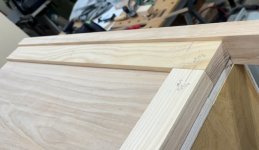
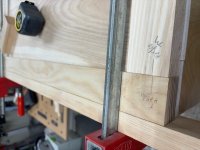
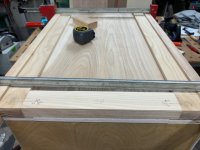
I have this dresser leg that needs a step cut in it and my head is hurting thinking about the best way to make the cut. I have a TS, BS, router table, jointer ...

I was almost thinking the best way would be to use the TS and hand chisel it square.

Any suggestions welcome.

Thanks[attachimg=1] -Mike
 

Attachments

  • IMG_6679.jpg
    IMG_6679.jpg
    66.4 KB · Views: 273
Mike, not knowing the exact application you have in mind, my first thought would be to use a band saw for the rough cut. And then apply other tools as needed to refine the surface.

If you tweak the band saw it is capable of producing great results. I think most folks think the typical band saw is nothing more than a Sawzall plugged into 120vac.  [smile]

And on the 2nd thought, the track saw would also be good to use especially if you are replicating a lot of these items.
 
With a router:
Make two sacrificial pieces.
  • Width 2 1/4"
  • Thickness at least one router bit diameter
  • Length at least 35"
Clamp the sacrificial pieces on each side of the leg, so they extend the cut with a few inches in each direction, and the top of the three pieces is plane. Clamp everything to a table. Clamp a temporary fence on top, perpendicular to the leg, with a distance to the step so you can run the router along this fence and get the step straight.

Now you just need to route across the leg sandwich, along the fence, and you have the start of the step.

From there, you have two options:

1. Continue routing the rest of the leg, cutting into the sacrificial pieces, but without removing them entirely, as you want to keep some material for support of the router base. You will probably want a fence parallel to the leg for this, unless you are good at freehanding.
2. Or you can put the leg sideways on your table saw and sneak up to the first cut from the router.
 
Mike make the vertical cut on the top first. If TS is table saw, then set a stop and cut each leg individually in the same place.  If that cut needs a slight angle of vertical easy to do.

If TS means track saw, just batch cut them. Align the pieces clamp them together set your rail and cut to the depth you need.

After that operation, go to the bandsaw and make the cut to remove the top piece up to the other cut. Set the fence and go.

Ron
 
Thanks for all the suggestions. I have included more info to help. First I built a crib for my son and daughter-in-law for their first child due early September and now working the matching dresser. She wanted a modern looking design even though I still kept forms I made for beautiful bent laminations for a crib I built for my daughters child. OK here is the crib design. She how she wanted squared corners but softened with 1/8" beads:

[attachimg=1]

Here is the dresser back leg (the front legs don't need the step cut). To keep with the clean design I want that flush with the side panel but see how it is about 1/4" proud:

[attachimg=2]

This is the front leg flush with the panel:

[attachimg=3]

Ha, this morning I had a brain fart in the shower and thought "this might look better with the 1/4" margin on both sides?". I'm pretty sure the CEO will turn it down but guess I can ask:

[attachimg=4]

If I need it flush (most likely) it needs a precise cut and probably my TS (1950 Uni with goose-egg cover) is the best bet. One other method I thought about is maybe recess the box frame down with a router.

Thanks - Mike
 

Attachments

  • IMG_6683.PNG
    IMG_6683.PNG
    906.6 KB · Views: 187
  • IMG_6680.jpg
    IMG_6680.jpg
    75.8 KB · Views: 180
  • IMG_6682.jpg
    IMG_6682.jpg
    99.6 KB · Views: 187
  • IMG_6681.jpg
    IMG_6681.jpg
    109.2 KB · Views: 183
If this is a "one-off" thing (and it sounds like it is), I would cut with a table saw as far as possible and finish with a hand saw and sharp chisel.
 
jeffinsgf said:
If this is a "one-off" thing (and it sounds like it is), I would cut with a table saw as far as possible and finish with a hand saw and sharp chisel.

Yes - this was my original thoughts but may add a "stop" cut like [member=3192]rvieceli[/member] suggested for a cleaner look but may just chisel it since it's only seen from the back of the dresser.
 
Yeah, I like the idea of a cut on the edge to set the depth precisely and give a nice clean stopping point. I'm pretty good with a chisel, but I'm hopeless with a hand saw.

I'll pass something along I learned recently on a similar cut. While I usually keep my table saw blade just a little above the workpiece, when making stopped cuts I now raise it to full height. The higher you go, the less you have to clean out.
 
The more you post, the more confused I get as to what you're asking.

I see a frame and panel sitting inside a couple of legs. I don't see anything "stepped" - certainly nothing that looks like your original drawing. You can make the frame of the frame and panel sit flush with the legs, or have itself recessed in, or cut a bead or rounded edge to get a detail, but I don't see a step that's halfway along the leg making the leg ⅛" narrower (2&⅛" vs 2&¼") halfway down the length of the leg, per the original drawing.

Sorry.
 
Maybe some outside the box thinking? That would only take a few minutes to do with a jointer, then square the end with a chisel.

Duckler said:
Can you make it from 2 pieces? Glue shorter skinny piece onto the longer piece?
I thought of that one too, depending on how visible it might be? I have done that often when building jigs. It is much easier to build a square hole than to cut one.
 
Stuff like this I always end up grabbing a router, some straight pieces of MDF, and double sided tape.
 
If I were going to do a leg like that, I'd set up a table saw for the long cut, but hold it just shy of the step.  Then I'd finish the long cut on all four legs with a Japanese pull saw.  I'd clamp all four legs together, properly aligned, then use that same saw to carefully cut the step so they were all exactly the same length.  Gently sand with 220 or 320 Granat.  YMMV...  [smile]
 
I’ve made very similar cuts using my table saw.

1.  With my stacked dado set to the maximum width, I made the stop of the cut to the exact depth required using the miter gage (or a sled).

2.  With my rip blade set to the maximum depth of cut, I ripped off the rest of the cut.

Note:  If you take more than one pass with the dado set, and you make a wider stopped cut, you will not have raise the blade to the maximum depth of cut.
 
Cuts are done. I used my TS for the majority of the cut and then my BS to complete it. Probably could have used the BS only but I have more confidence in my TS. I have a Laguna Driftmaster fence on the BS and was able to dial in the thickness easily.
 
It is good to know that you got the cuts done.  As I mentioned, I’ve made this type of cut many times over the years when I make my push blocks for my table saw.

1.  I start out with a piece of 3/4” thick scrap about 9” x 9”.  I usually use MDF or particle board.

2.  In sketch 2, I show the notch cut with my dado head.  Notch size:  1/4” x 1”

3.  In sketch 3, I show the rip to the notch.  I usually raise the blade all the way up to avoid cutting into the stop.  But a wider notch will achieve the same result with a lower blade height.

I treat these push blocks as consumable items.  If the cut is narrower than 3/4”, I simply sacrifice the push block, then trim off the damaged edge and make a new stopped cut.

The 45 degree angle cut provides downward pressure while giving forward motion.  This is a safer (and cheaper) option to the yellow molded push sticks on the market.

gNcaGLg.jpeg


0HFKBJR.jpeg


Back
Top