Tambour Door

Getmaverick

Member
Joined
Feb 7, 2016
Messages
199
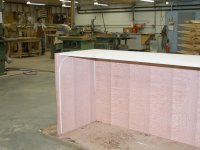
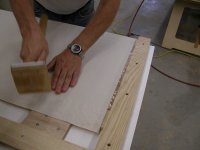
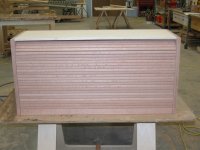
I have 2 tambour doors to replace in appliance garages. I have ordered replacement kits but not sure how to tackle this.
I have never installed them before. Cabinet cant be removed from wall due to tile damage etc...
Any tips will be helpful. Thanks
 
I am going to guess that you will be asked for some images so that readers can see what you are up against.

Peter
 
Peter Halle said:
I am going to guess that you will be asked for some images so that readers can see what you are up against.

Peter

Sounds like he's in between a rock and a hard place.

Can't imagine how the door can be replaced without disassembling the cabinet, at the very least removing it from the wall to get to the back.
 
I totally agree.  But an image of the inside of the cabinet might show how the cabinet was assembled which could help.  Or not.

Peter
 
It depends on the type of tambour. Some of the kits are like a roll up blind and can be unscrewed from the inside. The tambours we built for kitchens allowed a stop to be removed along with the handle then the door would roll up and out the back of the runner and drop down into the cabinet.

I agree pictures of the assembly are needed to offer good advice.
 
Sorry I have no pictures. The garages are built into an upper cabinet and sets on the countertop.
The trambour doors were slotted into the sides and center partition. They are side by side on face frame cabinets.
I will be cutting them out and attempting to installhttp://www.cshardware.com/67-2a-24-4v.html.

Customer sending picture soon.
 
Would it be possible to get images of the insides of the cabinet including the back of the doors, the top and the sides?

Peter
 
From that picture I would say the door is not removable without removing the cabinet.

Gerry
 
Because you are not trying to reuse the existing door you could try to separate the slats. If it is a traditional construction with canvas backer you could just cut between the slats  at the back of the door with a razor knife then close the door enough to let one end of the slat move up until it will come out. Some tambours have wire strung through the slats if that is the case you just need to cut the wires. 
 
That would be the way to remove it then. Just cut the canvas and remove each slat one at a time. Once you get 6 or so out you should not need to pull the door down to get clearance to twist them out.

Gerry
 
Oldwood said:
That would be the way to remove it then. Just cut the canvas and remove each slat one at a time. Once you get 6 or so out you should not need to pull the door down to get clearance to twist them out.

Gerry

This will be the easy part. Hard part is figuring a way to install the new ones.
 
I agree taking them out will be the easy part. Yes installing will be fun [big grin] They are designed to be installed in a existing cabinet though.

Gerry
 
The door kit you indicated appears that it will be fastened to the back of the face frame. As such, you only have to trim it for width and then install it from inside the cabinet. 😳

After you’ve removed the old one, of course.
 
I'm not trying to be a nuisance, but are you sure there's nothing inside the garage that can be removed? It seems like there should be a couple of removable tracks inside the garage itself.

If you can't crank your head around to see the inside of the garage (I get that), can you use a cell phone to take a couple of pictures?

For this project, it seems a small drill (think CXS) with a right angle attachment will become your new best friend.  [big grin]
 
Looking closely at the image, it appears that the tam ours are riding in a groove router into the cabinet side. Would be pretty much impossible to reuse such without dismantling the cabinet.
 
I think it is built like the one in the attached photo. We made this one as a separate cabinet so it could be slid forward and the door will drop out the front once it clears the counter.

The one in the picture looks like the upper and tambour cabinet are one piece.

Gerry
 

Attachments

  • DSCN0274.JPG
    DSCN0274.JPG
    1.4 MB · Views: 553
  • DSCN0377.JPG
    DSCN0377.JPG
    1.5 MB · Views: 611
  • DSCN0391.JPG
    DSCN0391.JPG
    1.6 MB · Views: 533
Back
Top