Taper ends of flutes

Joined
Jan 23, 2007
Messages
7,096
That’s what I need to do on some newell posts. Looking for tips on how to do this.

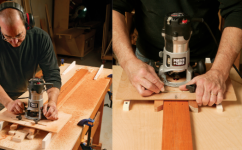
Maybe all in all it’s best to just get out the carving tools but as I tend to overthink things I’m leaning towards making a rig to hold a trim router motor such that it will lift off the work when it hits the stop ramp. Thinking either a simple telescoping sleeve or parallel arm linkage.

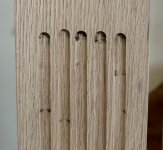
The flutes are only 3/8” wide and about 1/4” deep so the router only needs to lift that much but I’d go 1/2” for safety. Anyone know of something like this?

Background, I hired an experienced stair builder to add new balustrades to the stairs in my 120 year old house because I was getting bogged down thinking about how the posts would be anchored, and I needed it done fast before house guests arrived.

He got the stuff done quickly but the posts that were support o match the one remaining original post isn’t close enough.

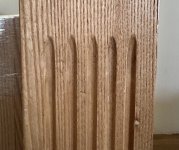
Mainly I need to taper the blunt ended flutes. That should eliminate the burn marks and even up the length at the same time.

The rift sawn red oak is a pretty good match for the old American Chestnut.

[attachimg=1]

[attachimg=2]
 

Attachments

  • IMG_0437.jpeg
    IMG_0437.jpeg
    1.1 MB · Views: 512
  • IMG_0436.jpeg
    IMG_0436.jpeg
    1.3 MB · Views: 530
Hi, somewhere there's a thread by honeydokreg,about this he made a ramp like this
 

Attachments

  • Screenshot (150).png
    Screenshot (150).png
    340.8 KB · Views: 99
Yup, make a ramp for the router. I did that to taper flutes for a built-in. I used composite shims and double sided tape. It did create a small transition where the lifting began. I could have chiseled / sanded it out but it made a nice detail  and I wasn't needing to match anything so I left it. If the ramp transition point is smooth this will be avoided.

[attachimg=1]

Seth
 

Attachments

  • IMG_1143 2.jpg
    IMG_1143 2.jpg
    140.2 KB · Views: 409
Yes, a ramp is simplest rig.

There are nine double ended runs of five flutes so I’m leaning toward a rig.
The posts are already installed so some of the runs are inaccessible to a router. Then it’ll be gouges and ball end mill and sandpaper.
 
This YouTube video shows drainage grooves cut in a butcher block sink countertop. I would take that concept for the jig and modify to work in your situation.

 
Packard said:
This YouTube video shows drainage grooves cut in a butcher block sink countertop. I would take that concept for the jig and modify to work in your situation.


I have done that same technique with solid surface tops too, but that produces usually a long continuous taper.

[member=297]Michael Kellough[/member] there is another alternative, it's either very expensive, or requires you to find someone who can help you. One of the newest features of Shaper Origin (Auto-Pass) can do this too. The length of the tapered section can be "tuned" by the software that controls the plunge. Of course, this is an extreme way of looking at it.....but it can be done. If you happen to have a friend who owns one, maybe a collaboration could get it done?
 
[member=74278]Packard[/member] that video shows tapered grooves but does not show how to make the tapered grooves.

[member=58857]Crazyraceguy[/member] the posts are already installed and vertical.

I do have an SO and Plate. I might be able to use the Plate on a couple of sides of the tops of the posts but it would be extremely awkward. Maybe I could make a smaller Plate-like thing that could be moved over each flute and run the same routine for each flute. Not sure how to orient SO to the work.
You don’t orient SO to the work you orient Plate to the work and the cut file is oriented to Plate. SO is oriented to Plate the first time and the cut file is oriented to Plate relative to the center of Plate

The ramp is still looking good.
 
Depending on how many you need to do, it may be easier just to use a carving chisel.  I think trying to get the trim router to match flute center and depth with a trim router after they are installed will be difficult since the flutes are already cut.  If you stop mid point, you will probably get burning of the wood and need to sand it out.

I have two sets simililar to this set from Lee Valley that I use to clean up router corners.  Once you get the hang of it and practice a couple of times it goes pretty quickly.  Palm handle carving set  It will also be easier to make the uneven flute ends taper to the same end/start point. 

If you do use a trim router, you could make two rails to go on the outside of the newell post, make a soft curved incline where you need the taper to start.  Personally I think it will take alot of effort to get it to look right. 

 
I've always thought with these wooden bechtops with draining grooves, wouldn't you want to undercut the inside edge a little so the liquid pours into the sink instead of dripping down the edge?
 
Michael Kellough said:
[member=74278]Packard[/member] that video shows tapered grooves but does not show how to make the tapered grooves.

[member=58857]Crazyraceguy[/member] the posts are already installed and vertical.

I do have an SO and Plate. I might be able to use the Plate on a couple of sides of the tops of the posts but it would be extremely awkward. Maybe I could make a smaller Plate-like thing that could be moved over each flute and run the same routine for each flute. Not sure how to orient SO to the work.
You don’t orient SO to the work you orient Plate to the work and the cut file is oriented to Plate. SO is oriented to Plate the first time and the cut file is oriented to Plate relative to the center of Plate

The ramp is still looking good.

The taper is not a product of the setup or the ramp, or the jig.

It is a product of geometry.  If you start with a flat bottomed bit, the groove will only get shallower as the router climbs the ramp.

If, however, you start with a bit that narrows to a point, then the groove will both get shallower and narrower as it climbs the ramp.  As it climbs the ramp, the pointy bit will become an increasingly small triangle (cone, really.  But the geometry is about the triangular profile.)

So the setup, or single groove variation is correct, if the correct bit is chosen.

Packard
 
Michael Kellough said:
[member=58857]Crazyraceguy[/member] the posts are already installed and vertical.

That complicates any technique, even the carving chisel method would be harder that way.
The Origin is definitely out. I'm seeing ramp building in your future.
 
Here is a video that might give some ideas.  Making a ramp type jig for posts already installed would need to haver the taped ramp parts attached to the sides of the newel posts.  Possibly really good double side tape?


Peter
 
I have house guests this week (the reason the balustrade installation was accelerated) so no time for working in the shop.

I do have a basic design for the rig and it will include a compact ramp double stuck to the Newell post. Doesn’t need to be big since the depth of cut is less than 3/16” and distance from center of bit to front of rig (the part that sits on ramp) will only be 1-1/2”.

Position of ramp determines location of beginning of tapered flute and I will start with the rig propped on the ramp and slide into cutting the flute. Cutting effort will be zero then ramp up to maximum (relative since it’s a small cut with 3/8” diameter core box bit) then back to zero resistance as the bit enters the existing flute.

Router will be  Milwaukee cordless trim router to minimize headroom on the ramp side and overall width. The router position has to adjust laterally 2-1/2” so a small diameter base also helps keep the new adjustable sub-base from being so wide.

The small router with wide sub-base will sit on a fence rig. Rather annoyed that the posts are not the same dimensions so I’ll have to allow for adjustment of one of the fences. And the position of existing flutes seems a bit random so the position of the router on the fence rig will likely need to be adjusted for every single flute end, and there are ninety of them although about a quarter of them are inaccessible to the router rig. Might try to add a screw adjustment to the cross slide…
 
I realize this is no help at all for the current problem, but for future projects it appears to me that these types of cuts would be easy to achieve on a shaper (spindle moulder) with the appropriate set of cutters and limiters. I don't care for the long pointed tapers and prefer the shorter tapers. Using a cutter, similar to this CMT, but perhaps with a 5mm radius, might make a better flute and taper.

CMT-Cutter.png
 
Last edited:
My brother-in-law built a deck for his lakeside vacation home.  He intended to use glass instead of railing.

He installed the posts first.  He asked me to give him a hand with routering the grooves (1/2”) for the glass.

In the end it was far simpler to remove the posts and make the grooves on the table saw with a dado head.

I think you are underestimating how difficult it is to use a router on a vertical application like this.  I think you will end up removing the posts or change your mind on the flutes.
 
The flutes are already done but the ends need to be dressed to make them even, remove the burns, and add short tapers. See the photos at top of thread.
 
What I call a “bent rasp” and Lee Valley called “rifflers” (as does Rockler), can make quick work of this and is relatively easy to master. 
https://www.leevalley.com/en-us/sho...iraIZaGpLN9DTYqWDb5Yi2-ieBFc_XmEaAmkLEALw_wcB

They also list a “chair file” but don’t caption the size.  It resembles the file I used many years ago.  Pricy though.

62W3040-auriou-chair-maker-s-rasp-f-12.jpg

https://www.leevalley.com/en-us/sho...iraIZaGpLN9DTYqWDb5Yi2-ieBFc_XmEaAmkLEALw_wcB

A bit off-topic, but it shows the way those files are made.  Not what I think of when I think “factory” or “manufacturing”.  I did not see a single measuring device in the video (but I did spot a “no-go-gage”).  No flatness gage; no quantifying the arc of the file.  The skill levels are rather astounding.


Michael Kellough said:
That tapered rifler would be about perfect if the teeth went the opposite direction.

Agreed. You could pull it up/out at the end of the flute, but doing that in a pushing motion, with the handle in the groove, would be tough.
I wonder if someone makes them like that?
 
Back
Top