You are using an out of date browser. It may not display this or other websites correctly.
You should upgrade or use an alternative browser.
You should upgrade or use an alternative browser.
Tapping 8020 Extrusions
- Thread starter greymann
- Start date
Hi Scorpion,
I like the jig. Now if I just had some metal working skills or equipment. I have a friend so I'll see if I can arrange something. You do lose some depth in tapping but it looks like it is still enough for this task. Since using this adds a lot to the time of the operation it again raises the question of whether trying to achieve that level of accuracy is necessary here.
I'm not sure where you got your extrusions but mine don't have the cross-hair slots in the center hole so I get much better results with the cutting fluid than without.
I did try my Milwaukee corded drill and found that I was holding the tail of a much too powerful tiger. It felt as if I could really mess up with the slightest slip. I went back to my Ryobi cordless and found that if I brace the drill to prevent breaking my wrist and use a slip jaw wrench on the chuck, I get it tight enough to use. It also has a bubble level so I can sight from side to side and use the level for the vertical. Using the spiral tap it is one pass in and out and the way I am inclined to go for now.
Dick Perry
SittingElf
Member
- Joined
- May 28, 2013
- Messages
- 1,369
Richard/RMW said:Here's the video footage.
RMW
Errr.....wrong color drill in that video! Sacrilege! [wink]
You could end up with a lot of blue. (Yellow+Green=Blue) [big grin]
Helpful video that. Keeping that one for future reference.
Frank
Richard/RMW
Member
- Joined
- Jul 11, 2010
- Messages
- 2,947
SittingElf said:Richard/RMW said:Here's the video footage.
RMW
Errr.....wrong color drill in that video! Sacrilege! [wink]
You could end up with a lot of blue. (Yellow+Green=Blue) [big grin]
Helpful video that. Keeping that one for future reference.
Frank
Leftovers from a misspent youth before I found the light... and the darned things won't die.
Actually I have 4 drills/drivers, circular saw, drywall trimmer, jigsaw and WORK light all in18v, too much invested to even switch to 20v, & the are great tools. Every couple years I invest in two new batteries to keep the fleet in shape for battle.
RMW
Richard/RMW
Member
- Joined
- Jul 11, 2010
- Messages
- 2,947
greymann said:Hi Scorpion,
I like the jig. Now if I just had some metal working skills or equipment. I have a friend so I'll see if I can arrange something. You do lose some depth in tapping but it looks like it is still enough for this task. Since using this adds a lot to the time of the operation it again raises the question of whether trying to achieve that level of accuracy is necessary here.
I'm not sure where you got your extrusions but mine don't have the cross-hair slots in the center hole so I get much better results with the cutting fluid than without.
I did try my Milwaukee corded drill and found that I was holding the tail of a much too powerful tiger. It felt as if I could really mess up with the slightest slip. I went back to my Ryobi cordless and found that if I brace the drill to prevent breaking my wrist and use a slip jaw wrench on the chuck, I get it tight enough to use. It also has a bubble level so I can sight from side to side and use the level for the vertical. Using the spiral tap it is one pass in and out and the way I am inclined to go for now.
Dick Perry
Dick the lighter extrusions (UL/ULS) have those slots. Yours must be the standard 40/40 profile, some stout stuff.
Good luck, make sure to post some details on your project.
RMW
greymann said:Hi Scorpion,
I like the jig. Now if I just had some metal working skills or equipment. I have a friend so I'll see if I can arrange something. You do lose some depth in tapping but it looks like it is still enough for this task. Since using this adds a lot to the time of the operation it again raises the question of whether trying to achieve that level of accuracy is necessary here.
I'm not sure where you got your extrusions but mine don't have the cross-hair slots in the center hole so I get much better results with the cutting fluid than without.
I did try my Milwaukee corded drill and found that I was holding the tail of a much too powerful tiger. It felt as if I could really mess up with the slightest slip. I went back to my Ryobi cordless and found that if I brace the drill to prevent breaking my wrist and use a slip jaw wrench on the chuck, I get it tight enough to use. It also has a bubble level so I can sight from side to side and use the level for the vertical. Using the spiral tap it is one pass in and out and the way I am inclined to go for now.
Dick Perry
Dick, Richard is right, the relief is because they're the light version. Sorry I failed to point that out, I only use e LS stuff for the weight savings and sometimes forget that it's not the only kind.
Using the fixture does result in tapping depth loss however once the first handful of threads are well formed, I can easily remove the fixture and re-tap to final depth with a bottoming tap without issue.
I think there's more than one way to make a similar tapping fixture if you can't weld/work steel. I'd bet a similar contraption could be made with wood or aluminum using common materials from a hardware store.
As for the level of accuracy - extrusions are expensive enough I don't buy extra to cover mistakes. The result is a lowered tolerance for errors. Too fast or too aggressive with a tap and it can break. Booger up the threads and seize something in there on the way in or out and I'm ordering a replacement piece which may result on the project getting put on hold (aka more money & more time). I can and have used a drill because it saves time but I have broken a tap because I don't get the same feel which also results in added risk of failure. In the long run I've found that patience tapping yields a fairly acceptable return and as a result, there is only one speed.
Slappy
Member
- Joined
- Aug 21, 2013
- Messages
- 544
+1 Scorpion , I'm with you on this one
I think I can make one outta AL & wood the only hard part is squiring that nut
Ya could even tap a thick AL block & pre-tap that on a drilll press
I'll figure out something , but I can't be buying extra expensive stock , expensive taps & risk messing up stock or taps
I'm not doing production work these are for Ho'made jigs , tables , extension tables for my shop
Dane
Member
- Joined
- Jan 27, 2008
- Messages
- 451
Hi everyone-
I followed this thread earlier this year when planning my own 80/20 bench. After burning out a corded Milwaukee drill trying to tap the holes, I decided to try the M12 impact driver. As you can see in the video- it appears to be the ultimate solution. At the end I show all the extrusions that I have tapped with one charge of the battery, which is still half full. The WD40 seems to the the key- a liberal application makes a difference of night and day. So far i've done about 50 holes without breaking the tap or seeing any signs of dulling. The hole I bored in the video was about the 20th one, and you can see how smoothly it goes. As to getting the holes straight- the hole in the extrusion seems to keep it straight without any other intervention on my part. The bolts bottom out flush. Anyway, hope this is helpful.
I followed this thread earlier this year when planning my own 80/20 bench. After burning out a corded Milwaukee drill trying to tap the holes, I decided to try the M12 impact driver. As you can see in the video- it appears to be the ultimate solution. At the end I show all the extrusions that I have tapped with one charge of the battery, which is still half full. The WD40 seems to the the key- a liberal application makes a difference of night and day. So far i've done about 50 holes without breaking the tap or seeing any signs of dulling. The hole I bored in the video was about the 20th one, and you can see how smoothly it goes. As to getting the holes straight- the hole in the extrusion seems to keep it straight without any other intervention on my part. The bolts bottom out flush. Anyway, hope this is helpful.
Dane said:Hi everyone-
I followed this thread earlier this year when planning my own 80/20 bench. After burning out a corded Milwaukee drill trying to tap the holes, I decided to try the M12 impact driver. As you can see in the video- it appears to be the ultimate solution. At the end I show all the extrusions that I have tapped with one charge of the battery, which is still half full. The WD40 seems to the the key- a liberal application makes a difference of night and day. So far i've done about 50 holes without breaking the tap or seeing any signs of dulling. The hole I bored in the video was about the 20th one, and you can see how smoothly it goes. As to getting the holes straight- the hole in the extrusion seems to keep it straight without any other intervention on my part. The bolts bottom out flush. Anyway, hope this is helpful.
Yeah, cuts it like butter and made short work of that hole. Slick. Don't really like the idea of the tap binding and the impact "persuading" it but maybe the persuasion is the magic.
So, done yet?! [emoji12]
Michael Kellough
Member
Dane said:Hi everyone-
I followed this thread earlier this year when planning my own 80/20 bench. After burning out a corded Milwaukee drill trying to tap the holes, I decided to try the M12 impact driver. As you can see in the video- it appears to be the ultimate solution. At the end I show all the extrusions that I have tapped with one charge of the battery, which is still half full. The WD40 seems to the the key- a liberal application makes a difference of night and day. So far i've done about 50 holes without breaking the tap or seeing any signs of dulling. The hole I bored in the video was about the 20th one, and you can see how smoothly it goes. As to getting the holes straight- the hole in the extrusion seems to keep it straight without any other intervention on my part. The bolts bottom out flush. Anyway, hope this is helpful.
You are right about the need for lubrication. WD40 is good enough but Alumtap works much better.
Consider yourself lucky you didn't break a tap using the impact driver. Taps are hardened and as a result they're brittle. The opposite of impact rated bits.
Snapping the head off a screw in a piece of wood is nothing compared to leaving half a tap in the hole in the end of a stick of aluminum. Another reason to cut your longest parts first so you can re-purpose them to shorter parts when one end becomes unusable.
I use a regular cordless drill/driver. The ability to stop instantly helps avoid snapping the tap. Setting the clutch to a low torque also helps preserve the tap. Hit reverse to sheer off the swarf when needed and withdraw and re-lube when it feels sticky (WD40 can be handy here to shoot lube down the relief cuts and avoid withdrawing the tap) and you get nice clean threads and your tap will last a long time. Even longer if it's coated with titanium nitride.
Rip Van Winkle
Member
- Joined
- Nov 26, 2014
- Messages
- 300
Kerosene is also a standard lubricant for drilling or cutting Aluminum.
Kerosene is also the lub of choice for glass cutting. In regards to tapping aluminum with a drill, I've been tapping aluminum in shop and on site for 34 years (storefront glazier, automatic door tech, plastics fab jigging). I've used corded and cordless drills. I currently tap anything under 5/16" with my Milwaukee M12 drill (not impact). This drill is great for tapping and removing old fasteners as with care it doesn't create enough torque to stress the taps. I use WD40 and jog the bit, just a quick trip of the trigger and then reverse. I use my drill press in the shop, again carefully jogging the switch and reversing often to clear the tap. I don't often break a bit often, but it does happen. I use a carbide or diamond 1/8" ball end mill to grind the broken bit enough to punch it out.
Dane
Member
- Joined
- Jan 27, 2008
- Messages
- 451
Hm. I'm not sure I share the concern about breaking the tap. One of the primary advantages of an impact driver is that the impact action reduces strain on the bit versus the torque applied by a driver. Same reason most folks use impact drivers to drive large lag bolts and screws. I did do a bit of Internet research prior to trying the impact driver and found quite a few folks who work in jobs that require tapping on a regular basis and they all said that they experience much less breakage of taps than when using either a hand tap or a regular twist driver. And, I can state from my own experience that after over 50 holes with a cheap tap that I bought in a 3'pack on Amazon for 8.00- the first one is still cutting smoothly. Dunno, I think we woodworkers tend to over think these things sometimes.
Dane
Member
- Joined
- Jan 27, 2008
- Messages
- 451
There's even a company that is marketing taps specifically for use with impact drivers: http://www.speedtaps.com
Michael Kellough
Member
Dane said:There's even a company that is marketing taps specifically for use with impact drivers: http://www.speedtaps.com
Based on your experience I have to admit there might be something different about how the impact drivers works but it is certainly counter-intuitive.
The specs for these SpeedTaps suggest they should only be used on material less thick than the diameter of the tap.
This page.
Dane
Member
- Joined
- Jan 27, 2008
- Messages
- 451
Good catch on the depth of those Speed Taps. I'm sure you'll be right in the end-'I'll inevitably break a tap doing this. My thinking is that I'd break one anyway using the traditional methods, just a question of which method does it faster. And, for someone who gets about 20 minutes of shop time a week with young kids in the house, the time savings is worth the unknowns at this point. I'll gladly eat a 10.00 chunk of 80/20 to save a few hours of tapping time. I can certainly understand others' more cautious approach.
Richard/RMW
Member
- Joined
- Jul 11, 2010
- Messages
- 2,947
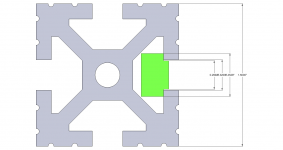
Like Dane I've never had a problem tapping 80/20, and as you can see in my earlier video below I use a non-impact cordless drill, CRC cutting fluid and a generic tap.
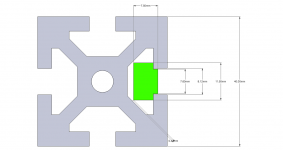
I do think tapping the end of the extrusions is less stressful on the tap due to the gaps in the extruded hole, which seem to help clear chips and reduce the metal the tap has to cut thru:
[attachthumb=1]
I tap about 1" deep, not sure if it would work as well in solid AL.
RMW
I do think tapping the end of the extrusions is less stressful on the tap due to the gaps in the extruded hole, which seem to help clear chips and reduce the metal the tap has to cut thru:
[attachthumb=1]
I tap about 1" deep, not sure if it would work as well in solid AL.
RMW
Attachments
![ScreenClip [1].png](/data/attachments/13/13133-2c13e75c2ed22848b946deba127f7e76.jpg?hash=YRrB_m_LMs)
Richard/RMW said:I tap about 1" deep, not sure if it would work as well in solid AL.
RMW
Taps bind quickly when chips have nowhere to go.
I get wanting to do it faster however you're not just risking a $10 piece of AL. Since time is limited A broken tap (~$10) also risks stopping what I'm doing and driving to the hardware store (time) to buy 2 more taps (I did just break one so buying only one more would be stupid ~$20). I've just learned the hard way more than once - slower is faster. I've probably personally saved thousands in consumables, materials, and hours in time following this simple rule. I follow it even though I have maybe a dozen of the taps too. Maybe that's why I still have a dozen (shrug).
clutzer
Member
- Joined
- Dec 24, 2014
- Messages
- 37
I downloaded their SketchUp profiles for their extrusions and the ones with slot width of 0.32" or 8.14mm seem like they would be extremely tight with Festool clamps. Can you confirm some of these dimensions with your own experience?rst said:I tap with my M12 milwaukee all the time. What you need is considered a gun tap. Use slow speed and constant pressure and use WD40 or dedicated aluminum thread cutting fluid (available from machinist suppliers... Fastenal, MSC, etc). 8020 material is amazing stuff. Their 15 series works perfectly with Festools clamps.
Note: my Festool clamp dimensions are purposely proud by a tiny fraction of a millimeter.
Attachments
Similar threads
- Replies
- 0
- Views
- 433
- Replies
- 64
- Views
- 3K