Tips for working with Stainless...

Cheese

Member
Joined
Jan 16, 2015
Messages
12,528
Following Richard's lead, I decided to start a new thread. Given that stainless steel is becoming ever more prominent in our everyday lives, I thought it was prudent to start a thread dedicated to the purchase, use, finishing and machining of stainless steel for everyday simple projects...in other words, stainless has become a new material norm.

I'm running some underground lines from the new garage to outlying areas in the yard, these will include:
1. Two each 120 VAC feeds to each fence, in the past these have been used to power hand tools but are really intended for Christmas decorations/lighting.

2. A single 12 VDC feed that contains 2 each 12 AWG wires that powers the garden and fence luminaires. All of the garden/yard lighting is now run on a single transformer that I "hid" under a bluestone cap I placed on the concrete steps. I did that work 25 years ago when wrestling a 150# piece of stone was less demanding.  [tongue]  After wrestling with the bluestone the last couple of years, I decided to move the "hidden" transformer to the garage where it will be easier serviced. At the same time I'm splitting the low voltage into 2 zones, thus the need for 2 each 12 AWG wires.

3. A buried PEX water line will allow me to have water inside the garage for 8 out of 12 months. I can use this for washing cars as well as washing the dogs.  [smile]  A number of years ago I installed a Prior hot/cold hydrant on the outside of the house and it has been a godsend over the years. I'd highly recommend that option. So the cars and mutts will be washed with tepid water.  [big grin]

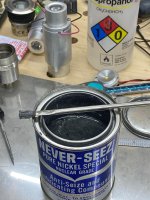
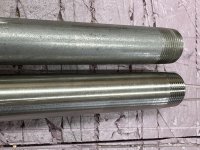
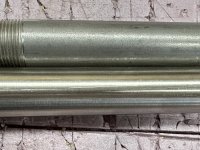
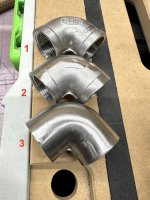
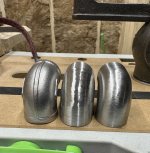
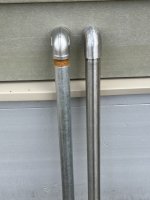
For aesthetic reasons, all the feeds leaving the garage will be 304 stainless pipe and fittings, once in the ground, the electrical will transition to schedule 80 pvc conduit while the water will transition to 3/4" PEX.
 
Putting a #3 or #4 brushed finish on stainless pipe/tubing is always problematic. The standard 2B cold-rolled mill finish is fairly nice but it does take a lot of work to bring it to the #3 or #4 level. 304 stainless tubing/pipe is welded so you also have to contend with the weld-joint bump to produce a nice product. In the past, I've brought the tubing/pipe to a local guy and had him centerless grind the various lengths, that produces a beautiful finish.

For this garage project, there will be a short nipple that penetrates the siding, coupled to a 90º elbow that's coupled to a 24" threaded nipple that goes into the ground. I originally thought I'd purchase a 20' stick of 3/4" stainless pipe, cut the lengths I needed and then have them threaded locally on both ends.

After much research, no one locally was willing to thread the stainless because it was hard on the threading dies. I started searching the internet and 3/4" x 24" 304 stainless pipe nipples threaded on both ends are hard to find. I did find 2 suppliers but the items were $60-$70 each plus shipping & handling and then I'd still have to apply the #4 finish.  [sad]

I decided to purchase a 24" galvanized nipple and see how that looked. Not bad after 2 weeks outside, but then it rained. The un-galvanized, cut threads rusted and that became a deal breaker for me.

I was searching on Amazon and noticed that Beduan offered the 24" nipples I was looking for. I've purchased Beduan machined stainless parts before and was thoroughly impressed with the quality of the machining and at a very good price. I decided to purchase the nipple and see what arrives.  [smile]

Wow...completely overwhelmed...the nipple I received, already had a brushed #5/#4 finish applied to it. Ya, there a few little scuffs on the surface, but 95% of the work I was planning on doing had already been done. It just needs a quick touch-up.

Here's a comparison of the Beduan nipple vs the standard faire. Did I mention...no shipping charges for Amazon Prime members?

[attachimg=1]

[attachimg=2]
 

Attachments

  • 14932.JPG
    14932.JPG
    1 MB · Views: 352
  • 14933.JPG
    14933.JPG
    1.1 MB · Views: 351
The problem I've always had is that I have too many interests, which means I seldom do the same repetitive task over and over again. Therefore, there is a short re-learning process for most items I touch. The good news is my, let's just call it "forgetfulness" can also lead to a cleaner thought process, a form of clairvoyance, that occurs once I reengage with the old task at hand and it can make for a more streamlined manufacturing/work process.

I've been modifying some stainless plumbing fittings to make them more visually elegant for exterior presentation. After all, this isn't a plumbing project, it's an electrical project.

This has become a place holder...I'll continue tomorrow...or the next day...or the day after.  [big grin]

 
tsmi243 said:
[popcorn]

Ya, now that's funny... [smile]...popcorn indeed. I'm trying, but the plethora of outside activities needed to reconstruct the yard into its former self after the garage construction project, now out numbers the amount of inside activities. Tomorrow may be the day as they predict rain for 13 hours. Yes...there is a God.  [big grin]
 
I decided to show some of the steps involved in "cleaning up" stainless pipe fittings.

#1 is the as-purchased fitting before any modification.

#2 is after being cleaned up on a Jet JSG-6DC using just the 6" x 48" belt. The 12" disc was NOT used. The belt is a Cubitron II, 947A in 120 grit. You can see that probably 75-80% of the material that needs to be removed can be done so with the Jet.

#3 is after some work with a Milwaukee Band File. It uses narrow 1/2" or 3/4" x 18" belts. Again in Cubitron II, 947A in 120 grit. All of the work using the Band File was with the offset contact arm installed which means you're working in the slack belt mode. This promotes a smoother/rounder, more uniform surface to prepare it for the final Scotch-Brite Surface Conditioning Belts.

This elbow still needs some further refining with a 120 grit belt but I ran out, the last one broke. [sad]  So I need to order some more Cubitron belts along with the Scotch-Brite belts so I can finish this project up.

I'm also going to install a 6" x 48" Scotch-Brite belt on the Jet to see how that works when used against the platen, although it probably works better in the slack belt mode.

[attachimg=1]

[attachimg=2]

[attachimg=3]
 

Attachments

  • 14964 marked.jpeg
    14964 marked.jpeg
    1.2 MB · Views: 249
  • 14965.jpeg
    14965.jpeg
    1 MB · Views: 255
  • 14960.jpg
    14960.jpg
    703.3 KB · Views: 247
Asking for a friend,,, [wink] [wink]  Galvanized pipe with exterior paint wouldn't have done it for you?  [poke] [poke]
Very interesting project Cheese....... [thumbs up]
 
leakyroof said:
Asking for a friend,,, [wink] [wink]  Galvanized pipe with exterior paint wouldn't have done it for you?  [poke] [poke]
Very interesting project Cheese....... [thumbs up]

I wanted galvanized to work...I really did.  [big grin]  It was cheaper, more readily available and folks from the local Ace Hardware to Home Depot would be willing to thread it.

I even purchased a 24" galvanized nipple, attached a stainless elbow to it and left it propped up against the garage for several weeks. Every time I passed by, I'd look at it and tell myself that it looked good...certainly just as good as some stainless.  [smile]

And then 2 things happened, just for kicks I decided to "clean up" a stainless elbow I found downstairs and while that was happening, it rained outside a few days later.

Which of these options do you prefer?  [big grin]

[attachimg=1]
 

Attachments

  • 14935.JPG
    14935.JPG
    872.1 KB · Views: 212
[member=44099]Cheese[/member] love the look of the stainless. Hate seeing the unused threads  [sad] How about trimming those threads down so you can't see them when the elbow is threaded on?

Or finding someone to bend some stainless tubing for you.

Ron
 
Random notes on stainless steel.

300 series stainless steel is non-magnetic and (generally) cannot be heat treated like carbon steel.  Type 302-303 stainless is the lowest carbon content generally available from stock, and is the easiest to weld (arc welding and resistance welding.). Also, it can be polished to a high gloss (mirror finish).

400 series stainless steel is mildly magnetic in the lower carbon ranges and significantly magnetic in the higher carbon ranges.  The higher carbon range metals can be very difficult to weld.  Worse, the welds can look nice and solid and still fail at substandard stresses.

400 series stainless steel can develop rust spots, but generally will not rust out.  Those rust spots will generally clean off with mild rubbing.  And they will generally clean off of stainless steel flatware just by cycling them through the dishwasher. 

The stainless steel pots and pans that are “Induction ready” (read “magnetic”), will have a pan surface in 300 series (because it will polish well) and be clad with 400 series stainless steel at the bottom so that there is something magnetic so it can transfer the energy and heat the pan.  Judging by the weight of these pans, I would guess that there is a disc of carbon steel sandwiched between the layers of stainless steel to enhance energy transfer.

About 1970 I bought an example of the new-to-the-market Buck Folding Hunter knife.  It had a carbon steel blade.  Later versions had stainless steel blades.  I still have that knife and I can say that it sharpens easier (with a Arkansas stone) and holds a longer edge than the same knife made with stainless steel.  Despite its age, I don’t see any rust.  I believe that the body heat transferred to the knife while carrying it in a pocket is sufficient to keep if from rusting, or frequent sharpening with oil does the same. 

Stainless steel knives are most often produced from 440 stainless, a heat treatable and high carbon version of stainless steel.

The biggest problem our company had with stainless steel was in welding.  The welds looked strong, but sometimes failed.  I talked the owner of the business into investing in a tensile tester.  Using the results shown by the tensile tester we were able to understand the relationship between heat, dwell and pressure (for resistance welds).  We were able to establish minimum weld strength, and we tested often.

But that was a $10,000.00 investment in 1982 - 1983.  That is a little over $33,000.00 today.  Small shops cannot afford this equipment.  So if you are buying stainless steel items that are welded, I suggest you buy from large, well-equipped manufacturers.

Stainless steel is generally passivated after welding or other operations.  Passivation is done by dipping the parts into either muriatic acid or citric acid. 

Muriatic acid leaves the stainless steel looking bright and polished.  Citric acid passivation leaves the part dull, multi-colored and generally ugly (but better for the environment, and easier to dispose of the waste water).

Passivation is done to impart a layer of chromium dioxide.  The chromium dioxide layer prevents rust from forming.

If you have ever seen a notice on a stainless steel much telling you to “not use bleach”, that is because the bleach can compromise the chromium dioxide layer.
 
rvieceli said:
[member=44099]Cheese[/member] love the look of the stainless. Hate seeing the unused threads  [sad] How about trimming those threads down so you can't see them when the elbow is threaded on?

Ron

Ya Ron, I don't enjoy looking at the threads either.  [crying]  So here's the way I'm going to approach it...these are being used only as electrical conduits so absolute water tightness isn't necessary.  [big grin]  I'm going to gather all of the parts and because of manufacturing tolerances, I know that nothing will align perfectly. The idea is to swap the various items around and obtain the best fit, at that point I will then consider each assemblage an item and I can cut and fit the pieces for that item to proper length.

I really only need a couple of threads to engage and I can finish off the joint with a little bit of RectorSeal to make things water resistant.

That photo of the 2 each 24"nipples really points out the issue. Both of the nipples threaded to the same ASME spec and one has 7 threads visible while the other has only 3 threads visible. The stainless elbows are from the same manufacturer so it's really a nipple issue.
 
Got it. Sounds like a plan.  [big grin] I'm hoping you are switching to PVC conduit when you go underground and only use the stainless where you can see it.  Like to see you have some $ left over when you get done with this project.  [eek]

Ron
 
rvieceli said:
Got it. Sounds like a plan.  [big grin] I'm hoping you are switching to PVC conduit when you go underground and only use the stainless where you can see it.  Like to see you have some $ left over when you get done with this project.  [eek]

Ron

Yup, at the bottom of the 24" nipple is a 3/4 fnpt PVC elbow and everything after that is PVC. The stainless is to just make the drop purdy before it becomes invisible.

That would make 2 of us.  [big grin] [big grin]
 
Hate to tell you this, but that system will fail any electrical inspection. To start with, the material does not have approval from a “listing” agency. It appears to be 3/4” pipe, the minimum bend radius for 3/4” electrical pipe is 4.5”. If it is 1/2” pipe the minimum bend radius would be 4”.

From a practical point, I don’t think you’ll ever get wire pulled through those bends.

LB’s are made for when you need a close to surface or tight to corner install, they have removal covers.

Tom
 
tjbnwi said:
Hate to tell you this, but that system will fail any electrical inspection. To start with, the material does not have approval from a “listing” agency. It appears to be 3/4” pipe, the minimum bend radius for 3/4” electrical pipe is 4.5”. If it is 1/2” pipe the minimum bend radius would be 4”.

From a practical point, I don’t think you’ll ever get wire pulled through those bends.

LB’s are made for when you need a close to surface or tight to corner install, they have removal covers.

Tom

Thanks for chiming in Tom...I've already passed the electrical inspection so I'm golden. [big grin]

None of this wire I'm pulling is big stuff, a single run of 12 ga low voltage burial and 2 runs of 12 ga UF-B each in their own separate conduit.  So pulling the wire will not be a problem. All of the conduit runs are 3/4" material.

I will admit, the methods I use may be unconventional, but they're certainly not code non-compliant. While I may have issues with the local construction codes, I will never flagrantly violate reasonable local codes because they truly have my family's health in their prevue.

However, this is a nice introduction for power feeds being palatable into home owner residences. All of the previous power feed looked like 460 volt 3 phase being introduced into a warehouse.
 
Wait... So, you are customizing stainless fittings (!) to be used as electrical conduits (!) that leave a garage (!) 
You must be retired.  [big grin]

BTW, tips for working with Stainless: If same type of stainless is used on both parts, threads will gall and cold weld together and you won't be able to separate them. Pipe threads are especially prone to this due to their cone shape and high friction. Don't ask how I know.
 
Cheese said:
rvieceli said:
[member=44099]Cheese[/member] love the look of the stainless. Hate seeing the unused threads  [sad] How about trimming those threads down so you can't see them when the elbow is threaded on?

Ron

Ya Ron, I don't enjoy looking at the threads either.  [crying]  So here's the way I'm going to approach it...these are being used only as electrical conduits so absolute water tightness isn't necessary.  [big grin]  I'm going to gather all of the parts and because of manufacturing tolerances, I know that nothing will align perfectly. The idea is to swap the various items around and obtain the best fit, at that point I will then consider each assemblage an item and I can cut and fit the pieces for that item to proper length.

I really only need a couple of threads to engage and I can finish off the joint with a little bit of RectorSeal to make things water resistant.

That photo of the 2 each 24"nipples really points out the issue. Both of the nipples threaded to the same ASME spec and one has 7 threads visible while the other has only 3 threads visible. The stainless elbows are from the same manufacturer so it's really a nipple issue.

Part of the blame goes to the people who cut the threads so long.  It defeats the galvanic protection.

There are two ways that iron (steel too) are protected from corrosion.  The first is an application of a coating that provides “coating integrity”.  That is, as long as the coating is not damaged and the underlying steel substrate is exposed, it is protected from corrosion (rust).

The second way is by galvanic sacrifice. This is where learning about the periodic table in science class pays off.  If you have two dissimilar materials near each other, the material that has a higher atomic number on the periodic table will be attacked first, thus protecting the less active material.

In the case of zinc and iron (steel—it is the iron component that rusts).  Since zinc is the more active element, all the zinc in the surrounding area would have to be sacrificed before the steel rusts.  But if the zinc is too far removed from the iron, then it is unable to fill that task.

In this case, if one or two threads were visible after connecting with the nipple, the zinc would have provided corrosion protection.

As a side note, if the coating is less active than the surface it is protecting, then violating the coating integrity will create a situation where the steel will rust faster than if it had been unprotected entirely.

Chrome plating will set up that situation.  If some of the chrome flakes off, the steel substrate will rust amazingly fast.

For quick reference, Iron is 26 on the table, Zinc is 30 and Cadmium (a superior finish) is 46.  Cadmium suffers from being an environmental nightmare.  It is a heavy metal, it requires cyanide to process it. Cyanide requires special equipment to process it and it costs a lot to dispose of the waste.  It is primarily used for military spec parts.

PeriodicTable-White-58b5d8c15f9b586046df020c.png
 
Svar said:
Wait... So, you are customizing stainless fittings (!) to be used as electrical conduits (!) that leave a garage (!) 
You must be retired.  [big grin]

BTW, tips for working with Stainless: If same type of stainless is used on both parts, threads will gall and cold weld together and you won't be able to separate them. Pipe threads are especially prone to this due to their cone shape and high friction. Don't ask how I know.

I am retired...there is a God.  [big grin]

I always chose a different stainless for both the bolt and the nut. 304 bolts are common and 316 nuts are fairly easy to find so that's the combination I used, to work around that issue. However, that wasn't the cure 100% of the time. Sometimes under high torque conditions, the fasteners still welded themselves together.  [sad]

What I've used in the last 8-10 years is a light application of Never-Seez. That works wonders. Just don't get it on yourself as it readily transfers to anything you touch.

[attachimg=1]


Attachments

  • 11402.jpg
    11402.jpg
    303.2 KB · Views: 141
Back
Top