You are using an out of date browser. It may not display this or other websites correctly.
You should upgrade or use an alternative browser.
You should upgrade or use an alternative browser.
Tribute to Sedge
- Thread starter Scott B.
- Start date
Zacharytanner
Member
- Joined
- Nov 5, 2009
- Messages
- 567
I just learned it from Sedge- I had never started below 80 grit..... Love it
- Joined
- Nov 24, 2011
- Messages
- 1,958
Untidy Shop said:[size=13pt]Scott could you please elaborate on this technique.
Is it forward - back, left - right?
[size=8pt]
[member=13337]Scott Burt[/member]
Probably calls for a video to demonstrate for the best explanation (I'll add it to the list), but it is a technique that breaks the golden rule of sanding and finishing by crossing the grain. In this case, crossing diagonally from opposing directions. Imagine the shape of an X across the direction of the grain. Now, a pattern creating that effect across the entire length of the grain. In the initial low grit passes on removal sanding (especially on cupped material), this is a great way to remove without digging deeper into the cupped edges and swirling the centers. Using an interface takes it to the next level. I do recommend practicing with an interface pad before going live on a project piece. Interface sanding is a bit different. It can feel really wobbly, and is very sensitive to downward pressure. You have to float and move quick. As you ascend grits, you gradually work out of the cross hatch pattern and more into a linear motion. With Rotex, I find left to right is best in that technique. You can feel the sander lock in and pull you along. That is sanding nirvana, when you aren't directing the sander, but rather following its lead. Again, a video demo and explanation will ultimately be best. It is a game changing technique though, because it keeps you from going deeper than needed, reduces swirls and keeps you moving forward in grit ascension. I hope this explanation helps, it is the best way I can describe it in words.
[member=19746]Untidy Shop[/member]
- Joined
- Nov 24, 2011
- Messages
- 1,958
Untidy Shop said:[size=13pt]
Thanks for the explanation: think I have got it. Practice indeed. Didn't notice the interface pad on first viewing. Looking fwd to the video. [smile]
[size=10pt]
[member=13337]Scott Burt[/member]
Definitely something to practice in low grit removal situations (not just cupped stock/interface). Another way to leverage the Rotex capabilities.
@ Scott Burt,
I have done several small projects (serving trays and lazy susans mostly) using resawn walnut and sometimes ash with patterns caused by large crotches or large swirls caused by branching of the tree. Such grain can include soft sections to extreme hard sections. I have found that starting with low grit (40) Granat has worked well for initial sanding. I have worked with "X" pattern for the low grits and then gradually going thru grits and straightening the work pattern as I increase the grits. I never knew what I was doing had a name. I would like to see a vid showing what you are talking about.
Also: What is an interface you are talking about?
Tinker
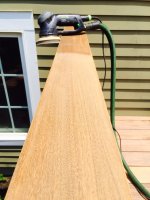
Scott Burt said:Had to roll out the Rotex low grit interface cross hatch technique on some cupped ipe hand rails today. Tipping hat to the man who taught it to me. [attachimg=1]
I have done several small projects (serving trays and lazy susans mostly) using resawn walnut and sometimes ash with patterns caused by large crotches or large swirls caused by branching of the tree. Such grain can include soft sections to extreme hard sections. I have found that starting with low grit (40) Granat has worked well for initial sanding. I have worked with "X" pattern for the low grits and then gradually going thru grits and straightening the work pattern as I increase the grits. I never knew what I was doing had a name. I would like to see a vid showing what you are talking about.
Also: What is an interface you are talking about?
Tinker
- Joined
- Nov 24, 2011
- Messages
- 1,958
Tinker said:@ Scott Burt,
Scott Burt said:Had to roll out the Rotex low grit interface cross hatch technique on some cupped ipe hand rails today. Tipping hat to the man who taught it to me. [attachimg=1]
I have done several small projects (serving trays and lazy susans mostly) using resawn walnut and sometimes ash with patterns caused by large crotches or large swirls caused by branching of the tree. Such grain can include soft sections to extreme hard sections. I have found that starting with low grit (40) Granat has worked well for initial sanding. I have worked with "X" pattern for the low grits and then gradually going thru grits and straightening the work pattern as I increase the grits. I never knew what I was doing had a name. I would like to see a vid showing what you are talking about.
Also: What is an interface you are talking about?
Tinker
The "X" pattern is "cross hatch". The interface pad is the soft cushy hook and loop that you can see between the base pad and the abrasive in my first picture above. It allows the sander to conform to non flat (cupped in this case) surfaces. Kind of like a super cushy soft base pad. A good thing to have around for odd situations.
Cheese
Member
[member=13337]Scott Burt[/member]
So, would using a LS 130 with a flat pad circumvent the need for an X pattern using conventional sanders?
So, would using a LS 130 with a flat pad circumvent the need for an X pattern using conventional sanders?
tjbnwi
Member
- Joined
- May 12, 2008
- Messages
- 7,409
Cheese said:[member=13337]Scott Burt[/member]
So, would using a LS 130 with a flat pad circumvent the need for an X pattern using conventional sanders?
Would be much slower process and I do not think it will turn out as well.
Tom
- Joined
- Nov 24, 2011
- Messages
- 1,958
Cheese said:[member=13337]Scott Burt[/member]
So, would using a LS 130 with a flat pad circumvent the need for an X pattern using conventional sanders?
Funny you should ask, [member=44099]Cheese[/member] , we used the LS130 on friday at this same project, on the pergola posts, which are doug fir. As Tom mentioned, it is rather slow. Not because the motor speed is slow, but because it takes so many passes in low grit material removal. We abandoned it fairly quickly as it is also difficult to use one handed and generally cumbersome for extended periods. While I still love it as a versatile interior sander, particularly on stairs, it hasn't been very effective for us in exterior applications. Plus, it just reminds me too much of a jigsaw. [scared]
Cheese
Member
Scott Burt said:Plus, it just reminds me too much of a jigsaw. [scared]
That's funny.
So [member=13337]Scott Burt[/member] & [member=4105]tjbnwi[/member] why wouldn't a belt sander work in this instance followed up with a random orbital sander to remove major dings from the belt sander?
You could then go back and use a belt sander with the grain with a fine belt.
tjbnwi
Member
- Joined
- May 12, 2008
- Messages
- 7,409
Cheese said:Scott Burt said:Plus, it just reminds me too much of a jigsaw. [scared]
That's funny.
So [member=13337]Scott Burt[/member] & [member=4105]tjbnwi[/member] why wouldn't a belt sander work in this instance followed up with a random orbital sander to remove major dings from the belt sander?
You could then go back and use a belt sander with the grain with a fine belt.
I no longer own a belt sander, the Rotex has replaced it. I find the Rotex easier to control and it does a superior job in my limited opinion.
Tom
tiralie
Member
- Joined
- Jan 26, 2010
- Messages
- 3,614
Scott Burt said:Had to roll out the Rotex low grit interface cross hatch technique on some cupped ipe hand rails today. Tipping hat to the man who taught it to me. [attachimg=1]
Probably couldn't use a planer because of the screw/nail heads but did you see Louis Sauzedde's latest Tips from the Shipwright video where he uses a planer to level some cupped QSF on the deck of a fishing boat?
Tim
- Joined
- Nov 24, 2011
- Messages
- 1,958
Cheese said:Scott Burt said:Plus, it just reminds me too much of a jigsaw. [scared]
That's funny.
So [member=13337]Scott Burt[/member] & [member=4105]tjbnwi[/member] why wouldn't a belt sander work in this instance followed up with a random orbital sander to remove major dings from the belt sander?
You could then go back and use a belt sander with the grain with a fine belt.
A belt sander is still linear and would be cutting the cupped edges before touching the bellies. I wouldn't cross grain with it. Also, you can't get close to posts and house with it, it'd be an inch off stops like that. It could be done but wouldn't be as fast. The least cumbersome and most efficient solution is best when dealing with large footage. On bench top, with no borders, a belt sander might still be legit. That's just not my life.
- Joined
- Nov 24, 2011
- Messages
- 1,958
vteknical said:Great tip Scott. In Chicago we are still anxiously waiting for exterior season to officially begin. Just when we think we are out of the woods we are graced with another week long of cold rainy weather. Sedge is the man [cool]
It's been a brutal season so far here too with all the rain. Keeps us on our toes.
- Joined
- Nov 24, 2011
- Messages
- 1,958
Tim Raleigh said:Scott Burt said:Had to roll out the Rotex low grit interface cross hatch technique on some cupped ipe hand rails today. Tipping hat to the man who taught it to me. [attachimg=1]
Probably couldn't use a planer because of the screw/nail heads but did you see Louis Sauzedde's latest Tips from the Shipwright video where he uses a planer to level some cupped QSF on the deck of a fishing boat?
Tim
Tim
Honestly, that's a level I'm not at yet. I want to explore it further. Sedge has been nudging us in the direction of cabinet scrapers and planers for a while now.
This is what keeps me in the game. Always a level up.
Similar threads
- Replies
- 13
- Views
- 2K
- Replies
- 22
- Views
- 40K