TS 55 job site set up

Bird

Member
Joined
Feb 15, 2017
Messages
16
I've been searching through here with various terms but haven't seen what I was looking for. So I'm not sure what to call it.

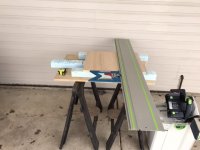
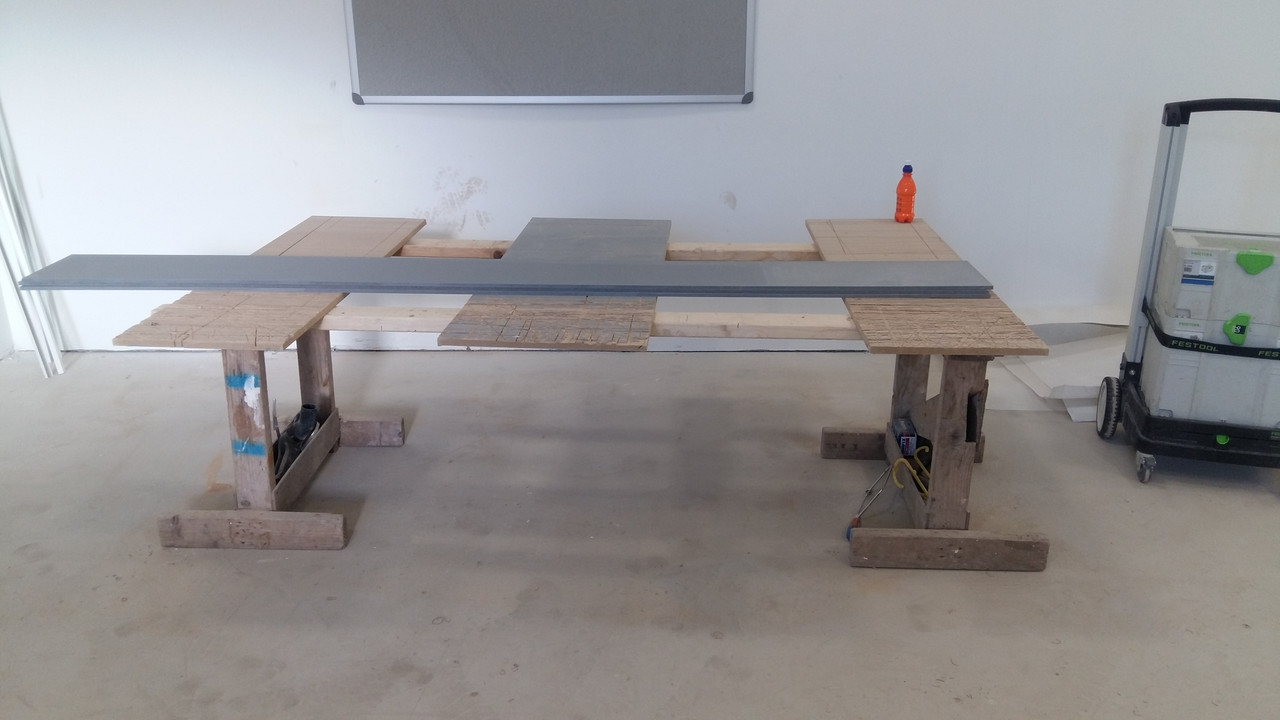
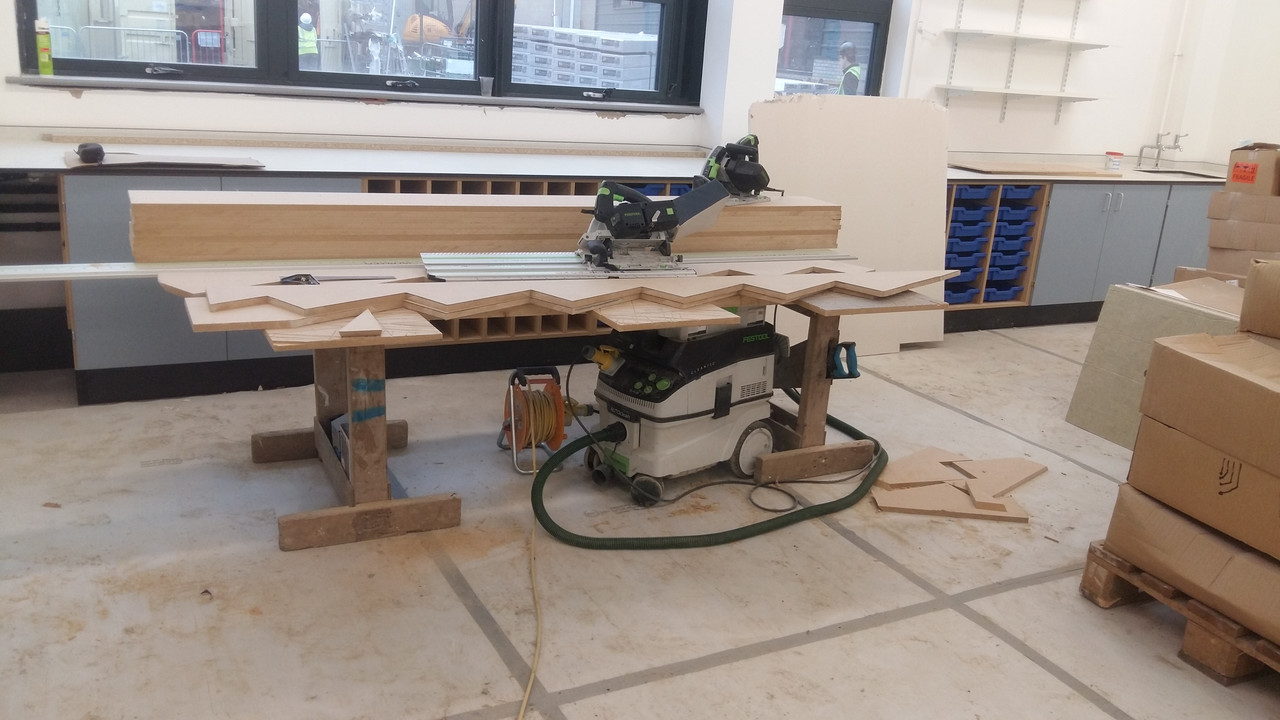
I use my TS 55 around some job sites with just sawhorses and some wood scraps for support. I'm pretty new to the saw, so I'm looking for ideas of simple set-ups to supports work pieces for good results.

Sadly, my saw jumped the track the other day and I managed to leave a nice gouge in the aluminum track. Well, as least you know I use it!

Send me a picture of your quick and dirty set ups so I can steal your ideas. Imitation is the best form of flattery.
 
[member=64135]Bird[/member] - check out the series of YouTube videos posted by The Poplar Shop

https://www.youtube.com/watch?v=Jrx1J9vr3Rg&t=30s

Well recognized series on building cabinets with FESTOOL TS-55.

Let's see if Tom Bader chimes in here. I doubt there's anybody on the FOG who cuts more lineal feet of sheet goods with Festool track saws than Tom.

You'll find that a sheet of rigid insulation on top of a sheet of 4x8 plywood on sawhorses will work well and be easy on your back for starters. But everything, even using a Track Saw requires some practice to get expected results - a step many of us are inclined to skip.

Have you downloaded the TS-55 FESTOOL Supplementary Manual and read it from cover to cover? - takes less time than replacing a wrecked sheet of plywood:

https://www.youtube.com/watch?v=Jrx1J9vr3Rg&t=30s

Hans

 
[member=64135]Bird[/member] -
the link to the FESTOOL TS-55 Supplemental did not copy correctly - dupllicated the YouTube link instead. Here's on more try for  the TS 55 Manual:

https://www.festoolusa.com/service/owners-manuals#Saws

Hans
 
To start with, I hate crawling around on the floor, that said, I avoid cutting crawling around on the floor.

As Hans stated, we cut a lot of sheet goods, 2 bunks of 3/4, 30 sheets of half and 6 sheets of 3/4x10’ in the last 10 days. All of the sheet goods are cabinet grade.

A thread showing my cutting table, we now use two.
https://www.festoolownersgroup.com/...ements/cuttingwork-table/msg342316/#msg342316

As you can see, I cut on foam.

There is a thread on here somewhere with the cut list/sheet attached. I can’t find it right now.

If you do not want to make a table consider a Centipede;
https://boratool.com/work-stands/centipede-work-supports

Festool is doing a limited release for their cutting table, I need to order one before the deadline. Another option to consider.

Cutting on foam allows you to cut/rip solid wood also. Cutting on foam increases dust collection.

Take the time to learn the saw, practice on scrapes when you get a chance. Imagine a cut, you’ll figure out how to do it with the track saw. I have yet to run across a cut I could make with a little thought and planning.

I also have 8 MFT 3’s. Look for used one, hopefully one will come your way.

FULL DISCLOSURE———I test TSO products!!!!

Get the TSO rail square at a minimum, the GRS 16PE. You can add to the system as needs arise.

A simple cut just to show a few of the things you have to consider;


The diamond on the end of this island the joints are mitered. The obtuse angles were ripped using the TS 55, the angle is ~117° If I recall correctly.

Tom


Attachments

  • CB11EADF-955C-4FAD-B496-0A7CD97D42F5.jpeg
    CB11EADF-955C-4FAD-B496-0A7CD97D42F5.jpeg
    1.5 MB · Views: 546
Here is my setup for quick and accurate cuts.

I am showing a setup with a small worktop but it works with larger sheets also.

I am fortunate to have a TSO Guide Rail Square for quick and accurate cuts.

I made some spacers to lay on the worktop so you can cut through without cutting into the worktop. Got this idea from Ramblin Russ on You Tube. They are 2 inch styrofoam with 1/4 inch plywood glued on and then cut into strips. These spacers can be offset so the cutoff will not fall to the ground.

Worktop with spacers.

[attachimg=1]

Guide Rail on piece ready for cut

[attachimg=2]


Attachments

  • BDDCE2D4-B38E-4247-81E6-14C00BCB3582.jpeg
    BDDCE2D4-B38E-4247-81E6-14C00BCB3582.jpeg
    76.5 KB · Views: 1,207
  • B9B1FF72-CBBC-4CF7-89DE-BB94C10B729E.jpeg
    B9B1FF72-CBBC-4CF7-89DE-BB94C10B729E.jpeg
    75.8 KB · Views: 1,212
Pair of sawhorses, 2 bits of 2x whatever timber on them and several bits of mdf/ply/2x2 running at 90 degres to the first timbers.

Dead easy to move about, the extractor fits underneath it all and it works.
20170130-103337.jpg


20161206-124345.jpg
 
Tom, I am in SW Wisconsin. I have gotten some good ideas from you all. I have been cutting some styrofoam today and paying attention to myself. I realize that I'm so used to my regular sidewinder saw that it becomes easy to treat the track saw that way. I'm getting better about being sure to allow the saw to come back up from the plunge which is how I managed to put a gouge in the track.

Thanks all. I have a good idea now and I hope I'll be a good sport and post what I make.
 
(I give up - I cant get these images to load in the right location or in the correct orientation!)

My setup isn’t as nice as tbjnwi, but it does trick for me.  It’s just a grid made of 1x4s, and it’s made to sit on the edge of my mfts:

[attachimg=1]

I cut a second set of notches so I can rotate the mfts if needed:

[attachimg=2]

[attachimg=3]

Then I put 3/4” rigid foam on top:

[attachimg=4]

The foam is cut into 2’x4’ sections, and the whole system breaks down small enough to fit in my van:

[attachimg=5]

[attachimg=6]

[attachimg=7]


Attachments

  • 6FF7EFC2-4CE7-412C-8295-9CAF88D0F21B.jpeg
    6FF7EFC2-4CE7-412C-8295-9CAF88D0F21B.jpeg
    31.2 KB · Views: 927
  • D7A3A74B-A72B-4E5D-8DFB-FAAF0551F483.jpeg
    D7A3A74B-A72B-4E5D-8DFB-FAAF0551F483.jpeg
    25.1 KB · Views: 924
  • 627BE8B2-5507-4CAE-8568-A17BADD04DFC.jpeg
    627BE8B2-5507-4CAE-8568-A17BADD04DFC.jpeg
    23 KB · Views: 924
  • 705C82BF-A0CD-4A96-8B34-07F02462B596.jpeg
    705C82BF-A0CD-4A96-8B34-07F02462B596.jpeg
    30.8 KB · Views: 943
  • A4A3AB37-D453-4B75-9429-7DD41277BC9B.jpeg
    A4A3AB37-D453-4B75-9429-7DD41277BC9B.jpeg
    35.3 KB · Views: 966
  • 7C1143AF-88C6-430E-A550-4F8B71B8FD71.jpeg
    7C1143AF-88C6-430E-A550-4F8B71B8FD71.jpeg
    35.9 KB · Views: 956
  • 66D9094C-482F-4BE2-B161-6602073AAA5B.jpeg
    66D9094C-482F-4BE2-B161-6602073AAA5B.jpeg
    31.4 KB · Views: 921
Great set-up/idea....like the 1x4 v grooved into the mft profile and that you can still work at each end
 
Back
Top