TS 55 - limit stop question

gamecock111

Member
Joined
Nov 16, 2022
Messages
8
Just getting around to using new saw. It came with 1 limit stop. If I wanted to limit cuts at both ends, would I need 2? Or, do you start cut, stop, and move limit to front, which seems error prone to me.

Sent from my iPad using Tapatalk
 
Buy another one.  Some also keep one handy to use in marking off an area to be cut off a factory fresh sheet of plywood to create a clean straight edge.

Peter
 
I think the intent of those is to stop kickback, which is why you only get one. 

But yeah, buy a 2nd one.  They're handy.
 
I have a second one for just that reason, but I initially bought it for use with the OF1010 on the rail.
As a new user, are you aware of the start and stop marks on the side of the saw body? They are only accurate at full depth of cut, with the rear one being the most accurate, but they can be quite helpful.
The rail should be clamped in place for this too. I don't clamp most of the time, but it's important with the stops and with bevel cuts. The act of pushing down on the saw is enough keep it from moving in most other situations.
 
When I need to make a plunge cut at other than full depth, I plunge in the middle and mark, usually with a bit of tape, where the start and finish are to be or just sneak back or up to the endings.
 
rst said:
When I need to make a plunge cut at other than full depth, I plunge in the middle and mark, usually with a bit of tape, where the start and finish are to be or just sneak back or up to the endings.

I generally do the same, except with the stops. I make the marks based on the lines on the saw case and set the stops at those points. The resulting cut should be slightly short, then I move the stops accordingly, especially the rear one. That's the place where the saw can jump. I measure the distance from the edge of the cut and the actual line where I want it to start and move the stop the same amount.
 
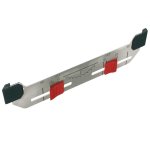
I have a TSC55K and a Mafell MT55, both saws I love, both have likes/dislikes. One of the 'likes' for the MT55 is a steel snap-on guide plate that has start and stop marks on it, for different depths of cut. Very, very handy for crucial plunge cuts.
 
Thanks for all the replies. I actually purchased the essentials book some time ago to learn and build lust before giving in and buying.

Seems like using carvex/jigsaw would be easy way to finish those plunges.

Sent from my iPad using Tapatalk
 
Lincoln said:
I have a TSC55K and a Mafell MT55, both saws I love, both have likes/dislikes. One of the 'likes' for the MT55 is a steel snap-on guide plate that has start and stop marks on it, for different depths of cut. Very, very handy for crucial plunge cuts.

That snap-on guide plate sounds really interesting. Any chance for a photo?
 
PaulMarcel said:
Lincoln said:
I have a TSC55K and a Mafell MT55, both saws I love, both have likes/dislikes. One of the 'likes' for the MT55 is a steel snap-on guide plate that has start and stop marks on it, for different depths of cut. Very, very handy for crucial plunge cuts.

That snap-on guide plate sounds really interesting. Any chance for a photo?

[attachimg=1]

Position indicator $98.45
 

Attachments

  • C3E11700-6B55-4E71-B7AC-0A294D504586.jpeg
    C3E11700-6B55-4E71-B7AC-0A294D504586.jpeg
    44.5 KB · Views: 197
Yes, that's it above. You slide the red markers to your depth of cut marks and that's the start/stop point.
 
I assume the start/stop points are measured based on where the blade enters the surface, rather than anywhere else?

The shallower the cut, the more you have to finish with a straight blade of the right kerf.
 
Crazyraceguy said:
As a new user, are you aware of the start and stop marks on the side of the saw body?

These are all I’ve ever used ^^^^ Fill them in with a black Sharpie so you can see them better.
 
Back
Top