Updating my MFT 1080: Dogs, Fences, and Other Crosscut Upgrade options?

Hotwheels

Member
Joined
Jan 23, 2007
Messages
237
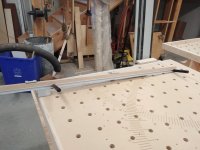
I had a lapse in my focused woodworking and after a recent move I now have a dedicated basement work space (12x22) and two MFT 1080s and other assorted Festool's and shop machines (table saw, planer, jointer). It seems my MFT 1080 is out of date, but I still think it is useful and not worth replacing with 2 MFT3's.

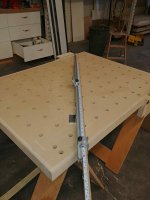
I recently had a CNC shop make two new tops for the 1080 tables.  However, I am without a fence and after reading here and watching some YOUTUBE videos it seems that during my hiatus from woodworking, there are newer options for repeatable crosscuts, one of my main cutting tasks on the MFT.  As I understand the current state of things, here are some of the options for putting a fence for crosscuts on my MFT 1080:

1) Benchdog and some others make a fence that uses dogs to hold the fence in place.
2) Some kind of track butted against dogs and clamped to the table so that it does not move.
3) Use aluminum extrusions like 8020 sells to attach to the the table for a fence.
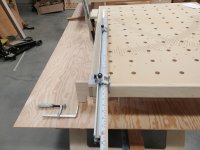
4) Use a variety of dogs and spacers to set up the table for repeatable cuts, including using rail dogs for the rail.
5) Replace the Festool brackets with the Dashboard brackets and use a Benchdog like fence.

Are there other options?  Some folks seem to prefer using a fence rail and others dogs for crosscuts. What is the state of current preferences for upgrading an MFT type table --- in my case a 1080 that does not have the newer edge profiles with the V track -- for repeatable crosscuts?

Thanks ...
 
You will get a wide variety of responses. Seems like everyone has a favorite technique.

I never use the MFT protractor. I place two dogs along the MFT top, drop the rail, and check square with the Woodpecker framing square. I butt the wood against the two dogs, drop the rail, and cut. Always comes out square.
 
Birdhunter said:
You will get a wide variety of responses. Seems like everyone has a favorite technique.

I never use the MFT protractor. I place two dogs along the MFT top, drop the rail, and check square with the Woodpecker framing square. I butt the wood against the two dogs, drop the rail, and cut. Always comes out square.

Seems reasonable.  How do you setup to make repeatable crosscuts, say you need to make multiple 24" cabinet sides/shelves, etc..., how do you set up a stop or whatever so you are not measuring or cutting to a line each time?
 
When I was switching over from another track saw system to Festool/Makita I had 3 MFT style slabs that make up a 4'x8' work table CNC'd too. I was all excited to try out all the bench dog tricks but then I discovered, for me, it was much simpler to use my TSO Products rail square and at the time their just released parallel guide system. The bench dogs are gathering a lot of dust right now.

Mike
 
John Russell said:
Birdhunter said:
You will get a wide variety of responses. Seems like everyone has a favorite technique.

I never use the MFT protractor. I place two dogs along the MFT top, drop the rail, and check square with the Woodpecker framing square. I butt the wood against the two dogs, drop the rail, and cut. Always comes out square.

Seems reasonable.  How do you setup to make repeatable crosscuts, say you need to make multiple 24" cabinet sides/shelves, etc..., how do you set up a stop or whatever so you are not measuring or cutting to a line each time?

Same principle just replace the dogs with fence dogs and attach to your fence of choice. Incra, Benchdogs, Festool. On my MFT/3 I carefully bored (2) 20mm holes farther back that are parallel to the other holes. That way I can drop my fence farther back using fence dogs and maintain 24" crosscut capacity.
 
i also have two 1080 MFT tables but got so tired of having to fool with bench dogs, squares, and all the other jigs to make cuts, I sold my TS55 and replaced it with a Sawstop and couldn't be happier and it fits where my MFT tables are. 
 
I have the paired MFTs and an Industrial SawStop. I find them complementary, not overlapping. I don’t like doing angle cuts on the table saw. I find them easy on the MFT using dogs, rail, and TS55.

The neat thing about woodworking is that people develop different methods of accomplishing the same task. I learn a lot reading how others solve problems.
 
I found it frustrating trying to cut angles. Maybe I was doing it wrong.  I find it so easy to set my miter gauge and make the cut.
 
I have a vintage 2005 industrial Sawstop with the 52 inch fence that has seen limited use in the past, but since a recent move I am reconsidering how to set up shop and what are the best tools for planned projects (shop cabinets/drawers/shelves, end tables, dining table, chairs, other sitting furniture, a kitchen island).  I previously used the Sawstop mainly for rip cuts and the MFT 1080 and Kapex for crosscuts.

I need to cut the Sawstop fence down to 30 or so inches to comfortably fit in my 12x22 basement workspace and maybe that will be my best tool for crosscuts using a vintage Jessem mitre excel or an upgrade to that if needed.

Or, I can invest in some of the other options for crosscuts using the MFT1080s with my newly CNC table tops.  The cost of the those options can add up for dogs, fences, rail squares, parallel guides, etc.... Previously, I could usually make good enough square cuts on the MFT, but it usually took lots of fiddling to get the rail 90 degrees to the fence.  As I have aged I have less patience for fiddling with the tool in order to use it. I am hopeful that there is an MFT solution for crosscuts that does not require ongoing fiddling since I like the dust collection using the track saw and for just a few cuts it is easier to use than the table saw.

Fence dogs and some type of fence seems like a straightforward solution, but I am still trying to sort out the pluses and minuses of dogs, fences, parallel guides, rail guides, etc....

Thanks for your comments and observations.
 
John Russell said:
Birdhunter said:
You will get a wide variety of responses. Seems like everyone has a favorite technique.

I never use the MFT protractor. I place two dogs along the MFT top, drop the rail, and check square with the Woodpecker framing square. I butt the wood against the two dogs, drop the rail, and cut. Always comes out square.

Seems reasonable.  How do you setup to make repeatable crosscuts, say you need to make multiple 24" cabinet sides/shelves, etc..., how do you set up a stop or whatever so you are not measuring or cutting to a line each time?

I found 80/20 to make the perfect fence.  I cant remember which profile I bought but it was low and wide to help minimize any deflection issues. approx 1 inch high and about 3 inches deep.  I mounted 2 angles off the back and installed parf anchor dogs so it could pop on and off the bench without any tools.  For stops what I used was 80/20 mending plates screwed down to the top.  Its basically just a flat plate with 4 holes.  I would screw these down to the top of the 80/20 for common cuts.  I then built a 3 sided plywood box (picture an upside down U shape) I would just butt the plywood fixture to the mending plates and then butt my material to the upside down plywood U stop.  The beauty of it was you can simply lift off the plywood stop and place it at any of the mending plate locations for common cuts (gable heights, widths etc. and just label each one.  It doesn't matter if its the same day or weeks later as long as you put the anchor dogs in the same 2 holes all your stops are exactly the same.  If you have an odd ball size you can just clamp the stop to the fence per usual tactics. KISS engineering at its finest.
 
I had my space setup about the same my MFT style workbench doubled as my outfeed table for my unisaw. Did all my rips on the TS and the crosscuts on the MFT style bench. The main reason I made the 80/20 fence easy to pop on and off. I built my own track hinge out of scrap 1/2" Russian birch.  It wasnt the prettiest thing but it functioned perfectly and stayed square no matter if it was flat to the table or raised up. I also made it so it would drop below the surface so it wouldn't interfere with out feed duties.  1 sheet of Russian birch for the bench frame, a sheet of mdf for the top and about 100-150 in 8020 supplies along with some scrap birch it was cheap, easy, and accurate. You dont even need a parf guide or fancy drilling template since the track hinge is squared off of the fence it doesnt mater how accurate the 100+ holes are. 
 
If you own an MFT 1080, what dogs fit the holes in your table?  It seems most dogs are made for the hole size in the MFT 3, which is apparently a different diameter than the 1080 hole. 

As I mentioned in another post, I have two older Veritas dogs that have a diameter of 19.86 or so mm and they fit snugly in the holes in my new MDF tops that were modeled after the original top that was broken during a move. These new tops were made by a CNC shop that used the old top as a model.

My options seem to be to have dogs custom milled to the diameter of the holes in my new tops, but that means if I want more dogs in the future then I have to go the custom route again.  Or, maybe I just simplify life and have the CNC shop make two new tops using the dimensions of the 1080 table -- which is different than the MFT 3 -- and the hole size for the MFT3

What do you think?
 
John Russell said:
If you own an MFT 1080, what dogs fit the holes in your table?  It seems most dogs are made for the hole size in the MFT 3, which is apparently a different diameter than the 1080 hole. 

As I mentioned in another post, I have two older Veritas dogs that have a diameter of 19.86 or so mm and they fit snugly in the holes in my new MDF tops that were modeled after the original top that was broken during a move. These new tops were made by a CNC shop that used the old top as a model.

My options seem to be to have dogs custom milled to the diameter of the holes in my new tops, but that means if I want more dogs in the future then I have to go the custom route again.  Or, maybe I just simplify life and have the CNC shop make two new tops using the dimensions of the 1080 table -- which is different than the MFT 3 -- and the hole size for the MFT3

What do you think?

As I understand it, the MFT 1080 and 800 models had slightly tighter holes than the MFT3, but they are the same "nominal" 20mm size. My clamping element clamps fit fine on my MFT 800, as do the hold-down clamps, but Parf dogs have a very tight fit. I did some sanding on the holes to help fit Parf dogs, but the recently available reamer would be a better choice. One of these days, I'm going to order one, but since buying an MFT3, the 800 gets a lot less use. The "Super Dogs" that can be tightened might work without adjusting the holes.

 
pixelated said:
John Russell said:
If you own an MFT 1080, what dogs fit the holes in your table?  It seems most dogs are made for the hole size in the MFT 3, which is apparently a different diameter than the 1080 hole. 

As I mentioned in another post, I have two older Veritas dogs that have a diameter of 19.86 or so mm and they fit snugly in the holes in my new MDF tops that were modeled after the original top that was broken during a move. These new tops were made by a CNC shop that used the old top as a model.

My options seem to be to have dogs custom milled to the diameter of the holes in my new tops, but that means if I want more dogs in the future then I have to go the custom route again.  Or, maybe I just simplify life and have the CNC shop make two new tops using the dimensions of the 1080 table -- which is different than the MFT 3 -- and the hole size for the MFT3

What do you think?

As I understand it, the MFT 1080 and 800 models had slightly tighter holes than the MFT3, but they are the same "nominal" 20mm size. My clamping element clamps fit fine on my MFT 800, as do the hold-down clamps, but Parf dogs have a very tight fit. I did some sanding on the holes to help fit Parf dogs, but the recently available reamer would be a better choice. One of these days, I'm going to order one, but since buying an MFT3, the 800 gets a lot less use. The "Super Dogs" that can be tightened might work without adjusting the holes.

The 1080 holes are slightly smaller than those on the MFT 3.  I have an MFT Kapex that has holes that I believe are the size of the MFT3 and the Veritas dogs and my clamping elements fit more loosely in those holes than in my 1080 holes.  I might try the superdogs before having some dogs milled to the 19.86 size that currently work well in my table. Is the reamer relatively error proof, that is if I don't hold it exactly vertical will it introduce some error when used?
 
John Russell said:
If you own an MFT 1080, what dogs fit the holes in your table?  It seems most dogs are made for the hole size in the MFT 3, which is apparently a different diameter than the 1080 hole. 

As I mentioned in another post, I have two older Veritas dogs that have a diameter of 19.86 or so mm and they fit snugly in the holes in my new MDF tops that were modeled after the original top that was broken during a move. These new tops were made by a CNC shop that used the old top as a model.

My options seem to be to have dogs custom milled to the diameter of the holes in my new tops, but that means if I want more dogs in the future then I have to go the custom route again.  Or, maybe I just simplify life and have the CNC shop make two new tops using the dimensions of the 1080 table -- which is different than the MFT 3 -- and the hole size for the MFT3

What do you think?

I ordered a Parf Guide from Axminster Tools in the UK and a few accessories to go with it and will make my own MFT to suit my needs. If you watch Peter Parfitt's video you can see it in action.

I also intend to order the UJK fence for the table when it is back in stockhttps://www.axminstertools.com/global/ujk-fence-and-length-stop-for-guide-rail-saws-107068

With Peters system i can make as many variations of MFT tables as i desire and not rely on buying someone elses idea of a layout. I can also use the top material of my choice. This might be a bother to some and might not be initially cheaper then buying a top but when i'm finished i will have the top layout that i want for myself and the Parf Guide should last a lifetime. Guide rules will also allow you to layout shelf holes and you can accurately layout 30 and 60 degree holes on your top. The system has many uses and allows accurate and perpendicular hole using a hand held drill. Give it a look.
 
suds said:
I found it frustrating trying to cut angles. Maybe I was doing it wrong.  I find it so easy to set my miter gauge and make the cut.
I use dogs for the item to be cut and Parf dogs on the rail, for square cuts. For angled cuts I find the Woodpeckers track square to be fantastic. The ability to use it in a portable fashion made it an easy choice for me, but the financial outlay is substantial.
Cutting any angle from "point to point" with a track saw is easy, IF you know where those pints need to be. The Woodpeckers square makes it possible to cut to a known angle.
 
I use the Lee Valley quad track with Qwas rail dogs to align it. I also drill extra holes towards the back for the fence. I mount a tape on the wood that is attached to the quad track with screws and t nuts. You can then loosen the screws and adjust the ruler to index it to the cut.

I use it for angles by leaving one rail dog in the hole by the track, and then I can swivel the track to the angle you need. I just clamp it in place when I have the angle I need with the angle bracket on the back side. If you have two rail dogs in the track you can move it forward for cutting narrow pieces.

My tops have the angles scribed into the top, but that is not necessary you can just mark the angle you need and set it to that.
 

Attachments

  • Track bottom.jpg
    Track bottom.jpg
    897.3 KB · Views: 595
  • fence on angle.jpg
    fence on angle.jpg
    442.9 KB · Views: 639
  • track end view.jpg
    track end view.jpg
    915.2 KB · Views: 1,154
Back
Top