Using the domino to re-attach a broken cheap Newel Post?

gearhound

Member
Joined
Oct 12, 2016
Messages
149
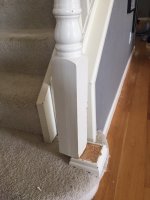
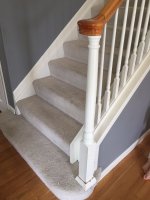
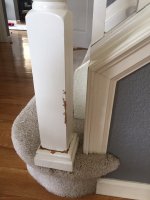
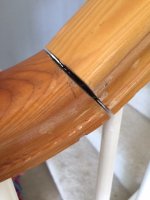
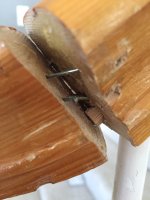
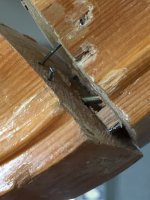
My kiddos love to swing around the banister when running up/down the stairs and this cheap post finally gave out where it connects to the base.

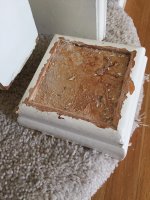
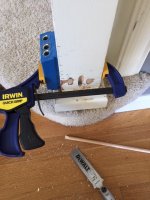
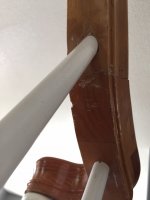
It appears it was attached just with wood-glue so I'm surprised it's lasted this long... I went over to Home Depot and the only thing they sell is a kit with L-brackets and some molding to then cover the metal brackets. I also see online there is a "key lock" plate I can route in with a lag bolt. Neither of these seems like an ideal quick solution.

Our plan is to eventually put in a new bannister so I'm not too concerned with longevity, I just need something to get us thru the short-term. Wondering what you guys think about putting in 4 dominos/glue? Do you think that will suffice for the next year or so? Or is there some solution I'm not thinking about? The post itself is not connected to the stairs so I unfortunately can't just screw directly into that.

Thanks for any suggestions!
 

Attachments

  • IMG_0554.JPG
    IMG_0554.JPG
    569.7 KB · Views: 537
  • IMG_0555.JPG
    IMG_0555.JPG
    783.2 KB · Views: 396
  • IMG_0556.JPG
    IMG_0556.JPG
    660.9 KB · Views: 538
  • IMG_0557.jpg
    IMG_0557.jpg
    573.6 KB · Views: 415
I think getting good mortise alignment would be highly difficult. If you accomplish it, please show us how. I like the epoxy idea, but I would bolster the joint with toe in nails. Pre drill the nail holes angled into the base of the post. Use the nails with small heads. Drive the nails below the surface using a nail punch. Putty the holes and paint.
 
Instead of nails or screws use 3/8 oak dowel and a brad point bit to drill holes in at an angle. Put two on each of the three faces you can access. Then after glue dries cut flush and sand and paint. You might even be able to drill down into the tread through the base. Could use steel rods too and set below the surface then cap off with a short wood plug that you sand flush then paint.
 
Bob D. said:
Instead of nails or screws use 3/8 oak dowel and a brad point bit to drill holes in at an angle. Put two on each of the three faces you can access. Then after glue dries cut flush and sand and paint.

This is exactly how I repaired a newel post about twenty years ago and it worked a treat. Very quick method too.
Good call Bob D.  [thumbs up]

Rob.
 
Thanks Guys! I can definitely see the concern in getting proper registration on the dominos. I think I'm going to go with the dowels and epoxy....I'll let you know how it goes!

 
You might want to practice the drilling on some scrap. I've never been good at drilling at a sharp angle without the bit skittering.
 
Scott in San Diego said:
One dowel in the center, lots of adhesive and a Kreg HD pocket hole jig using #14 2-1/2" screws.
Birdhunter said:
The kreg jig is a great idea.

Use the Kreg drill bit freehand, it is designed to cut at an angle, and match the diameter with the dowelling. Skid free drilling. [big grin]

Rob.
 
Scott in San Diego said:
One dowel in the center
Question: is it possible to lift up the post at all? It looks like it's somewhat firmly attached to the rail...

Because if you can't lift it: how to insert the dowel in the center (or anywhere else) ?
 
Well, I went with the dowels/epoxy and then came back to this thread this morning and saw the Kreg jig tip....not sure why I didn't think of that! I've got 2 dowels in each of the 3 faces and one on the rear face and then a pocket-hole screw in between them. I wish I would have put one right in the center too, but this is pretty rigid as is.

However, now that I've got the base secure I've got a problem with where the hand rail joints with the newel post arm.....what's the best way to get this tight? It appears it originally was done with just some small nails.

Thanks for all the help guys!
 

Attachments

  • IMG_0566.JPG
    IMG_0566.JPG
    91 KB · Views: 360
  • IMG_0565.JPG
    IMG_0565.JPG
    95.5 KB · Views: 401
  • IMG_0568.JPG
    IMG_0568.JPG
    127.3 KB · Views: 364
You never mentioned the problem with the rail, I think I would have worked out a solution for that first before re-anchoring the base of the newel post. It looks like there is more of a gap at the top nearest the camera, but that may be because it is still attached with the dowel screw just loose. You might be able to pull it up tight AFTER you get all the crud out of the joint by just tightening the nut on the underside of the rail, which may (as in should) be hidden by a wood plug. If the plug is missing then you can probably see the end of the screw and the nut with a flashlight.

You'll find a diagram that shows what I am talking about here:https://www.pearstairs.co.uk/fitting-volutes-and--volute-newels

From what I can tell in the photo, you might have an alignment problem the way it sits. I say that because the gap does not appear to be uniform. The volute is probably fastened to the end of the rail with a dowel screw. On the underside of the rail next to the joint is there a hole about 1 inch in diameter? There may be a plug covering the hole which you will need to remove. If you look inside you should see a nut and washer. The dowel screw has a wood screw thread on one side and a bolt thread on the other. The wood screw thread should be screwed into the volute and the bolt end slipped into the end of the rail and then the nut and washer secured to draw the two pieces together.
 
Yeah, I didn't really think about it at the time...figured the top would be tight enough once I got the bottom re-anchored.

I can't see a wooden plug underneath and when I pull the joint apart it looks like there's about 4 nails, a small metal rod, and a dowel that was never attached into the newel post end....it's got a rod running underneath it. Please bear in mind that my house is part of a massive cookie-cutter development that was built in 2000 and they cut as many corners as possible with construction.

Here's some pics of what I'm talking about:

EDIT: Is it possible that the nut to tighten is underneath that 2nd post on the bannister...from the photo you can see theres some wood filler used there?
 

Attachments

  • IMG_0572.JPG
    IMG_0572.JPG
    344.4 KB · Views: 314
  • IMG_0573.JPG
    IMG_0573.JPG
    524.6 KB · Views: 350
  • IMG_0575.JPG
    IMG_0575.JPG
    512.9 KB · Views: 376
Thanks for the close up photos. There should have never been any nails driven in like that, maybe someone before you had trouble with the volute coming loose. Could be under that one spindle, can you get it out without doing any damage?
 
The spindles appear to just be anchored with a bit of epoxy and a toe-nail...luckily the thing is such a mess right now that I don't really care if damage gets done. I'm just hoping I can get it tight enough until I find a new bannister my wife and I like.

 
I hope when you do decide on a new rail, you get someone who knows how to properly install a rail. For your existing problem, try trim screws and glue. Those metal plates with screws and wood trim are one of the best newel attachments I have come across. The metal plate routed into the landing with lag bolt doesn't last. The only other quality attachment is a newel bolt with lag threads on one end and machine threads on the other end.
 
Back
Top