VAC-SYS (vacuum clamping system) question

ChiknNutz said:
Part of my motivation was after I visited a local dealer and one of the gents their sung the praises of the VAC-SYS, saying that you really don't need the MFT if you have it.  For me, I remain dubious on that point.  Even if not a MFT, I feel you still need a proper layout table and the various accouterments that go along with it.

He just meant you don’t need a board with holes in it for clamping your work if you have a vacuum clamp.

You still need something else for layout and cutting. An MFT is great for that...
 
[member=64379]ChiknNutz[/member] The vac sys setup could be something as simple as:

i-tznK8zw-4K.jpg


which is how I first used it. That evolved into a dedicated cart that I really enjoy using:

i-WGZMd9S-4K.jpg


i-VBxGGQv-4K.jpg


i-KvbF7WG-4K.jpg


It's one of those tools that you don't need to get the job done. But it makes it more pleasant when doing Domino, edge banding, sanding, freehand routing.
 
[member=65062]DynaGlide[/member]

B.E.A.U.tiful setup there!  I am about to pull the trigger on about $2k worth of Festool goods (which doesn't get you much with Festool as y'all well know) and still need to buy a big air smasher, cyclone, router and table, probably a table saw and have a few 220V outlets installed in my shop.  And this is all just part time hobby stuff now, not even sure I will get a new business license here (moved from WA to NC).  As such, I think the vac-sys idea will need to be shelved for now.
 
The triad is a large area. I am in Reidsville just north of Greensboro. Due to illness I haven’t been in my shop much lately,  but I have the equipment that you have been looking at. You are welcome to stop in my shop and play with it as much as you would like, and hopefully gather some information as to what would work for you.
Send me a PM if I can be of help.
Bob C
 
That's a very smart 'Vac Station' you've created there, DynaGlide.

I have no need or justification for anything like that just now, but that doesn't stop me from drooling.
 
Euclid said:
That's a very smart 'Vac Station' you've created there, DynaGlide.

I have no need or justification for anything like that just now, but that doesn't stop me from drooling.

I'm not sure I understand. What do the words "need" and "justification" mean?  [tongue]
 
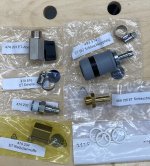
A bag of parts recently showed up from Festool Service.  [cool]

[attachimg=1]

I recently purchased the SE 2 vac head and wanted to hook it up. However, I don't like that the foot valve is permanently tethered to the SE 1 vac head. It makes for a cumbersome package when you need to move it. Also, I am space constrained and I don't always need/want to have both vac heads set up.

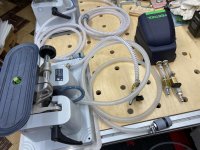
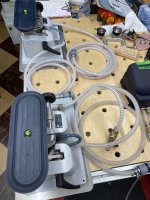
So, by reconfiguring the parts of the SE 2 along with adding a few extra items, I can use just the SE 1 by itself or simply add the SE 2 when it's needed. The foot valve is also a stand-alone item and can be stored away by itself. I like the options.

SE 1 stand-alone with 2 hoses.
SE 2 stand-alone with 2 hoses.
Foot valve stand-alone with 2 vacuum connections.

[attachimg=2]

[attachimg=3]
 

Attachments

  • 11315.jpg
    11315.jpg
    344.5 KB · Views: 1,355
  • 11320.JPG
    11320.JPG
    432.8 KB · Views: 1,515
  • 11321.JPG
    11321.JPG
    887.6 KB · Views: 1,377
Im a big fan of vacuum clamping and even made my own vac-sys head.  However, since I use a conturo instead of an iron I find very little need for the rotating and tilting capabilities of the vac-sys.  I always planned on buying it but glad I didnt.  I find a simple vacuum pod made from plastic works great for me.  I simply attach a couple 20mm dowels to the bottom and it plugs into the dog holes of the mft and I use some 6mm tubing and push to connect fittings to attach it to the pod.  I use a simple pneumatic valve from amazon for 16 bucks to toggle the vacuum on/off which a prefer to a pedal I would probably be tripping over half the time.  You can make the pods from dense wood or russian birch too if you dont have any plastic material just seal it up with some wood glue.  You can make them any size or shape for practically nothing.  The biggest investment is the vacuum pump but that can be made from an old compressor for cheap too if you prefer.  Check joes woodworking he sells all the parts needed.  I converted my old trim gun compressor for about $100 It was a good compressor but since all my traveling nail guns are battery powered I didnt need it anymore.  I was about to get rid of it till I thought of converting it.  It works great I use it for vacuum clamping and bagging and it works perfectly.  It even cycles on/off instead of running non stop like the festool pump. 

I would say "IF" your primary reason for getting the vac-sys is for edge banding and "DONT" own a conturo then the money spent on the vac-sys is waaaaaaaaay better put towards a conturo.  The tilting and rotating head is a nice feature but most cabinets only need one edge edge banded and the rare occasion that requires rotating a part I can flip my toggle switch grab the part and rotate it  myself just as fast as reaching down loosening the knob rotating and then tightening the knob again.  I know some will say well its easier to do with the vac-sys with big panels.  yes and no really big panels will/should need two pods anyways so in that case you still cant rotate.  So to me the rotating is more of a gimmick.  When using the conturo you need to let the banding cool anyways so the work flow doesnt typically need rotating anything. slap it down, flip the toggle to clamp it, run the banding, flip toggle again to release, grab part and stack it somewhere to cool, repeat. 
 
I didn't like having to fuss with the hoses when storing.  I bought 8mm hose, really cheap, from Automation Direct and use the push/pull function to disconnect.
 
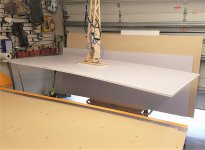
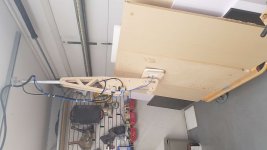
Once you start down the road with vacuum clamping the possibilities are endless.  Here is a photo of a vacuum clamp/lift I designed and built.  It raises and lowers, swivels and the head pivots so I can grab a sheet vertically off of an A frame cart and place it on the cnc.  It rides in a piece of unistrut on the ceiling.  The vacuum pod in the photo is the same kind I use for the MFT vacuum clamp the only difference is it has a couple dogs screwed to it so it can be placed anywhere on the MFT. 
 

Attachments

  • 20210308_154645.jpeg
    20210308_154645.jpeg
    202 KB · Views: 526
  • 20210322_112816.jpg
    20210322_112816.jpg
    552.1 KB · Views: 483
here is a pic of one of the original clamping pods I made.  this was the prototype and the vacuum pod was RB sealed with some titebond.  These worked well but as I mentioned in my other post I prefer just to have the pod that plugs into the mft holes since I never really used the tilting, swiveling anyways and like to kiss it but that would depend on what you build primarily. Point is the pods are very simple you just need a router and some epdm cord.  Some people dont even do that and just stick some type of gasket cord to the face of a piece of wood and dont even bother cutting in the groves. 

I have found that the push to connect fittings do leak slightly when used with vacuum.  Its very small but I have a lot of them in the system since my pump is plumbed throughout the shop and located in a separate shed.  I have 2 drops plus a 3rd line for the vacuum sheet mover.  I have one drop to power my vacuum bag and one drop near the bench to power the clamps.  each has a ball valve so I can turn them on/off as needed.  My point is I recently went through switched out a lot of the 6mm push connect fittings to 3/8 hose and barb fittings and cut my pump cycling drastically.  Im not sure if I just had one bad fitting somewhere or what but the barbs seem to be more air tight.  I still have plenty of the push to connect fittings in the system but the 3/8 hose runs up to the ball valve and then I use the push to connect fitting from the ball valve to the clamps.  This way I can quickly disconnect and store them when not in use.  When I shut the ball valves my system stays on 24/7 and I never notice the pump cycling when not in use. If I need the clamps I just plug in the the 6mm tube to the other end of the ball valve and turn it on.  You dont need big lines for vacuum like compressed air. 6mm line is plenty and 4mm would probably even work as will 8mm but anything over 6 is overkill really.  You will get a little extra reserve vacuum with bigger lines but its marginal at best and the festool pump never shuts off anyways and if you convert a air compressor you will have the tank so its kind of a moot point. 

Also one of the other big advantages of switching an old compressor over a vacuum pump is you can utilize the tank as reserve vacuum.  I used a 4cfm 4 gallon compressor so I always have 4 gallons of reserve vacuum.  When I vacuum bag the pump hardly ever cycles on.  I never timed it but it probably only kicks on every 4-8 hours.  Most of the time the glue has set long before that.  However I have used epoxy in the past and left the parts in overnight. The 4 gallons of reserve comes in handy when drawing down large vacuum bags or reducing cycling when clamping.  But I will confess I do usually draw out 90% of the air from a vacuum bag with my CT first which works really good to draw the bag down fast.   
 

Attachments

  • clamp.jpg
    clamp.jpg
    622.8 KB · Views: 472
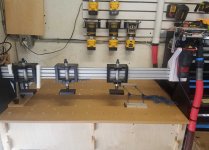
Not only is vacuum clamping somewhat addictive but pneumatic clamping too.  Here is a doweling station I made.  The vertical clamps slide along the 80/20 rail for doing different width panels (which was recycled and cut down from my old MFT fence) but the horizonal clamps can be plugged anywhere into the MFT top much like the vacuum pods I made.  Since I register off the bottom of the DDF40 its important to make sure the piece is tight and flat to the bench top. The upper clamps and 80/20 rail slide front to back on some linear guides. When not in use I can push it to the rear and use the bench for other small tasks.  Pneumatic clamping is pretty cheap and very effective.  The ability to clamp or release multiple clamps with the flick of a switch is very handy.
 

Attachments

  • mafell.jpg
    mafell.jpg
    974.2 KB · Views: 499
[member=73094]afish[/member] Would love to see more of your shop. It looks like you have some very creative setups.
 
afish said:
I have found that the push to connect fittings do leak slightly when used with vacuum.  Its very small but I have a lot of them in the system since my pump is plumbed throughout the shop and located in a separate shed. 

My point is I recently went through switched out a lot of the 6mm push connect fittings to 3/8 hose and barb fittings and cut my pump cycling drastically.  Im not sure if I just had one bad fitting somewhere or what but the barbs seem to be more air tight. 

Ya, those push-on connectors were originally developed to prototype vacuum/pneumatic systems and then once the kinks were worked out, they'd be replaced with some form of hard plumbing. All of those fittings will leak a little bit and the more fittings the more apparent the loss. If you can hard plumb the majority of your system and keep the push-ons to a minimum, then they'll work fine.

Really nice job on the vac lift for sheet goods... [big grin]...that's pretty slick. Does it work on sheets of MDF?
 
theres not much else to show. The rest is just typical machines and systainers and tool totes stacked in every possible inch of free space.  I will try to take some photos of the mft vac pod later. I dont see any on my hard drive. It is exactly like the pod on the lifter because I originally built the lifter with 2 pods that were attached to the other half of my 80/20 leftover fence.  However I found out it was actually harder with 2 pods vs. 1 pod and was much more bulky.  That one pod supplies around 1000# of holding force so 2 was overkill anyways for handling sheet goods. Thats when the aha moment happened and I screwed a couple plastic dogs I make to the back of it.  I usually attach them to bench cookies and that greatly improves the bench cookie experience.  My primary motivation is space since Im only in a 2 car garage and here in Florida the laundry is in the garage a lot of times so I actually have less than a 2 car garage space. My saving grace is I have a shed that is built off the side of my garage so I keep all the noise generating equipment in there(air compressor, dust collector, vacuum pump, and shop vac) If you look close at the mafell shot you will see the 2" pvc I ran from the shed to the garage and have a few ports for small tools like the domino, sanders and ddf40 This gives me peace and quiet from all the noise and any stray dust that escapes the DC. My shop is always in some type of transition and always evolving from my need of space.  I am currently working on building a folding vacuum press since I dont have the space for a full 4x8 press to be out all the time and Im not a huge fan of vacuum bags (to hard getting large items in and out) I still have a few more cabinets to build but it is started.

The mafell table will actually be getting removed next.  In favor of using a smaller more portable drilling template like they sell but I will be making my own that attaches via vacuum so I can get rid of the mafell bench to make room for a laser.  The ideas are still evolving in my head for the mafell jig but getting close.

My other little project will be a a dial indicator and jig so I can quickly and "perfectly" get either my ddf40 or domino "perfectly centered" in the material or matched to the cnc spacing but typically centered is best for me and reduces having to have left/right/top/bottom etc. parts.  Waiting on digital dial indicator now the first one that Amazon dropped off was damaged in shipping.  I have a few dial indicators now but since I need it to read backwards (from plunge to extended) the digital one is easier. The dial type required to much math and introduced to many possibilities for errors for me. 

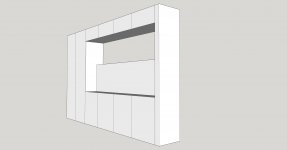
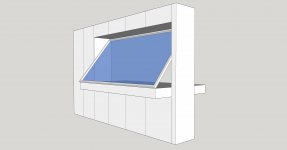
I posted the vacuum press rendering before but will post again incase some missed it. then I will probably turn to my MFT bench.  It is in need of a rebuild since it has been cut down or changed a few times now and is cobbled together.  I discovered I needed the bench mount for the conturo so the center section of the bench needs to come out to put in the conturo. Luckily I dont use it for cutting only clamping so it doesnt really matter if the holes are perfectly aligned. I think I have found a size that works for me (30"x97") is about the max anything else I add or enlarge is going to require either moving or a commercial space both of which I would like to avoid and would also require me to transition from hobby to job.
 

Attachments

  • closed.jpg
    closed.jpg
    239.9 KB · Views: 355
  • open.jpg
    open.jpg
    339.3 KB · Views: 343
Cheese said:
afish said:
I have found that the push to connect fittings do leak slightly when used with vacuum.  Its very small but I have a lot of them in the system since my pump is plumbed throughout the shop and located in a separate shed. 

My point is I recently went through switched out a lot of the 6mm push connect fittings to 3/8 hose and barb fittings and cut my pump cycling drastically.  Im not sure if I just had one bad fitting somewhere or what but the barbs seem to be more air tight. 

Ya, those push-on connectors were originally developed to prototype vacuum/pneumatic systems and then once the kinks were worked out, they'd be replaced with some form of hard plumbing. All of those fittings will leak a little bit and the more fittings the more apparent the loss. If you can hard plumb the majority of your system and keep the push-ons to a minimum, then they'll work fine.

Really nice job on the vac lift for sheet goods... [big grin]...that's pretty slick. Does it work on sheets of MDF?

yes but the pump will run constantly if trying to lift mdf since it bleeds a lot of air and I suspect a hard enough bump it would let go.  I dont usually use it for non finished material its easier to just grab it and slap it up on the cnc but finished goods with a nice veneer or laminate that I dont want to risk scratching is different story. 
 
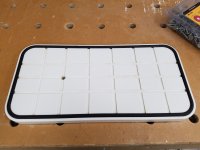
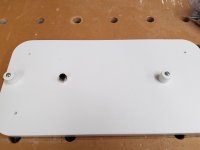
So here is the vacuum clamping in its simplest form. This pod, a pump, a $16 dollar valve and some tube and fittings is all thats really needed.  It can plug into the MFT anywhere and the push to connect fitting fits into a 3rd dog hole.  As I mentioned I had made one that tilted and swiveled but for what I do I never used all that.  Typically I just need to hold a panel flat and securely to run the conturo or trimmer.  Quickly and efficient clamping is what I needed.  when edge banding or trimming two clamps is typically needed and that gets a little monotonous every time.  I do need to make a narrow one but this handles most panels but some drawer parts need a narrower unit.  Those plastic dogs work good with the pneumatic clamps or bench cookies too. I typically use bench cookies with the dogs for sanding or polishing.  the pods are easy to make and if you need to hold a panel vertically it wouldn't be to hard to fashion a way to attach them to the side of a bench.  If you need the infinite adjustability of the vac-sys then cool but I would suspect most would be happy with just the two positions. 
 

Attachments

  • pod.jpg
    pod.jpg
    217.2 KB · Views: 420
  • pod back.jpg
    pod back.jpg
    405.4 KB · Views: 377
you can use lots of different material for the gasket.  What I use is EPDM cord from McMaster Carr. (this will require routing in the groves including one for the cord. Others have simply used some closed cell weather stripping.  You can probably find something at lowes/HD.  If the weather stripping is firm enough you dont even need the grooves. The EPDM cord is pretty soft so it compresses easily and the grooves are just there to assure the vacuum is evenly distributed across the entire surface.  If you have a larger pod and hard rubber gasket you have the potential to deform the panel.  At 20"hg is about 10 psi of clamping force so a 12x12 pod will can have 1440# or more.  It doesnt take much depending on what you are trying to do.  THat pod in the photo is bigger than needed but it was left over from another project so I use it but it doesnt "need" to be that large. 

Its fun to mess around with the vacuum/pneumatic clamping but once you do you will wanting to do it for everything. You have been warned.
 
Back
Top