SittingElf
Member
- Joined
- May 28, 2013
- Messages
- 1,371
My wife wants to do some veggie gardening this summer. I already put together a simple 6" raised bed garden for her in the back yard, but we needed something to keep the animals and the dog out, so I started looking for a solution.
I found the Veg Trug which is expensive for a product made in China.....Much more that I wanted to spend and is delivered in an IKEA style system requiring assembly.
[attachimg=1]
I looked at the product and thought "I should be able to build this a lot cheaper", and so the build saga began.
With only the picture to reference from, I took the metric measurements shown in the photo, and converted to closest imperial, and then went to the BORG to buy lumber to build. I am a little crippled, because I only brought tools up from our Florida home to the Georgia rental for things I thought I'd need for other pending projects. I've made do, but it would have helped to be in my full shop. (Especially for dado's and half-laps on the table saw and/or router table)
I cut most of the major pieces to size, and equally spaced the panels that form the sides of the planter...
[attachimg=2]
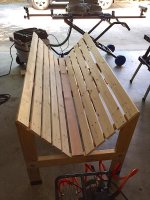
Cut the legs to size and then spent a lot of time trying to figure the angle of the miter required at the top of each leg, so I clamped the uncut frame together to carefully lay the panels into the frame to mark the approximate angles.
[attachimg=3]
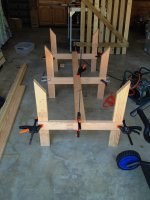
Having gotten an eyeball look at the angles, I did a few shallower miter cuts, and kept going back to the frame to check if it was flush at the top yet, and then going back to the Kapex to increase the miter angle repeatedly in stages.... Ended up finding that I needed a 52 degree miter for a perfect fit. I was then able to set the exact height of the cross beams from the floor, and needed to cut half-laps in them; the legs, and the longitudinal brace. All 15 of them! I would have used my Carvex for the half-laps, but I realized that I had only brought the 75mm blades, and needed the 105's. Not long enough with the 75's to do a longitudinal cut through the ends of 2x4's. Also no way to set up a jig for any of my routers, and didn't really have a bit that would be appropriate anyway. SO..... off to the Kapex for about 2 hours of dadoing and trenching the required cuts. PAIN IN THE BUTT!!! I was also very disappointed in the dust collection on the Kapex while doing these cuts. I have to figure that out because it ain't what I paid $1400 for!! Once the miters, half-laps, and dado's were completed, I did a test assembly using only clamps. It seems to be as perfect as I can hope for.
[attachimg=4]
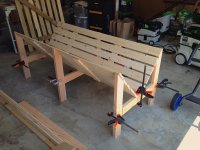
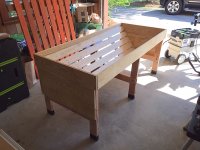
Finally, at this point, I used my PDC and a 1/2" bit to drill the holes in the legs and braces for the 1/2" bolts used to hold the frame together. Once done, and loosely bolted, I checked the fit once again and I'm pretty happy with the progress.
[attachimg=5]
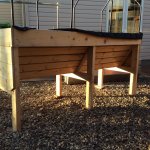
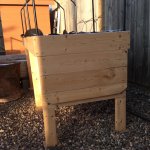
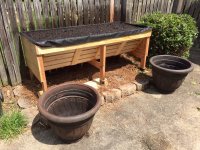
That's where I left it until this point. I took a trip to Highland Woodworking in Atlanta today to take a break. Tomorrow, hopefully I'll get close to completion with the hard attachment of the panels, and then the 1x6 tops surrounding the whole planter. Still deciding what simple finish to spray for a little outdoor protection against weather and UV, but can't interfere with plant growth or health.
Tools used so far:
Kapex (Sizing, Half-Laps, Trenching dado's, Rabits)
CXS (Pilot holes)
PDC (Screws and hard drilling)
Festool Stabila LVL1400 (1400mm Level)
I'll add more as I progress. Comments and suggestions are welcome.
Cheers,
Frank
I found the Veg Trug which is expensive for a product made in China.....Much more that I wanted to spend and is delivered in an IKEA style system requiring assembly.
[attachimg=1]
I looked at the product and thought "I should be able to build this a lot cheaper", and so the build saga began.
With only the picture to reference from, I took the metric measurements shown in the photo, and converted to closest imperial, and then went to the BORG to buy lumber to build. I am a little crippled, because I only brought tools up from our Florida home to the Georgia rental for things I thought I'd need for other pending projects. I've made do, but it would have helped to be in my full shop. (Especially for dado's and half-laps on the table saw and/or router table)
I cut most of the major pieces to size, and equally spaced the panels that form the sides of the planter...
[attachimg=2]
Cut the legs to size and then spent a lot of time trying to figure the angle of the miter required at the top of each leg, so I clamped the uncut frame together to carefully lay the panels into the frame to mark the approximate angles.
[attachimg=3]
Having gotten an eyeball look at the angles, I did a few shallower miter cuts, and kept going back to the frame to check if it was flush at the top yet, and then going back to the Kapex to increase the miter angle repeatedly in stages.... Ended up finding that I needed a 52 degree miter for a perfect fit. I was then able to set the exact height of the cross beams from the floor, and needed to cut half-laps in them; the legs, and the longitudinal brace. All 15 of them! I would have used my Carvex for the half-laps, but I realized that I had only brought the 75mm blades, and needed the 105's. Not long enough with the 75's to do a longitudinal cut through the ends of 2x4's. Also no way to set up a jig for any of my routers, and didn't really have a bit that would be appropriate anyway. SO..... off to the Kapex for about 2 hours of dadoing and trenching the required cuts. PAIN IN THE BUTT!!! I was also very disappointed in the dust collection on the Kapex while doing these cuts. I have to figure that out because it ain't what I paid $1400 for!! Once the miters, half-laps, and dado's were completed, I did a test assembly using only clamps. It seems to be as perfect as I can hope for.
[attachimg=4]
Finally, at this point, I used my PDC and a 1/2" bit to drill the holes in the legs and braces for the 1/2" bolts used to hold the frame together. Once done, and loosely bolted, I checked the fit once again and I'm pretty happy with the progress.
[attachimg=5]
That's where I left it until this point. I took a trip to Highland Woodworking in Atlanta today to take a break. Tomorrow, hopefully I'll get close to completion with the hard attachment of the panels, and then the 1x6 tops surrounding the whole planter. Still deciding what simple finish to spray for a little outdoor protection against weather and UV, but can't interfere with plant growth or health.
Tools used so far:
Kapex (Sizing, Half-Laps, Trenching dado's, Rabits)
CXS (Pilot holes)
PDC (Screws and hard drilling)
Festool Stabila LVL1400 (1400mm Level)
I'll add more as I progress. Comments and suggestions are welcome.
Cheers,
Frank