Veg Trug type planter for my wife...

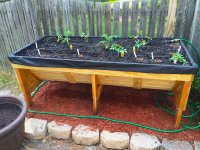
And now, it's planted!

I also didn't like the pine straw underneath originally, so I replaced it with red cypress mulch. Looks a lot better in my opinion.

Set up soaker hose irrigation on a timer, so plants will get regular watering during the summer heat when my wife forgets! [scared]

Plants = Tomatoes (five varieties), herbs (x3), cucumbers, and spinach.

[attachimg=1]

Back to Nigeria for six weeks next week. Hope this all survives until my return in early July! [big grin]

Cheers,
Frank
 

Attachments

  • Planted.jpg
    Planted.jpg
    529.2 KB · Views: 31,787
Thanks Frank for generating the Vegtrug knock-off idea.  Built mine over the weekend, just in time to receive some tomato and lettuce seedlings.  Pictures of the build:

For the half-lap joints, I secured the 2x4s together with scrap on one end and a clamp on the other and did some rail guided routing with the OF1400:

[attachthumb=3]

Secured the legs with glue and a carriage bolt through the joint, and then determined the right angle on the verticals:

[attachthumb=1]

Putting together the slats, with scrap for 1" spacers:

[attachthumb=2]

Cut the assembled slats to size and square:

[attachthumb=4]

Attaching the slats:

[attachthumb=5]

Attaching the edge pieces:

[attachthumb=6]

Cutting the end caps to size:

[attachthumb=7]

All finished:

[attachthumb=8]

Plants now have a home:

[attachthumb=9]
 

Attachments

  • IMG_4643.JPG
    IMG_4643.JPG
    557.2 KB · Views: 1,775
  • IMG_4639.JPG
    IMG_4639.JPG
    536.7 KB · Views: 10,024
  • IMG_4638.JPG
    IMG_4638.JPG
    613.9 KB · Views: 5,037
  • IMG_4637.JPG
    IMG_4637.JPG
    583.2 KB · Views: 3,417
  • IMG_4636.JPG
    IMG_4636.JPG
    526.3 KB · Views: 2,142
  • IMG_4634.JPG
    IMG_4634.JPG
    471.2 KB · Views: 1,776
  • IMG_4626.JPG
    IMG_4626.JPG
    450 KB · Views: 2,331
  • IMG_4632.JPG
    IMG_4632.JPG
    498.5 KB · Views: 1,815
  • IMG_4630.JPG
    IMG_4630.JPG
    570.7 KB · Views: 2,127
Nicely done Ed! [big grin]

I smacked my head when I saw how you did the half-laps.  I should have thought of that! [embarassed]

Let's post pics in the Summer when the plants are producing!

Cheers,

Frank
 
[member=20326]SittingElf[/member]  - Frank you inspired me to promise the boss her raised-bed Mother's Day gift (What do you give when you neglect to have the gift in time?.?.? An IOU!) would be ready to plant by Memorial Day, just made it...

The boss wanted a 2 tier planter, so I went with 2 narrower troughs. Planning Phase:

[attachthumb=1]

[attachthumb=2]

[attachthumb=3]

Dry fit:

[attachthumb=4]

The peanut gallery (a pair of nesting gold crested night herons):

[attachthumb=5]

Test fit:

[attachthumb=6]

Final product:

[attachthumb=7]

I neglected to get a photo but the legs are tied together with thru-bolted trestles. It all breaks down for storage in the winter. SWMBO is happy, & along with the MIL is out playing in the dirt right now.

Mission accomplished!

RMW


Attachments

  • ScreenClip [9].png
    ScreenClip [9].png
    1.9 MB · Views: 2,728
  • ScreenClip [8].png
    ScreenClip [8].png
    870.8 KB · Views: 2,394
  • ScreenClip [7].png
    ScreenClip [7].png
    764.1 KB · Views: 868
  • ScreenClip [6].png
    ScreenClip [6].png
    2.1 MB · Views: 1,221
  • ScreenClip [5].png
    ScreenClip [5].png
    729.4 KB · Views: 951
  • ScreenClip [4].png
    ScreenClip [4].png
    2 MB · Views: 979
  • ScreenClip [3].png
    ScreenClip [3].png
    2.1 MB · Views: 1,180
That is a REALLY nice shallow planting system. Very esthetically pleasing! [tongue]

Cheers,
Frank
 
Frank,
Thanks for sharing and providing the inspiration.  My wife and I are building a new home this year (and I'm building all the cabinets and milling all the trim) so this will need to wait until I'm in the new shop, but it will need to be one of the first projects next spring.  Wife will love it!!  (Maybe she'll be OK with me buying another Festool?!?).

One question:  Did you apply any finish?  If so, what did you use?

Regards,
Gerald
 
After looking at others I copied as best I could.  Wife doesn't know these exist yet, was able to get them done while she is gone for a couple of weeks.  She will have to decide on the placement on the patio, then we will put the liners in and fill them.  I used Cedar fence pickets for the spaced interior boards, ripped them down with the TS55.

[attachthumb=2] [attachthumb=3] [attachthumb=4] [attachthumb=5]
 

Attachments

  • photo 2b.JPG
    photo 2b.JPG
    135.8 KB · Views: 7,476
  • photo 2a.JPG
    photo 2a.JPG
    107.5 KB · Views: 6,798
  • photo 1x.JPG
    photo 1x.JPG
    130.1 KB · Views: 3,176
  • photo 1y.JPG
    photo 1y.JPG
    124.2 KB · Views: 4,107
  • photo 1w.JPG
    photo 1w.JPG
    119 KB · Views: 3,533
Gerald_D said:
Frank,
Thanks for sharing and providing the inspiration.  My wife and I are building a new home this year (and I'm building all the cabinets and milling all the trim) so this will need to wait until I'm in the new shop, but it will need to be one of the first projects next spring.  Wife will love it!!  (Maybe she'll be OK with me buying another Festool?!?).

One question:  Did you apply any finish?  If so, what did you use?

Regards,
Gerald

Hi Gerald,

I just used two spray coats of Thompson's Water Seal. Available at the big box stores. It basically protects the wood from water and I didn't want to use anything that might affect the plants or food safety.  Seems to work really well.

Have fun building, but be careful...my neighbors and in-laws saw this and want me to build the same system for them at some point!

Cheers,
Frank
 
groveb said:
After looking at others I copied as best I could.  Wife doesn't know these exist yet, was able to get them done while she is gone for a couple of weeks.  She will have to decide on the placement on the patio, then we will put the liners in and fill them.  I used Cedar fence pickets for the spaced interior boards, ripped them down with the TS55.

[attachthumb=2] [attachthumb=3] [attachthumb=4] [attachthumb=5]

Happy to see I've started a trend! [big grin]

As for yours, the regular design calls for another spacing at the bottom of the side rails to allow for water drainage without pooling. (Look at my build at the inside bottom cross beam.  You can still salvage yours I think, by drilling some holes in the 2X4 cross beam.  Pooling that lingers might cause the cross beam to warp or rot quickly.  Otherwise...VERY NICE builds, and your wife will love them!

For those building to approximately the same dimensions, you can buy the pre-formed liner through Amazon at the following link. Cheap and saves a hassle of trying to work with a roll to fit. The link is for the full size Trug...the same as I and others built. (Yes, the picture shows the smaller size, but the liner is for the larger version)

http://www.amazon.com/Compact-VegTrug-Planter-Replacement-Liner/dp/B00EOW6NU6

Cheers,
Frank

 
SittingElf said:
groveb said:
After looking at others I copied as best I could.  Wife doesn't know these exist yet, was able to get them done while she is gone for a couple of weeks.  She will have to decide on the placement on the patio, then we will put the liners in and fill them.  I used Cedar fence pickets for the spaced interior boards, ripped them down with the TS55.

[attachthumb=2] [attachthumb=3] [attachthumb=4] [attachthumb=5]

Happy to see I've started a trend! [big grin]

As for yours, the regular design calls for another spacing at the bottom of the side rails to allow for water drainage without pooling. (Look at my build at the inside bottom cross beam.  You can still salvage yours I think, by drilling some holes in the 2X4 cross beam.  Pooling that lingers might cause the cross beam to warp or rot quickly.  Otherwise...VERY NICE builds, and your wife will love them!

For those building to approximately the same dimensions, you can buy the pre-formed liner through Amazon at the following link. Cheap and saves a hassle of trying to work with a roll to fit. The link is for the full size Trug...the same as I and others built. (Yes, the picture shows the smaller size, but the liner is for the larger version)

http://www.amazon.com/Compact-VegTrug-Planter-Replacement-Liner/dp/B00EOW6NU6

Cheers,
Frank

Frank,

Thanks for the heads up, I didn't catch that detail, shouldn't be too hard to fix at this point.
 
SittingElf said:
groveb said:
After looking at others I copied as best I could.  Wife doesn't know these exist yet, was able to get them done while she is gone for a couple of weeks.  She will have to decide on the placement on the patio, then we will put the liners in and fill them.  I used Cedar fence pickets for the spaced interior boards, ripped them down with the TS55.

[attachthumb=2] [attachthumb=3] [attachthumb=4] [attachthumb=5]

Happy to see I've started a trend! [big grin]

As for yours, the regular design calls for another spacing at the bottom of the side rails to allow for water drainage without pooling. (Look at my build at the inside bottom cross beam.  You can still salvage yours I think, by drilling some holes in the 2X4 cross beam.  Pooling that lingers might cause the cross beam to warp or rot quickly.  Otherwise...VERY NICE builds, and your wife will love them!

For those building to approximately the same dimensions, you can buy the pre-formed liner through Amazon at the following link. Cheap and saves a hassle of trying to work with a roll to fit. The link is for the full size Trug...the same as I and others built. (Yes, the picture shows the smaller size, but the liner is for the larger version)

http://www.amazon.com/Compact-VegTrug-Planter-Replacement-Liner/dp/B00EOW6NU6

Cheers,
Frank

Frank,

I bought my liners from DR Equipment

https://www.drpower.com/shop-by-category/gardening/gardening/vegtrug---replacement-liner---medium-1-8m.axd

$10.99 before shipping, shipping isn't too bad if you are buying multiples.
 
groveb said:
SittingElf said:
groveb said:
After looking at others I copied as best I could.  Wife doesn't know these exist yet, was able to get them done while she is gone for a couple of weeks.  She will have to decide on the placement on the patio, then we will put the liners in and fill them.  I used Cedar fence pickets for the spaced interior boards, ripped them down with the TS55.

[attachthumb=2] [attachthumb=3] [attachthumb=4] [attachthumb=5]

Happy to see I've started a trend! [big grin]

As for yours, the regular design calls for another spacing at the bottom of the side rails to allow for water drainage without pooling. (Look at my build at the inside bottom cross beam.  You can still salvage yours I think, by drilling some holes in the 2X4 cross beam.  Pooling that lingers might cause the cross beam to warp or rot quickly.  Otherwise...VERY NICE builds, and your wife will love them!

For those building to approximately the same dimensions, you can buy the pre-formed liner through Amazon at the following link. Cheap and saves a hassle of trying to work with a roll to fit. The link is for the full size Trug...the same as I and others built. (Yes, the picture shows the smaller size, but the liner is for the larger version)

http://www.amazon.com/Compact-VegTrug-Planter-Replacement-Liner/dp/B00EOW6NU6

Cheers,
Frank

Frank,

Thanks for the heads up, I didn't catch that detail, shouldn't be too hard to fix at this point.

I think the solution will be to wedge some plastic shims between the bottom 1x4 and the pieces of cedar sitting on top of it.  I tried that last night and it created a nice 1/4" gap that should allow water to drain out from that area.
 
Billy D said:
Old topic - Gonna be my first - Have 30 days to build and deploy for the Mothers Day - Do I build extra for Ma as well as Mama?  [unsure]

If you order the liners from Williams Sonoma - and use the coupon code "EGGHUNT" - 20% off and free shipping - 25$ for 2 shipped to your door.
http://www.williams-sonoma.com/prod...egtrug|30|best|0|1|24||7&cm_src=PRODUCTSEARCH

Thanks to all of you that previously posted! Great work!

Yes, build more than one!

I saw this thread when first posted, thought I'd have time to build one but with too many other projects ongoing, decided to buy one. My wife was delighted and put it to good use the first summer, however one wasn't enough. So now she has two (also purchased).

Ordered the first from Williams-Sonoma, and decided to get the covers at the same time. The frame only comes with the greenhouse cover, the other two (insect and frost) require that frame. One of the items was back-ordered, when it finally arrived, I opened the package to find some sort of indoor curtain. Umm, not quite. Sent it back, got something totally unrelated to VegTrug the next time. Sent that back, got a duplicate of one of the covers I already had. At this point, I gave up, they told me to simply keep it.

Ordered the correct cover and VegTrug #2 from Gardener's Supply in Vermont.  The wood color differs from VegTrug #1 but my wife doesn't care. Oddly enough, she still hasn't used any of the covers. Figures.

In winter they're covered with tarps, she's anxious to get going with planting pretty soon.
 
I agree...thanks Frank for the motivation.  Unfortunately, I did not take build pictures...rookie mistake.  However, here is my version about 95% complete.  My wife cannot wait to use it, and my sister-in-law and mother-in-law are waiting patiently for theirs [eek]

View attachment 1
View attachment 2
View attachment 3
 

Attachments

  • IMG_0143.JPG
    IMG_0143.JPG
    1.8 MB · Views: 589
  • IMG_0144.JPG
    IMG_0144.JPG
    1.9 MB · Views: 704
  • IMG_0145.JPG
    IMG_0145.JPG
    1.8 MB · Views: 643
nappys said:
I agree...thanks Frank for the motivation.  Unfortunately, I did not take build pictures...rookie mistake.  However, here is my version about 95% complete.  My wife cannot wait to use it, and my sister-in-law and mother-in-law are waiting patiently for theirs [eek]

...

Well - Still time for the drawings then ;)

[hiding monitor from Haus-Boss' view]
 
Richard/RMW said:
[member=20326]SittingElf[/member]  - Frank you inspired me to promise the boss her raised-bed Mother's Day gift (What do you give when you neglect to have the gift in time?.?.? An IOU!) would be ready to plant by Memorial Day, just made it...

The boss wanted a 2 tier planter, so I went with 2 narrower troughs. Planning Phase:

[attachthumb=1]

[attachthumb=2]

[attachthumb=3]

Dry fit:

[attachthumb=4]

The peanut gallery (a pair of nesting gold crested night herons):

[attachthumb=5]

Test fit:

[attachthumb=6]

Final product:

[attachthumb=7]

I neglected to get a photo but the legs are tied together with thru-bolted trestles. It all breaks down for storage in the winter. SWMBO is happy, & along with the MIL is out playing in the dirt right now.

Mission accomplished!

RMW

All the planters are very nicely done. Rich, you said yours breaks down for winter storage. I take it the planter troughs lift off and the legs look like they fold up is that correct? Something like that would work out well on our deck. Wife would love it I'm sure. I was thinking of using cedar as its plentiful in these parts, cheap, and resists rot, what wood has everyone else used?
 
Bob D. said:
I was thinking of using cedar as its plentiful in these parts, cheap, and resists rot, what wood has everyone else used?

[member=60461]Bob D.[/member]  I just used pine for the bed and normal 2x4s for the legs, and then coated everything in Thompson's.  I just planted this summer's vegetable garden yesterday, in fact -- two years on it's still holding up, though I would probably do it in cedar if I had to do it again, just so that I didn't have to bother reapplying the water seal every couple of years.  The spray on rubber coating for the feet is a good idea, too.


Attachments

  • 20170529_075143.jpg
    20170529_075143.jpg
    373.8 KB · Views: 821
  • 20170529_075305.jpg
    20170529_075305.jpg
    390.2 KB · Views: 845
Back
Top