Walnut lamp project

rvieceli

Member
Joined
Feb 4, 2008
Messages
2,384
Thought I would start a thread on a new project I’m starting on instead of sanding and finishing the stuff that needs it.  [eek]

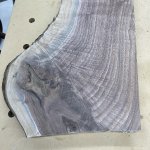
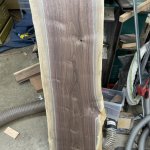
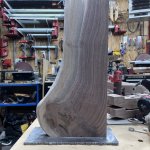
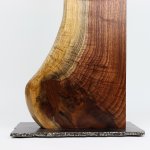
Milled this piece of walnut up today. The photo does not do it justice. The color is outstanding. The compression curl is stunning. Overall gorgeous.

[attachimg=1]

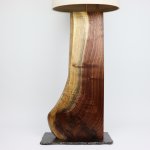
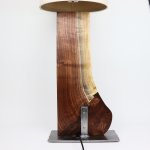
I think it’s going to be a table lamp. The piece may have other ideas.  [tongue]

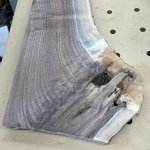
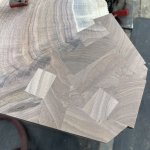
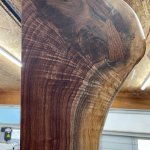
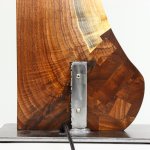
Here’s the challenge. This is the other side.

[attachimg=2]

Kind of scary right? Can’t plane this dude flat without losing too much thickness. Overall it is right where it will work. I have to remove and replace the rotten parts so the plan is to build up the edge thickness while doing that.

The challenge will be to NOT spend so much shop time completing it that I’d need to charge a price that very few would pay.

We’ll see how it goes.

Ron
 

Attachments

  • 529A92BE-BBE4-4F12-A4CE-E67E95A66C2A.jpeg
    529A92BE-BBE4-4F12-A4CE-E67E95A66C2A.jpeg
    965.9 KB · Views: 1,030
  • 71752295-4557-46B2-BC20-D4F2A56741E2.jpeg
    71752295-4557-46B2-BC20-D4F2A56741E2.jpeg
    796.4 KB · Views: 984
Nice chunk of wood. Can’t wait to see what you’re going to do with it. That grain is 👍
 
Ron, does the piece absolutely need to be flat? I have a bench/table that I made from a large potato chip slab. Similarly if I'd milled it flat the 10/4 slab would have ended up around 3/4".

Instead I jigged up and cut some coplaner pockets in the bottom so I could attach legs of the same length, sits evenly on the floor yet the top retains the original warp. Feature, not bug...

Just a thought, absolutely love your typical design aesthetic.

RMW
 
Richard thanks. I have been thinking about doing that as well. Just repair the voids and the rotted sections and the RO 90 and just smooth that area where it dips. I’ve done that before and it has worked.

That area has a lot of bark inclusions, some rot and insect damage. It looks like there was small branch there and the tree grew around it.

I think I have an outline of a plan. I started to say a plan but that’s so unlike me.  [tongue]

Ron
 
First blood.

[attachimg=1]
 

Attachments

  • 296DBCE0-6A8D-4A0E-B5FE-16AAB8399753.jpeg
    296DBCE0-6A8D-4A0E-B5FE-16AAB8399753.jpeg
    536.4 KB · Views: 910
This'll be interesting.  [popcorn]

That walnut is STUNNING Ron.  [thumbs up]
 
More progress. Still plenty of time to screw up though.  [eek]

[attachimg=1]

[attachimg=2]
 

Attachments

  • 0500A6F9-CBB9-4AFB-9552-059D79FEEB42.jpeg
    0500A6F9-CBB9-4AFB-9552-059D79FEEB42.jpeg
    637.6 KB · Views: 882
  • 59D30625-5BD9-4222-AAA9-A69DCBB874DE.jpeg
    59D30625-5BD9-4222-AAA9-A69DCBB874DE.jpeg
    512.8 KB · Views: 860
That’s funny…that’s exactly what I was going to suggest, the famous “rvieceli rectangular wood patch” process.  [cool]
 
Here’s the straight part from my funky piece. Gotta love that color. 

[attachimg=1]

Ron
 

Attachments

  • DF5906B5-4CDE-4317-9586-88D2D9EF0025.jpeg
    DF5906B5-4CDE-4317-9586-88D2D9EF0025.jpeg
    152 KB · Views: 841
This turned out better than I thought.  [big grin]

Just have to take care of a spot on the reverse and then break out the Kutzall disk to sculpt the inlays to match the original.

[attachimg=1]

Ron
 

Attachments

  • 2A108E3D-8A6F-49A0-95A5-6F8DE8128E5F.jpeg
    2A108E3D-8A6F-49A0-95A5-6F8DE8128E5F.jpeg
    545 KB · Views: 730
rvieceli said:
This turned out better than I thought.  [big grin]

Nice Ron...that's such a slick solution.  [smile]

How much time did it take to implement the "“rvieceli rectangular wood patch process"? I'm assuming the Shaper Origin was at the forefront of this task?
 
[member=44099]Cheese[/member] none of the new fangled high tech stuff for me. Router and chisel.

Started Monday, took the last clamps off that side this morning. Should finish up on the other side today.

Ron
 
I don’t think it turned out too badly.  [big grin]

May get some more edge shaping and I may slim it down by taking a bit off the straight side.

Ron

[attachimg=1]

[attachimg=2]
 

Attachments

  • 69AC8DF9-C29A-4A70-AB7E-1A96E18B6BF5.jpeg
    69AC8DF9-C29A-4A70-AB7E-1A96E18B6BF5.jpeg
    539.5 KB · Views: 697
  • 2FA30784-0055-48E6-86B9-6B9D2DABEE6C.jpeg
    2FA30784-0055-48E6-86B9-6B9D2DABEE6C.jpeg
    495.6 KB · Views: 703
Put this aside for for a bit. Got back to it today. Welded up a base, fitted the walnut to it. Now I need to drill for electrics and then start sanding.

[attachimg=1]

[attachimg=2]

Ron
 

Attachments

  • 682CD8D6-C3C2-465A-B2FF-8171BD410C7B.jpeg
    682CD8D6-C3C2-465A-B2FF-8171BD410C7B.jpeg
    520.4 KB · Views: 536
  • A69A060E-0421-4C13-B7B9-B9F4BDA36A33.jpeg
    A69A060E-0421-4C13-B7B9-B9F4BDA36A33.jpeg
    533.9 KB · Views: 549
Nice!  You always do some interesting stuff.  Looking forward to the finished product.

Mike A.
 
Got the first coat of Osmo Polyx on this thing. Stunning!!!

[attachimg=1]

[attachimg=2]

Ron
 

Attachments

  • CE13F53E-071F-40BE-9C94-0E638BD4E856.jpeg
    CE13F53E-071F-40BE-9C94-0E638BD4E856.jpeg
    643.3 KB · Views: 438
  • DA7C4384-B262-4282-89F7-7C20D8CA36E4.jpeg
    DA7C4384-B262-4282-89F7-7C20D8CA36E4.jpeg
    667.2 KB · Views: 414
Finally managed to get this thing finished up. Dragged it in for a quick photo session.

Ron

[attachimg=1]

[attachimg=2]

[attachimg=3]
 

Attachments

  • IMG_1097.jpg
    IMG_1097.jpg
    1.5 MB · Views: 248
  • IMG_1104.jpg
    IMG_1104.jpg
    1.4 MB · Views: 215
  • IMG_1107.jpg
    IMG_1107.jpg
    1.5 MB · Views: 256
[attachimg=1]

[attachimg=2]

Thanks for following along.

Ron


Attachments

  • IMG_1117a.jpg
    IMG_1117a.jpg
    1.4 MB · Views: 262
  • IMG_1113a.jpg
    IMG_1113a.jpg
    1.8 MB · Views: 231
Back
Top