Weathered wood

cfullen

Member
Joined
May 15, 2011
Messages
62
I'm getting more and more inquiries about building projects in this finish. Mostly wanting me to recreate a piece from restoration hardware, pottery barn, etc.

Two part question here.

1.  What wood is best to use?  Pine is ok, but too soft for me to sell to a client as a lifetime piece. What are you guys using for these projects?

2.  I realize there are hundreds of methods for aging the wood. What is your favorite? 
 
Vinegar and steel wool solution,  various ratios can be used. I have been doing a lot of this oxidizing finish lately.  Not much luck adding tannins with black tea though.
 
Oak and cherry will react quickly and go black.  I am finishing up a rift sawn white oak table now and need to water down the mixture a fair amount. Alder will react as well.
 
I'm actually going to test out the steel wool and vinegar method on White Oak for a project I'm considering.  Will post some pictures when they're available.  But in the meantime, keep us updated with photos if you come across any good methods.

cfullen said:
I'm getting more and more inquiries about building projects in this finish. Mostly wanting me to recreate a piece from restoration hardware, pottery barn, etc.

Two part question here.

1.  What wood is best to use?  Pine is ok, but too soft for me to sell to a client as a lifetime piece. What are you guys using for these projects?

2.  I realize there are hundreds of methods for aging the wood. What is your favorite?
 
If you want a raised grain worn look, Makita makes something they call a "Wheel Brush Sander" model 9741.  The sander uses 4" diameter wheels that are just under 5" wide. The wheels are either abrasive nylon bristles available in a few different grits, or steel wire wheel drums. The makita sander can be used to remove surface coating or raise the grain of the wood.

There are similar "burnishing machines made for refinishing metal surfaces that can use similar wheels. The ehhels for the normal burnishing machines are usually a maximum of 4" wide. The burning machines might would give you s wider variety of other accessories to use since a number of companies now manufacture them.


This is one video showing the makita in use.


This is another.

Festool sells something in Europe that can be used similarly called the Rustofix BMS 180 e Brush machine.

Since the Festool isn't sold in North America Bosch, Metabo, Flex, snd Walter Abrasives all sell something similar.

Non of the tools are cheap especially once you add in the cost of the bristle wheels.
 
Yeah, even if Festool suddenly made the RustoFix available stateside, not sure if I could justify the cost -- it would be nice to have dust collection on this operation though.

Has anyone compared the Makita with the Metabo?

Rip Van Winkle said:
If you want a raised grain worn look, Makita makes something they call a "Wheel Brush Sander" model 9741.  The sander uses 4" diameter wheels that are just under 5" wide. The wheels are either abrasive nylon bristles available in a few different grits, or steel wire wheel drums. The makita sander can be used to remove surface coating or raise the grain of the wood.

There are similar "burnishing machines made for refinishing metal surfaces that can use similar wheels. The ehhels for the normal burnishing machines are usually a maximum of 4" wide. The burning machines might would give you s wider variety of other accessories to use since a number of companies now manufacture them.


This is one video showing the makita in use.


This is another.

Festool sells something in Europe that can be used similarly called the Rustofix BMS 180 e Brush machine.

Since the Festool isn't sold in North America Bosch, Metabo, Flex, snd Walter Abrasives all sell something similar.

Non of the tools are cheap especially once you add in the cost of the bristle wheels.
 
This guy has a good method for esp. distressed look finishing:


Make sure to check out his other vid’s. He uses reclaimed stuff a lot.
 
I've been doing a lot of "weathered" projects for customers lately.  Just grab some different colors of paint and stain and start experimenting.  I have a bunch of scraps in the shop with different color combos on different wood species that I use for reference.  Fortunately, this style works best with the less expensive wood species.  I've experimented with walnut and maple but never gotten good results.  I prefer Western Red Cedar for most projects but have been experimenting more with White Oak lately and getting good results.

Cedar:
i-bNznT62-L.jpg


i-KHSJRFC-L.jpg


i-m9bHHmS-L.jpg


Painted surfaces on this one are poplar and alder:
i-p377Fww-L.jpg


White Oak and walnut:
i-58ZTdct-L.jpg
 
Man, that's a lot of work to make something look like it was rescued from a barn.

Bert Vanderveen said:
This guy has a good method for esp. distressed look finishing:


Make sure to check out his other vid’s. He uses reclaimed stuff a lot.
 
I realise that this is not quite what the OP had in mind but...

I met a chap from California not long ago who recognised me and we got chatting. He distresses wood by using high voltage. I saw several photographs of his work and it is stunning. He took a microwave apart and used the transformer to generate the high voltages required to "put lightening" through the wood.

I Googled it and found this video - not by the chap that I met:


Peter
 
Here's a test I did of the vinegar/steel wool solution on a piece of white oak.  Soaked 1 pad of 0 grade steel wool in 16 oz. of vinegar for 24 hrs, strained twice with a coffee filter, then applied with a lightly dipped cotton rag.

Came out a lot darker than I expected.  I think m aybe I will try to scuff sand it to get some more variation in the color, then perhaps seal it with a clear coat when dry.
 

Attachments

  • 20160302_223739.jpg
    20160302_223739.jpg
    2.6 MB · Views: 303
  • 20160302_223729.jpg
    20160302_223729.jpg
    2.8 MB · Views: 268
  • 20160302_223750.jpg
    20160302_223750.jpg
    2.4 MB · Views: 265
Edward A Reno III said:
Here's a test I did of the vinegar/steel wool solution on a piece of white oak.  Soaked 1 pad of 0 grade steel wool in 16 oz. of vinegar for 24 hrs, strained twice with a coffee filter, then applied with a lightly dipped cotton rag.

Came out a lot darker than I expected.  I think m aybe I will try to scuff sand it to get some more variation in the color, then perhaps seal it with a clear coat when dry.

I find pine works best for this method. I do use a foam brush dip it in the vinegar stain mix brush it on DO NOT WHIPE IT OFF. Let it dry the next board do 2 coats the same way the 3rd board I would brush it on and whip it off immediately this should give variations in the wood when put together.
 
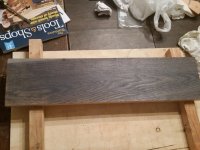
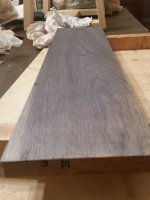
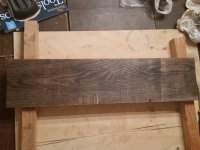
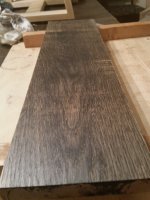
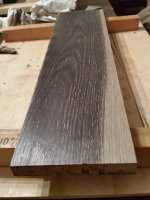
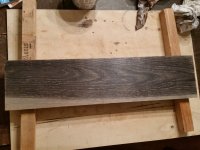
Just wanted to do an update on my test.  By request, I actually applied a finish of Osmo to the side initially stained with the vinegar and steel wool solution.  To compare it with what a normal, water-based polyurethane finish would look like, I turned over the board, applied a new application of the stain, then sealed it with two coats of the poly.  I gave it a light hand sand with 220 between the coats, which surprisingly still exposed some small spots of the wood at the top of the grain, as you can see in the pictures.  I think the polyurethane looks much better than the Osmo.  The Osmo darkens/yellows the underlying wood, which contrasts unfavorably with the stain, while the water based poly preserves the bluish/metallic tone.

This is not quite an apples to apples comparison though.  Here are the variables:

1.  Before applying the Osmo on the first side, I gave it a light hand sand with 150 grit paper, which is why the wood grain shows through a bit more.  Looking at it now, I don't think this was necessary -- or, if I were to do it on a real project, I would probably sand down the board first before applying the stain.  Right now, this board still has the planing marks.

2. The stain applied to the other side is actually more concentrated/charged with iron.  The original solution was 16 fluid oz. of vinegar with a steel wool pad soaked for 24hrs.  After straining this solution and applying it to the first side, I stuck a fresh steel wool pad in and soaked it for an additional 24 hrs.  I actually like how dark it gets.
 

Attachments

  • 20160303_225307.jpg
    20160303_225307.jpg
    2.9 MB · Views: 247
  • 20160303_225317.jpg
    20160303_225317.jpg
    2.7 MB · Views: 244
  • 20160304_072116.jpg
    20160304_072116.jpg
    2.4 MB · Views: 229
  • 20160304_072135.jpg
    20160304_072135.jpg
    2.7 MB · Views: 273
Back
Top