What do you use to fill in large cracks in solid timber slabs?

Acrobat

Member
Joined
Jun 30, 2008
Messages
471
Hi
I have made a few bathroom seats lately, quite simple stuff, textured surfaces using the festool 850 planer with the funky blade. Man that thing makes chips fly. Then sanded and stained and waxed.
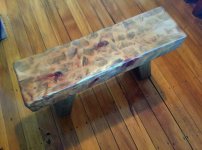
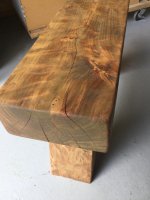
Anyway after much sanding and smoothing down it looked fab, but I have left the items for a while and notice long cracks in the top of one of them. Not really deep just visually unappealing (so my missus says anyway).
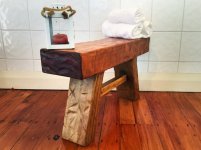
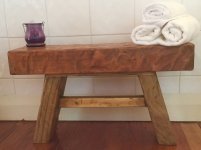
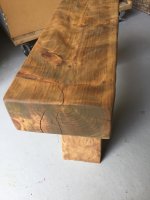
It's Macrocarpa timber, (sold here in NZ for garden walkway sleepers) which I thought I'd try. I assume its slowly drying and cracking. Wasn't completely dry when I got it I think. I doubt whether it'll ever be a major fault that would weaken it substantially if at all, but I'd like to fix it with some sort of clear filler. Any recommendations or advice is welcome, indeed needed! Here's a pic of a previous one I did which is fine. I'll take a pic of the new one showing the crack later today if I can. It's a rather thick slab so am not worried of losing any strength, just would like to give it a better look since the wife reckons she wouldn't buy one that showed open cracks and thinks others wouldn't either. (I actually like 'em! as I think it gives it more character but what do I know).
So why filler/s do you use or should I use on something like these?
thanks

[attachimg=2][attachimg=3]
 

Attachments

  • IMG_0202.JPG
    IMG_0202.JPG
    144.5 KB · Views: 1,645
  • IMG_0201.JPG
    IMG_0201.JPG
    114.2 KB · Views: 6,400
  • IMG_0199.JPG
    IMG_0199.JPG
    163.6 KB · Views: 5,952
Here's a pic of the top. I'll see if I can put up one of the actual offending cracks later today.
 

Attachments

  • IMG_0202.JPG
    IMG_0202.JPG
    144.5 KB · Views: 925
Here on this side of the pond I use West Marine Two Part Expoxy System  You can mix in some sawdust from a piece of wood to fill in and match the bench. I get mine in a marine supply store might be something to look into if you can get it
 
2part epoxy, ok will have look in my local store and see what's available. Thanks
Here's a view of what's happening at the moment...
 

Attachments

  • image.jpeg
    image.jpeg
    675.5 KB · Views: 1,779
  • image.jpeg
    image.jpeg
    622.7 KB · Views: 898
It depends what you're intended look is, but i usually use 2 part epoxy as well.  I use "System 3", but west is good as well. It's possible to tint the 2 part epoxy with dyes or stains.  I've only used water/alcohol based dyes and stains to do this.  If this thing is a huge void...i've made them look like knots by filling, gouging and refilling with darker dye in the center. Some people choose to "highlight" the cracks and voids adding brilliant or glow in the dark powders to the epoxy...the possibilities are limited mostly by your imagination!!!
 
Yeah, thats a great idea highlighting the cracks. There's a long one I forgot to take a picture of along one of the sides. If I can get it filled in a different colour I reckon that would look great. More than likely the missus would prefer to have the cracks as hidden as possible but if its a strong bond it will be fine ether way and personally would add to the appeal. Thanks for the idea.
 
The cracks belong there, I would suggest to convince the wife that every expert on interior design here at the FOG says so
 
Ha ha.Yeah I agree, some diplomacy will be required methinks, else I just do it anyway ;)
 
Does epoxy hold up over time? As in does it actually stop a split in a big piece of timber that's still got a few years drying still to go from splitting further? I've always wondered if it'd pull apart years down the line and gone down the bow tie spline route instead.
 
I haven't had any further splitting occur but that being said I won't say it can't occur down the line. I find the Expoxy is thin enough to get into the wood grain in it liquid state and as that it seems to prevent further cracking. I have also done bow ties and Expoxy jointly for looks and strength
 
[member=31413]roblg3[/member] I was actually going to get some system three for this very purpose, but I was a bit confused/bewildered by all the choices on their site, and their tech support folks haven't called me back yet, so I was wondering what is the basic option to get for crack filling on slabs (and one which dries clear or relatively clear, allowing me to add tint if I want or not).

roblg3 said:
It depends what you're intended look is, but i usually use 2 part epoxy as well.  I use "System 3", but west is good as well. It's possible to tint the 2 part epoxy with dyes or stains.  I've only used water/alcohol based dyes and stains to do this.  If this thing is a huge void...i've made them look like knots by filling, gouging and refilling with darker dye in the center. Some people choose to "highlight" the cracks and voids adding brilliant or glow in the dark powders to the epoxy...the possibilities are limited mostly by your imagination!!!
 
From my experience, epoxy (West System included) will not keep a crack from opening up further if the wood wants it to happen.  I would reinforce it with dovetail keys first and epoxy, once I feel that the wood is fairly stable.
 
Those cracks looks great and with a piece of timber that size your bound to get a few more. We also use a 2 part epoxy resin (they say it's "elasticated"). Dry flex or Reno flex. Used for timber rot repairs. But to be honest I wouldn't bother. But those cracks bring character. Filling will look naff
 
As long as one does not collect a wild hair on the edge of a crack... extracting it in a cross between tweezers and a claw hammer...

I think filled or unfilled would look good.
If it is in a kitchen with food, then filled.
In a bathroom with water, probably filled makes sense.

I would take either - it looks great.
 
My experience with system 3 is that it's quite clear and not as yellow at all as many of the others i've seen.  Just know, that ALL epoxies need a uv blocker on top or will weather quickly if place in the sun, EVEN when indoors.i use a uv stabilized top coat, unless the piece is supposed to be "rustic" i'd not fill the gaps, but reinforce to prevent further splitting.
 
Since the wood is apparently wet -- what is the moisture level in the wood?  Can you seal up the wood to minimize further drying?
Alternative thought, put metal straps around the ends (roughened up and antiqued/hammered, etc). Rustoleum makes a nice line of hammered paints.  Just adds to the aged look. It might help with large cracks.  In the sense of stopping/retarding the growth of cracks (not in the sense of decorating), you drill a hole of some diameter larger than the point of the crack.
 
Keep in mind that most all epoxies are mixed to a thick consistency (like bees honey) and will not flow very easily into those cracks very deep at all.  I have tried using a blade to force the epoxy down into cracks with poor results then I discovered that West Systems makes a formulation for this purpose.  It's a specially formulated to be able to flow into deep cracks but, it must be used in stages since there's a lot of solvent in this formula (that's what allows it to flow) but it will need to dry between layers.

I have used it and bought some small plastic graduated cups from a medical supply store that were very cheap and mixed the epoxy  a small batch at a time filled the cracks (I used blue painters tape to seal the sides and bottom if necessary) let it cure several hours and repeat until the epoxy stands proud.
http://www.westmarine.com/buy/west-marine--penetrating-epoxy--P015023724

I have used this on several projects including oily woods like rosewood with complete success.

If you want to use another formulation for the wider cracks, West Systems has flexible system called GFlex which I have used to fill large voids in timbers.
http://www.westmarine.com/buy/west-system--g-flex-epoxy--P004_120_001_507

Jack
 
Oh, and then there's a hornet's nest of problems you encounter when pouring any kind of runny material into a crack.

Where does the crack go, how well sealed is this crack on the escape routes for the liquid, how much did you like your bench before you poured this runny liquid all over it via a piece of timber.

Food for thought, I speak from experience.
 
Back
Top