What is your preferred Festool way to build a craftsman style newel post?

I had a hard time visualizing it at first with the over cut.  For those visual folks,  I drew a quick example on sketch up and sure to help visualize it.  Seems like a time saver (I was hesitant to put a 1/4" groove in if I had to do it after assembly.  Pre-assembly seems much simpler.)

See the sketch up just for fun:

Backside showing the over-cut-
[attachimg=1]

Frontside with perfect inset 1/4" ply, and 1/2" reveal
[attachimg=2]

overanalyze said:
tjbnwi said:
Before, it is easier and no one will see the over cut once you install the cap on the post.

Tom
Good point...you wouldn't ever see it.
 

Attachments

  • Screen Shot 2015-02-17 at 8.41.55 PM.png
    Screen Shot 2015-02-17 at 8.41.55 PM.png
    22.8 KB · Views: 4,608
  • Screen Shot 2015-02-17 at 8.42.12 PM.png
    Screen Shot 2015-02-17 at 8.42.12 PM.png
    7.5 KB · Views: 4,650
I agree.  That sounds pretty solid.

Thanks Tom!

overanalyze said:
tjbnwi said:
Route a dado 3/4" wide by 3/8" deep, in the posts about 6" down from the top. As you assemble the post insert a piece of 1x with a 3/4" hole in the center. locate the post center on the floor drill 3/4" hole. Use a length of 5/8" threaded rod to draw the post to the floor by tightening the nuts on the rod.

Tom
Rock solid technique! Very good advise Tom.
 
I'll be sure to post some pictures.

Thanks for the advice!

overanalyze said:
I enjoy getting to do projects like this. I look forward to some progress pics [member=40570]Grasshopper[/member]
 
Grasshopper said:
Bryan,

I too am sad.  I had a lot of hope for the lock miter.  It is pretty frustrating!  I ran last night and purchased some 1x2 pine just to run scrap through as a final test.  Being soft pine, I made the cuts with just one pass, and the joint came out perfect.

Not sure what went wrong with 3 passes on the Maple.  Perhaps the OF1400 met it's match with the harder wood?  Not sure there.

Yes I used a CMT bit, no setup blocks exist.  The frustrating part was I setup the bit to work perfectly with short runs of scrap.  The issue came into play when I'd route the 40" long runs.  I suspect the CMS insert rings may play a role as the hole around the 2" bit is fairly wide when you use the appropriate table insert ring.  I think long runs may have a tendency to get pulled down into the cutter

I've never used MDO before, something to consider.

bkharman said:
I am sad that you gave up on the lock miter bit!  If you want, stick with ¾ MDO and get the matching setup blocks for your bit. MDO routes very well and you might not have the issues you had with maple.

What was the lock bit manufacturer?  CMT?

Cheers. Bryan.

Ps:  in any event, go with MDO. Very nice, stable and durable product.
One trick I used to eliminate making multiple passes with the router was to run the boards through my table saw with the blade set at 45 degrees. I would only take a portion of the corner of the board off so I could still create the full lock miter profile but enough that I only had to take a single pass on the router table. I Thing this gave me a more accurate joint.

Hope this helps
 
Grasshopper Beware! of running your rabbit's all the way through. If you want to rabbit before you assemble that's fine just do a start and stop rabbit. That way you have the full 3/4" to pocket hole or domino together your face frame. with the rabbits run through your taking out the material to close to were your screws are going to attach most likely splitting the stile. The domino route won't split it but there is less glue surface and I say the more the better. Well I said my peace hope it helps and good luck.
 
Someone may have already posted this thought. but when I have had to make this style post(inside or outside use) I built the panels the same way as a cabinet door( if fact I have made many into hidden storage cubbies). You have a Dimino or a plate jointer, at least I thought I read that you did in other post. All post are small cabinets when done in this style(non-turned). If you are worried about the joint showing(you really don't have to with modern glues) run a shallow groove in the seam & the mating edge(I have used a "V" & a saw kerf, both make a nice detail). Also don't give-up on the mitre lock yet, just over size the rails until you get the joint you want & then rip the stock to size. Good luck
A quick note; To be a great tradesperson is to be able to take a mistake & make into something great. Too often folks strive for the  wrong goal, please yourself (or your client) not anyone else.
 
These post have 5/8" threaded rod trough the center to secure them to the floor.

Tom
 

Attachments

  • Joe%2520Kitchen%2520019.jpg
    Joe%2520Kitchen%2520019.jpg
    26.2 KB · Views: 976
  • Joe%2520Kitchen%2520020.jpg
    Joe%2520Kitchen%2520020.jpg
    26.3 KB · Views: 1,005
  • Joe%2520Kitchen%2520021.jpg
    Joe%2520Kitchen%2520021.jpg
    33.6 KB · Views: 1,036
This may have already been posted here but I would make four stile & rail frames using dominos and/or pocket screws.

Use a rabbeting bit with a bearing in a handheld router to make room for a plywood panel.  Make two passes - the first one should be a climb cut with your biggest bearing to avoid tear out.  The second pass should go the opposite direction with the bearing for your desired rabbet.

Use a trim router with a straight bit to clean out the corners so that they will accept the plywood panel.  This is done by hand and does not need to be pretty.

Apply your panel with glue and pin nails.

Now you can either run your panels through a tablesaw to miter the long edges or just put the whole thing together with butt joints (which is not a cardinal sin when doing Craftsman style).
 
*Update*  I am going to do butt joints, and have all the hard maple that I need to complete the two box newel style posts (they will actually be supporting a granite slab on my island, but they will be in the box newel style).

My primary concern is strength, so I'm wrestling a little with how to build these.  The simplest method would be for me to construct the rails and stiles similar to a face frame (x4), and glue each face frame to a mitered 3/4" plywood panel (similar to shown here:  http://www.finehomebuilding.com/pdf/021176075.pdf)

I'd join the rails and stiles using domino's and upon assembly, I'd glue the plywood miter (probably a 46 degree cut with the TS55 to make sure it doesn't cause problems), and rely on dominos and glue face frame to face frame for each assembled frame for final alignment/strength (only glue in the mitered ply "under box").  I'd butt each joint together flush with dominos, so no flush trimming needed.

To me, this seems like the strongest option, because there is a 3/4" plywood box inside the frame, vs. 1/4" panels dadoed into the voids.  This also seems simpler.

The question/issue with using 3/4" plywood is it creates a 3/4" reveal on the rails and stiles vs. a 1/2" reveal that would be if I went with inset panels.  My design calls for the completed post to be 5 1/4 wide, so the center "panel area" is the same width as the stiles which are 1 3/4".  (I realize using narrower stiles would make the center panel area wider, but I do prefer a beefier look).

I made a few templates for reference, showing a plywood post wrapped in 1x2's which shows the full 3/4" reveal of the 1x's.  I made another quick mockup with a piece of 1/4" scrap inset, so a 1/2" reveal is established.

I initially felt like the full 3/4" reveal may be too much, but the 1/2" may be too subtle with such a small center "panel" area.

What sayest thou FOGgers?

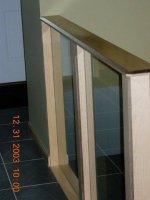
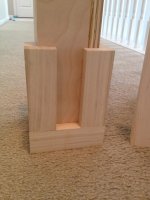
Picture of full 3/4" reveal (trim wrapped flush on plywood 3/4" box)
[attachimg=2]

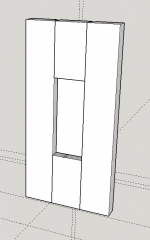
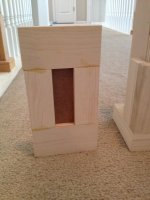
Picture of partial 1/2" reveal with 1/4" panel dadoed into back
[attachimg=3]

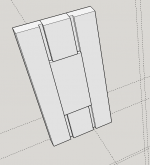
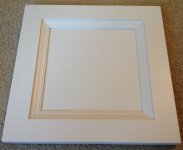
Picture of both together for reference:  (yes the center in the 1/2" reveal is a little narrower than the final product would be.  Just the scrap I had laying around for a quick look)
[attachimg=1]
 

Attachments

  • IMG_7342.JPG
    IMG_7342.JPG
    142.4 KB · Views: 5,237
  • IMG_7344.JPG
    IMG_7344.JPG
    184.1 KB · Views: 6,034
  • IMG_7343.JPG
    IMG_7343.JPG
    175.6 KB · Views: 4,693
Thanks Willy, I think you are right on.

I think I lean towards the chinky massive look, over graceful.  At the same time, I don't want it to be overbearing.  Who'd have thunk 1/4" would be so significant?  ;D

…I suppose I can cut the rails and stiles to size, and decide the final reveal tonight or tomorrow.  The feedback here is very helpful indeed.

Sparktrician said:
I'm thinking that the 1/2" reveal looks more like the photo you posted initially.  3/4" will look more massive, but 1/2" will look more graceful, if that's what you're after.
 
Grasshopper said:
Thanks Willy, I think you are right on.

I think I lean towards the chinky massive look, over graceful.  At the same time, I don't want it to be overbearing.  Who'd have thunk 1/4" would be so significant?  ;D

…I suppose I can cut the rails and stiles to size, and decide the final reveal tonight or tomorrow.  The feedback here is very helpful indeed.

Sparktrician said:
I'm thinking that the 1/2" reveal looks more like the photo you posted initially.  3/4" will look more massive, but 1/2" will look more graceful, if that's what you're after.

You can't beat a mock-up for being the decision-maker. 

[big grin]

 
Mock-up + Wife  ;D

Sparktrician said:
Grasshopper said:
Thanks Willy, I think you are right on.

I think I lean towards the chinky massive look, over graceful.  At the same time, I don't want it to be overbearing.  Who'd have thunk 1/4" would be so significant?  ;D

…I suppose I can cut the rails and stiles to size, and decide the final reveal tonight or tomorrow.  The feedback here is very helpful indeed.

Sparktrician said:
I'm thinking that the 1/2" reveal looks more like the photo you posted initially.  3/4" will look more massive, but 1/2" will look more graceful, if that's what you're after.

You can't beat a mock-up for being the decision-maker. 

[big grin]
 
Sorry to be the dissenting opinion but the 3/4-inch panel reveal just looks wrong to my eye.

I generally do either 1/4 or 3/8 depending on whether I'm using plywood or solid panels.  (With solid panels, I use a 3/8 rabbet on the frame and resaw 3/4 stock to 3/8 for glued up panels.)

The 3/4 panel reveal would look better with a 1/2-inch cove molding around the perimeter.
 
I appreciate the variation of opinions.  Dissenters welcome  ;D

I thought a small cove molding was the perfect solution as the panels that I have for the island sides as well as doors have a small transitional molding which a cove or other small trim piece would compliment.

My problem is, with only a 1 3/4" wide recessed "panel" area in the center, using 1/2" cove would eat up a full inch, leaving only a 3/4" "panel".  I think it would look odd, almost like an inverted raised panel, or something like that.

I began thinking about trying to find a 1/4" trim piece to see how that would look.  (I am also a little concerned that to the eye, if the center recessed panel area appeared to be narrower than the stiles, than it may look off to the eye.  Making the overall posts a little wider to make the center wider isn't an option, because at 5 1/4" total x2, they are already making legroom as tight as it can be.  Ripping down the stock isn't an option either, so my options are limited)

I'm open to suggestions for a smaller inset trim piece to ease the reveal a tad.  I'm certainly not the expert for different types of small trim that is available.

See photo of panel below:

[attachimg=1]

deepcreek said:
Sorry to be the dissenting opinion but the 3/4-inch panel reveal just looks wrong to my eye.

I generally do either 1/4 or 3/8 depending on whether I'm using plywood or solid panels.  (With solid panels, I use a 3/8 rabbet on the frame and resaw 3/4 stock to 3/8 for glued up panels.)

The 3/4 panel reveal would look better with a 1/2-inch cove molding around the perimeter.
 

Attachments

  • IMG_7347.JPG
    IMG_7347.JPG
    363.3 KB · Views: 1,174
Grasshopper said:
My problem is, with only a 1 3/4" wide recessed "panel" area in the center, using 1/2" cove would eat up a full inch, leaving only a 3/4" "panel".  I think it would look odd, almost like an inverted raised panel, or something like that.

I agree.  Why do you want the 3/4" plywood sub-assembly?  Are you worried about the 1/4" plywood panels being kicked out or broken?
 
Back
Top