Wish the second setting of the tightness of the domino were less

Mark

Member
Joined
Jan 22, 2007
Messages
271
I've been trying to use the tight setting on my Domino 500 for both pieces but its alway hit or miss even with the most accurate scribe mark. I've been wondering if there has been any feedback on making the setting less loose. If I just has 2mm on either side of the second setting I think I'd be able to nail a flush fit every time.

How are others able to nail flush fits with the domino on the first/tight setting?

Thanks
 
Can't say I have the same problem when using my Domino 500. If it has to be tight, I'll use the tightest setting. If I want to have some room to move to the left of right, I'll use the second setting..
 
Mark Enomoto said:
How are others able to nail flush fits with the domino on the first/tight setting?

I think my approach is pretty standard. Let's say you were joining an edge to a face, as at the top or bottom of a case or as a divider somewhere in the middle. I use the narrow setting on all the domino slots I cut in the edge. I also use the narrow setting on the first slot in the face, the one that is closest to the front (or show) part of the case. Then I use the medium setting on the remaining slots in the face.

The same applies joining edge to edge - narrow setting on all the slots in one board; one narrow and the remaining medium on the second board.

The key is to always use one of the indexing tabs to set the first (front) slot and not rely on a pencil mark for it. This takes your eyesight, parallax, etc. out of the equation and ensure your to boards will be flush at the front. The tabs on machine itself are 37 mm from the centerline of the cutter and the ones on the support bracket are 20 mm from the cutter (I believe).

I've not yet come up with a scenario where I would use the widest setting.
 
I agree with Mr Katz. That’s the same method I use and it’s been very reliable.

Sent from my iPhone using Tapatalk
 
In addition to Katz’s method, which I also follow: On the receiving piece I use one tight setting (referenced of an edge using the tabs) and all the others are medium. The offered piece has all tight domino’s, so there is wiggle room for all holes except the referenced one.
 
Mark Enomoto said:
I've been trying to use the tight setting on my Domino 500 for both pieces but its alway hit or miss
Snip.

How are others able to nail flush fits with the domino on the first/tight setting?

Thanks

You're right that it's a hit or miss business if you rely on the pencil lines to align your pieces. Using the edge stop dogs or paddles for the reference cuts as others have pointed out is the only way to avoid the hit or miss occurrences. (Make sure the dogs are calibrated right at the factory.)

But there're situations in which you can't use the paddles to reference your cuts, and must use pencil lines (unless you have the cross stop accessory for the reach). To overcome the "misalignment" in those cases, you can plunge one of the mating mortises again to widen it a hair, or make the domino slightly narrower.

Widest setting: I've used it to make mortises for use with the buttons for table tops, or to make wide slots (for a clamp-friendly apron), among other things.

I wish that Festool would release a pin base for the paddle base users once the patent concerned expires.


Attachments

  • IMG_0474.jpg
    IMG_0474.jpg
    72.6 KB · Views: 279
Mark Enomoto said:
I've been trying to use the tight setting on my Domino 500 for both pieces but its alway hit or miss even with the most accurate scribe mark. I've been wondering if there has been any feedback on making the setting less loose. If I just has 2mm on either side of the second setting I think I'd be able to nail a flush fit every time.

How are others able to nail flush fits with the domino on the first/tight setting?

Thanks
Hi,

      Do you mean getting two board surfaces flush or do you mean alignment of the pieces length wise? 

      If talking about getting the surfaces flush, then the domino width settings will not help.

Seth
 
I always use the Mark Katz method.
But another thought is your machine calibrated? If not not then when you work the right side you are using one set of pins/paddles, then when you work the left side you are using the other set of pins/paddles when you start off.
 
I'm making some shoji frames so it is like making a face frame for a cabinet. 37mm using the pins is too deep since the rail and stiles are 1.5" and I need to have the domino centered. YES! Using the pins are really the way to go as there are so many variables with a pencil line. I almost "wish" there were detents that you could dial for the tightness of the bit but I also think it is just my eyes and bad lighting and probably too thick a pencil scribe.

I think most of this is just operator error as I don't use my Domino on a daily basis though I've learned to ease into the plunge so the tool doesn't move. Again.. practice makes perfect :-) Thanks for all the advice. Aloha!
 
ChuckM said:
Widest setting: I've used it to make mortises for use with the buttons for table tops, or to make wide slots (for a clamp-friendly apron), among other things.

I wish that Festool would release a pin base for the paddle base users once the patent concerned expires.

Aha - I wasn't thinking of non-dominoing uses for the Domino. Good idea!

I'd love my Domino to be retrofitted with the pins someday but I imagine it would be very expensive - probably mean replacing the entire front end with maybe a few parts transferred from the old one.
 
Mark Enomoto said:
I'm making some shoji frames so it is like making a face frame for a cabinet. 37mm using the pins is too deep since the rail and stiles are 1.5" and I need to have the domino centered.

I think you might find the Trim Stop LA-DF 500/700 accessory (Festool part number 493487) useful for at least the mortises in the 1.5" ends. It can be setup to fit the 1.5" stock and then all you need to do is slide it onto the end of each rail and plunge. If set correctly, it should allow you to cut those slots in rapid succession with repeatable precision.

That doesn't help on the stiles though, where you're mortising the edge rather than the end. For that I suggest making a set of custom setup blocks from some scrap stock. Butt the end of the stile against a stop and use your first setup block (also against the stop) to position the Domino for the first mortise. Use a second, longer, setup block for the next mortise and so forth. If you are reasonably careful and use the same procedure on each stile, the mortises should all line up. You should be able to use the narrow setting for all the mortises.
 
Mark Enomoto said:
I'm making some shoji frames
Snip.

The best approach to dealing with that kind of narrow piece is to build a dedicated jig so each mating piece is registered against a stop for mortising. Someone has shared his adjustable jig where the DF500 is mounted to it, for doing small pieces. 1/4 of the time, I use the DF500 with some kind of a jig or fixture to overcome the limitations of the machine.
 
Maybe I'm the odd one out here.  [scratch chin]

For 95% of the Dominoing I've done, I'll always use the tight fitting on all of the Dominos. The only time I can remember using the Katz method was for a 10' long walnut kitchen countertop.

I'll clamp the 2 boards together so there is no possible movement. Then I'll mark each mortise with a .5 mm pencil. A single stroke of the pencil across the 2 boards. Any more than one stroke and you increase the chance of widening the pencil mark.

Then I'll remove the clamp, separate the boards and position the first board for mortising.

The switch on the DF 500 is rather stiff so I'll position the 500 close to the mortise mark, turn the 500 on and then move the 500 cursor exactly to the pencil mark. I start to plunge but before the cutter hits the wood I glance again at the cursor to make sure it's still on the mark. A little plunge movement with my hand coupled with the vibration of the 500 can move the cursor off the pencil line just a little bit. Plunge slowly at a constant rate and you're good to go.

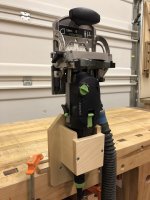
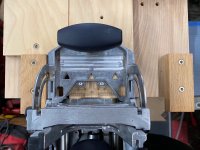
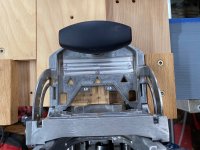
I agree with Chuck, for small items or for a quantity of the same item I prefer to use a jig of some kind. There are commercial fixtures available or you can fabricate your own. Here's a Seneca Dockplate that can be used in the Domino Dock.
https://www.senecawoodworking.com/products/dock-plate-xlhttps://ramonvaldezfinefurniture.com/product/domino-dock-for-df500/

[attachimg=1]

[attachimg=2]

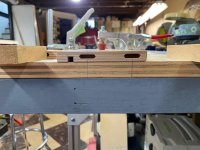
Here's a simple jig I made to fabricate drawers/storage boxes from prefinished drawer sides. The small oak blocks on the LH & RH sides are used as hard stops for the DF 500.

[attachimg=3]

[attachimg=4]

[attachimg=5]
 

Attachments

  • Seneca.jpg
    Seneca.jpg
    63.5 KB · Views: 634
  • DF 500 Domino Dock.jpg
    DF 500 Domino Dock.jpg
    1.3 MB · Views: 683
  • 8431.jpg
    8431.jpg
    725.9 KB · Views: 657
  • 8432.jpg
    8432.jpg
    883 KB · Views: 652
  • 8433.jpg
    8433.jpg
    313.4 KB · Views: 634
Cheese said:
The switch on the DF 500 is rather stiff
Snip.
The switch is something I expect the new DF500 (if and when a new version comes out) to be better at. [scratch chin]

This is the kind of jig I referred to in my last post:https://www.festoolownersgroup.com/...no-jig-for-smaller-parts/msg596062/#msg596062

I've seen something similar, but couldn't locate the link (somewhere else on the web).

The power of the DF, to me, doesn't lie in its functions to do regular joinery (a much cheaper dowel jig can do it), but in its ability to handle angled joinery such as ladders, louvered shutters, splayed structures, etc. But to do all of those, we need to build jigs since the DF can only cut mortises that are parallel to its fence  (the intersecting line technique to cut angled mortises is simply too slow and again, it relies on registering against pencil lines).

If the Festool designers could find a way to make the new DF's fence rotate, angled joinery would be a piece of cake without designing and making your own fixtures.
 
Cheese said:
I agree with Chuck, for small items or for a quantity of the same item I prefer to use a jig of some kind. There are commercial fixtures available or you can fabricate your own. Here's a Seneca Dockplate that can be used in the Domino Dock.

I also use the Ramon dock and Seneca Dock Plate with my DF700.    I add the TSO Big Foot to make mortices on the front of a board.  Easy to clamp to the big foot and use the stops on the dock plate.  I get very accurate and repeatable results with this combination. 

I like your jig for making drawers, I will do something like that next time I have the need.

Bob
 
Back
Top