Woodpecker thin rip guide

HowardH

Member
Joined
Jan 23, 2007
Messages
1,572
I like to make projects using thin strips and was never comfortable getting the table saw fence within a couple of mm of the blade.  I could always use my band saw but it's not very accurate and it would require me to run it through the drum sander to get it to the final thickness.  I saw this advertised several months ago and decided to give it a try.  I have several other WP tools and have for the most part found them worth the money. I had forgotten about ordering it and it showed up in the mail couple of days ago. My initial impressions is that this follows the pattern that woodpecker provides, meaning it's a very well made, heavy, high-quality tool.

[attachimg=1]

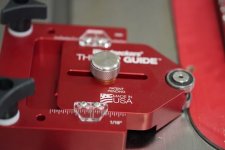
It requires a standard three-quarter inch miter slot and has these hexagonal nuts that slide right in and are tightened by a knob on each side.

[attachimg=2]

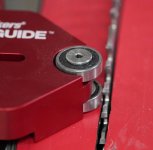
Once it's tightened down, it is rock solid.  The first thing you have to do is set up the plastic scale indicators. That is accomplished by loosening the centerpiece with the big knob and sliding the bearing to where it just touches the blade tooth.

[attachimg=3]

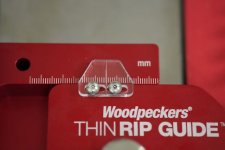
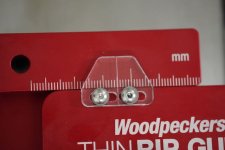
Then you tighten down the center knob and slide the indicator over until it's centered on the closest major mark. It does have both metric and imperial scales which is a nice touch because I use both systems in my projects.

[attachimg=4]

At that point, it's fully calibrated and ready for use. The first thing you have to do is slide the unit toward you so it's a couple of inches in front of the blade. Then, you simply loosen the main nut and slide the centerpiece with the bearing back using the scale to get your desired offcut. In this example, I used 5 mm.

[attachimg=5]

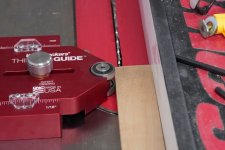
From there, all you have to do is move your fence with the stock until it just touches the bearing and then tighten the fence and begin to rip away! Each offcut is exactly the same.  You can go out a couple of inches if you needed to but I think as long as I can safely get a push stick between the blade in the fence, I won't need to go that far.

[attachimg=6]

I can see using this quite a bit, especially when I'm doing my cutting boards. Again, it's not cheap, but neither are Festools and there's no question that we all share the value of buying quality. It's like the old saying goes, "buy once and cry once!"  If you do a lot of thin ripping, it's definitely worth taking a look at.


Attachments

  • DSC00252.jpeg
    DSC00252.jpeg
    25.3 KB · Views: 602
  • DSC00251-2.jpeg
    DSC00251-2.jpeg
    19.3 KB · Views: 601
  • DSC00255.jpeg
    DSC00255.jpeg
    31.2 KB · Views: 605
  • DSC00256.jpeg
    DSC00256.jpeg
    23.7 KB · Views: 579
  • DSC00258.jpeg
    DSC00258.jpeg
    26.3 KB · Views: 584
  • DSC00261.jpeg
    DSC00261.jpeg
    35.6 KB · Views: 586
Woodpecker should have comped you for the glowing review. 

My other saying for some Woodpecker tools is "Cry once, use once".
 
ha ha... They should!  I have some of those others as well.  The box corner clamps are pretty useless. But back to this guide.  It works as advertised.  I really couldn't find anything wrong with it. 
 
I blame myself for my drawer full of rarely used red aluminum. Terrifically built, but most are single use gadgets. However, I could not be without my 2616 square and Paolini Rule.

I have read many great reviews of the thin-rip guide and may eventually pick up to replace my cheap Rockler version (which works fine). Thanks for your through review!
 
My experience is very similar with the WP thin rip guide.    I am pleased with it.

I used it this week to make some 3/16" shims for a cabinet I made with inset drawers to get the drawer fronts aligned. 

Bob

p.s. I too have mixed experience with Woodpecker tools, some I use a lot, others not so much.  Save that for another post :-)
 
SDWW2019 said:
I blame myself for my drawer full of rarely used red aluminum. Terrifically built, but most are single use gadgets. However, I could not be without my 2616 square and Paolini Rule.

I have read many great reviews of the thin-rip guide and may eventually pick up to replace my cheap Rockler version (which works fine). Thanks for your through review!

For a little bit more money than the plastic Rockler Thin Rip Guide, you could buy this aluminum Woodpecker's rip-off version from Banggood:https://www.banggood.com/FONSON-Woo...stable-Positioning-Fixing-Tool-p-1971108.html . There are other versions there too (such ashttps://www.banggood.com/Tablesaw-J...icing-Positioner-Contour-Gauge-p-1960751.html ).

But, I still happier with the $150 I spent on a DRO for my tablesaw rather than hundreds more on multiple special purpose jigs designed in an era before high accuracy was available to home shops.
 
Was thinking of getting this guide but I have a vintage 1950 Uni that doesn’t have a T miter slot. Was looking for adapters that expand in the slot and stumbled on a 3D print file for a similar guide (Thingiverse). For around $15 made one:

[attachimg=1]
 

Attachments

  • IMG_0079.jpeg
    IMG_0079.jpeg
    1.9 MB · Views: 279
HowardH said:
I like to make projects using thin strips and was never comfortable getting the table saw fence within a couple of mm of the blade.
 

Have you thought about using a 1-2" wide deadman?  Cut it accurately from material the same thickness as the material you're making into strips and the length of your saw's fence.  Apply double-sided tape to one side of the deadman.  Slide it up to the saw's fence and clamp it gently in place to be sure the tape gets an equal grip for the length of the deadman.  Remove the clamps and you should be able to use the deadman as a guide for continuously cutting thin strips.  [smile]
 
I cut thin strips with a jig just like the one shown in this video.  I do have the Gripper push block, but I will usually use the jig as shown in this video.

However, he fails to mention that if you try that with a short piece (say about 6” long) the narrow strip can kick up.  The only time I have been injured on the table saw was when short piece kicked up instead of back. 

I am self-taught in the workshop and I failed to self teach myself about kick-up.

I think the jig shown (the red one) in an earlier post will also be susceptible to kick up.

I did get a narrow kerf blade for when I had a bunch of narrow strips to cut.  If you are cutting 1/4” thick strips with a standard blade, you are throwing out 1/8” with each piece produced.

The downside of that jig is that it is extremely unwieldy for long pieces.

I have the Gripper pusher.  I don’t like it much.  Once the rubber contacts sawdust it loses almost all of its friction.  I keep a spray bottle of alcohol near when I do use it.  I frequently spray the bottom and wipe it off with a towel.

My undersized and underpowered band saw sucks.  But if you have a nice powerful one and a nice wide blade, your scrap is kept to the absolute minimum width the bandsaw.
=6s
 
Packard said:
The only time I have been injured on the table saw was when short piece kicked up instead of back. 

Just wondering, did your tablesaw at the time have a riving knife? I have my riving knife set a couple thou over from the blade, pushing the stock away from the blade as it feeds through. Works well for me.
 
smorgasbord said:
Packard said:
The only time I have been injured on the table saw was when short piece kicked up instead of back. 

Just wondering, did your tablesaw at the time have a riving knife? I have my riving knife set a couple thou over from the blade, pushing the stock away from the blade as it feeds through. Works well for me.

My table saw predates the requirement for a retracting riving knife.  If I were younger, I would replace this saw with one with all the safety goodies.

I do have an aftermarket device in my sale that has a tiny spacer that acts as a riving knife, but ther are plenty of situations where it would not work.

But if you are cutting short pieces with the Woodpecker unit, and that are shorter than the distance to the riving knife from the woodpecker unit, you still are at risk.

I am just pointing out that ripping short pieces like that is a risk.  One that is rarely noted.

I still prefer the jig shown in the video I posted.

Addendum:  Apple’s spell check automatically replaces “riving” in all cases.  I have seen “roving” and “Irving” in this post.
 
Back
Top