Woodpeckers New StealthStop Miter Saw Fence & Stop System

Neither vertical fence nor track. KISS.
 

Attachments

  • No fence no track.JPG
    No fence no track.JPG
    16.4 KB · Views: 427
  • stop block.JPG
    stop block.JPG
    52 KB · Views: 444
4nthony said:
I came across a Wood Whisperer video where he switched to a no fence miter station and relied solely on the miter saw fence as the single material point of contact for square cuts.

If you set up moving block in the same plane as the saw fence and place flip stop on the other end, it will provide another point of contact. Indeed, no need for a continuous fence.

[attachimg=1]
 

Attachments

  • ms.JPG
    ms.JPG
    49 KB · Views: 3,097
4nthony said:
I'm still thinking through how I'd like to configure my future miter station and am leaning towards flush mount but am curious what advantages vertical offers that I'm not considering. With these stops, there's the option of having two stops set up close enough that they overlap (one vertical, one flush) but other than that, are there any advantages to vertical track over flush track? Thanks!


4nthony,

It doesn't necessarily have to be one or the other. With the StealthStop you can have a flush surface mount and add a vertical section in a couple minutes, should you have a project where you're going to need stops very close to each other. The vertical track indexes into a groove in the horizontal track and the brackets slide into both extrusions to lock them together squarely.

I like Spagnolo's theory of the critical alignment being that section right next to the blade. I also agree with his idea that it keeps the work surface more functional when the miter saw is not being used.
 
4nthony said:
I'm still thinking through how I'd like to configure my future miter station and am leaning towards flush mount but am curious what advantages vertical offers that I'm not considering. With these stops, there's the option of having two stops set up close enough that they overlap (one vertical, one flush) but other than that, are there any advantages to vertical track over flush track? Thanks!

If you didn't want a vertical component you could embed both tracks side-by-side and retain the ability to set two stops in close proximity to each other. Lay the two tracks so the wider miter slot which holds the stops are beside each other and position so the back track is just in front of the fence line if it extended out past the end of the saw.

Or, just use on track but position it such that the miter slot is in front of the fnce line and the t-slot is behind the fence line. Then use a flip stop in the t-slot which can be flipped up and back out of the way. This would give the ability to set two stops within 1/16" if you really needed to and you could have multiple stops in either the miter track or the t-slot.
 
Well, I started this thread about 5 months ago, and I received my StealthStop kits about 2 weeks ago. I finally got around to doing something with them. Well one so far. I thought I would share what I had and where I'm at now with the Woodpeckers StealthStop installed.

I removed my old Kreg flip stop system that I have been using for a few years now. I like it well enough but the biggest issue was not being able to set a stop closer than 12 inches from the blade. I have used a spacer to let me reach into that 12 inch space when need be. Not that difficult but I want something different.

So I bought into the StealthStop last Fall and they were shipped out to me a couple weeks ago. I've been busy with other projects and printing parts for the LR32 Adapter Kits and also a number of fence caps for both the MFT/3 and the Woodpeckers SuperTrack used on their drill press table.

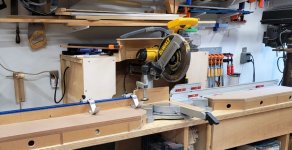
All the while I was thinking about how I might install the StealthStop on my miter station. I didn't want to redo the whole thing. I also thought am I going to get a new mitersaw anytime soon. I've had the DeWalt DW708 for a long time. It still works and cuts fine so I don't see me replacing it in the near future. So I decided to use the StealthStop with what I have which meant cutting the bottom track down to 36 inches. I really hesitated doing this thinking I will probably come up with a better way tomorrow but too late now. :-)

So I removed the Kreg fence and flip stops and figured out how I could mount the SS. I knew it would not be a conventional install. But then I don't believe anyone has posted an install here yet. The only one I've seen is [member=7266]jeffinsgf[/member] when he did his Deep Dive YT video in his shop.

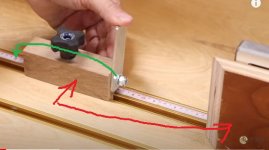
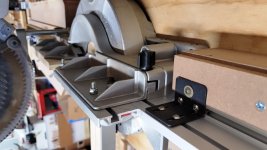
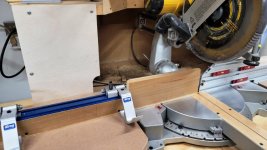
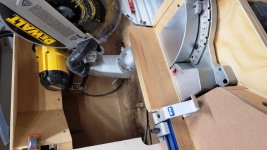
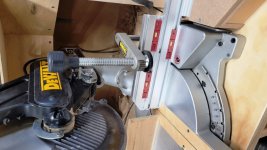
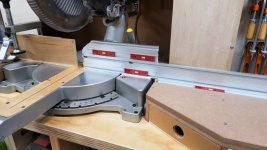
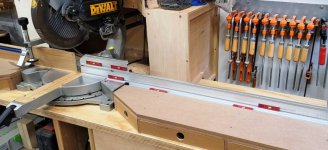
I had to drill the fence to be able to mount the vertical track. The horizontal track I cut 12 inches off because the wing is only 36 inches long. That gives me 48 inches to the right of the blade. I took that 12 inch piece and placed it above the vertical track. That doubled the height for the first 12 inches to 4.5" (each track is 2.25" wide). I was able to secure this piece to the MS fence too using a pair of 1/4-20 HH bolts and nuts.

In the end I gained back 1/4" of crosscut capacity. Previously I had a piece of 3/4 x 4-1/4 stock screwed to the face of the fence. The Kreg flip stop track needs 3/4 material to mount to. But by fastening the SS track to the face of the fence which is only 1/2" thick I got that 1/4" back.

Now I need to work on the left side because the two fence faces do not line up. Should go pretty fast now that I have figured out how to mount it.

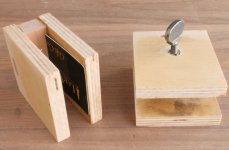
Photos in no particular order.

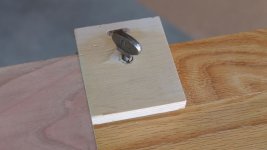
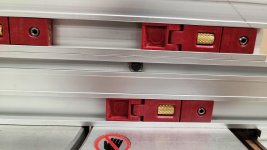
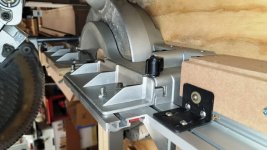
In response to the question [member=44099]Cheese[/member] asked, they are a 'big foot' design.


"I'm also interested in what style ends the set screws have, the "big foot" design or a smaller point style that dents the aluminum rail?"


Attachments

  • StealthStop_RFD  (9).jpg
    StealthStop_RFD (9).jpg
    98.2 KB · Views: 278
  • StealthStop_RFD  (8).jpg
    StealthStop_RFD (8).jpg
    88 KB · Views: 262
  • StealthStop_RFD  (7).jpg
    StealthStop_RFD (7).jpg
    82.5 KB · Views: 235
  • StealthStop_RFD  (6).jpg
    StealthStop_RFD (6).jpg
    113.3 KB · Views: 262
  • StealthStop_RFD  (5).jpg
    StealthStop_RFD (5).jpg
    115.6 KB · Views: 314
  • StealthStop_RFD  (4).jpg
    StealthStop_RFD (4).jpg
    112.4 KB · Views: 285
  • StealthStop_RFD  (3).jpg
    StealthStop_RFD (3).jpg
    110.1 KB · Views: 382
  • StealthStop_RFD  (2).jpg
    StealthStop_RFD (2).jpg
    118 KB · Views: 331
  • StealthStop_RFD  (1).jpg
    StealthStop_RFD (1).jpg
    118.6 KB · Views: 500
  • StealthStop_RFD  (10).jpg
    StealthStop_RFD (10).jpg
    103.6 KB · Views: 304
Back
Top