You are using an out of date browser. It may not display this or other websites correctly.
You should upgrade or use an alternative browser.
You should upgrade or use an alternative browser.
Woodpeckers parallel guide systainer mod
- Thread starter fritter63
- Start date
Slartibartfass
Member
- Joined
- Apr 25, 2014
- Messages
- 1,082
Gwerner said:Has anyone who ordered direct from Woodpeckers received the new connectors? I find it odd that people who ordered through other vendors have received the new connectors and I'm still waiting for mine.
Yup a tad frustrated myself....
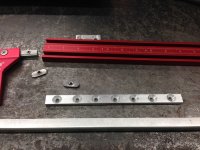
Peter_C said:One of the other things I did was to make a couple of stops out of some scrap aluminum left over after making a new front door sill. I haven't had a chance to fully test them over multiple setup and take downs, but my assumption is I can dial the stops in and instead of having to calibrate every time (Or marking the tracks) I can just butt them up and run em' with some consistency. If it works I need to make another set for my metric rails.
Peter, my cnc machine should be up and running in the next week, maybe I can cut some more of these stops for you as practice? Just need a block of aluminum.
Gwerner said:Has anyone who ordered direct from Woodpeckers received the new connectors? I find it odd that people who ordered through other vendors have received the new connectors and I'm still waiting for mine.
I have received my new connectors and I ordered direct.
I have not received mine and I ordered direct, but I'm not complaining.justaguy said:Gwerner said:Has anyone who ordered direct from Woodpeckers received the new connectors? I find it odd that people who ordered through other vendors have received the new connectors and I'm still waiting for mine.
I have received my new connectors and I ordered direct.
One of the first things I did with my parallel guides was accidentally bend one of the metal rods. I called Woodpeckers and told the lady that I bent that rod and ordered another one and gave her my debit card number. It came about a week later. The invoice was marked "warranty" and they never charged me a thing.
I thought I would let everyone know when someone goes above and beyond. Thanks, Woodpecker. Feel free to send my connectors last.
I received my "connector bars" a few days ago directly from Woodpeckers, where I bought the PGS. The guide system in Systainer arrived a few weeks ago, just before I went on vacation. As I just returned today, I have not yet had a chance to try out the PGS, let alone the modification bars.
I own several Woodpeckers products, and am always impressed with the engineering, quality of workmanship and materials as well as the customer support. In the case of the PGS, I feel that the engineering may have initially fallen a bit short, in light of the fit problems that many of us had. However, you have to give Woodpeckers credit, as they acknowledged the problem, engineered what I am calling a work around, produced and delivered the part, all within a month.
I'm looking forward to trying out the PGS within the week, and will report back when I do. Just setting it up, I do have a couple of initial comments. I would have liked to have seen a knob on top of the connector to attach to the Festool guide rail, similar to the way that Seneca does theirs. As it is, you have to tighten 4 screws (and in the right order, I might add) and this process requires both a Phillips head and a hex tool.
In my opinion, it is best to tighten the Phillips head screws after you tighten the two hex nuts on the connector bar (this is the way that Woodpeckers suggests, as well). It's also best to have the Woodpeckers rail perfectly flat, in a plane with the Festool guide rail. This takes care of itself, assuming that the guide rail and the Woodpeckers rail are already lying on your sheet good. I have noticed that sometimes, even after tightening down the connector, the entire connector can "slip" up or down several degrees, so that the Woodpeckers rail is no longer flat or in the same plane as the Festool track.
I would have liked to have seen Woodpeckers create a new connector, rather than an add-on bar, but I realize that would be costly. Time will tell, and I do need to give the system a fair shot in use. All the little pieces are potentially easy to lose. In particular, the t-nuts that hold the connector to the Woodpeckers rail can easily drop off when you are putting on or taking off the Woodpeckers rail. Since I am a hobbiest working in my garage, having everything neatly broken down in the Systainer may not be a big deal for me, and I may just assemble and calibrate my PGS with 24"-36" Woodpeckers rail on there all the time. But for a tradesman, the ability to neatly break down this system is brilliant.
This is all my two cents worth, and is not at all intended as a negative commentary. If anything, it is meant as a tribute to Woodpeckers, both for their innovation as well as their ability to listen to customers and respond.
I looked at Seneca's system and it appears to be the same connection to the rail as Woodpeckers uses, except with allen head screws. Seneca does use a knob for their rail attachment to the part that attaches to the Festool rail. Not really a benefit if you have to get an allen key out to move the parallel guides to a shorter/longer rail or remove them altogether. In fact I would think Woodpeckers is more solid in that it has two mounting points not one thumb screw. These things are going to take a beating, as you will see when you go to use it.snachlas said:I would have liked to have seen a knob on top of the connector to attach to the Festool guide rail, similar to the way that Seneca does theirs. As it is, you have to tighten 4 screws (and in the right order, I might add) and this process requires both a Phillips head and a hex tool.
My biggest complaint is they didn't include a #3 Phillips which is not a standard size for most tradesman to carry. I said so in the other thread on the PGS. Storing a regular #3 Phillips driver means having a very large handled driver that won't fit in the Systainer with the PGS. I made a little doohickey #3 bit holder to store in the Systainer. The screws should be all allen head even if it requires two different size keys. Allen keys are just easier to store and the keys are cheaper to replace. I need to see if allen head screws are available. As a side note, they are different lengths.
So far I have not noticed any movement. Hopefully it stays that way with time, but I have not had a chance to properly test the new connectors.snachlas said:I have noticed that sometimes, even after tightening down the connector, the entire connector can "slip" up or down several degrees, so that the Woodpeckers rail is no longer flat or in the same plane as the Festool track.
I am sure you will find all kinds of fun projects with a CNC [big grin]fritter63 said:Peter, my cnc machine should be up and running in the next week, maybe I can cut some more of these stops for you as practice? Just need a block of aluminum.
Thanks! Very generous offer. I was already tooled up to complete two more, and actually made three today with one as a spare. Since all I had to do was drill holes, counter sink them, sand, then cut to length, and sand again. Perfect they are not as they are hand made. The material should have been a little wider, but I used what I had. The scrap aluminum, that I ripped thinner on my table saw, is shown in the front of the first photo.
Attachments
TheTrooper
Member
- Joined
- Mar 19, 2015
- Messages
- 243
I got mine last week or the week before from WoodpeckersGwerner said:Has anyone who ordered direct from Woodpeckers received the new connectors? I find it odd that people who ordered through other vendors have received the new connectors and I'm still waiting for mine.
blaszcsj
Member
- Joined
- Feb 21, 2015
- Messages
- 545
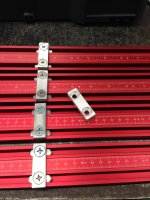
Peter_C said:I went a different direction. Most important the issue has been resolved with the track connection. FWIW I like the silver parts against the red
My goal was to have the PGS pieces left together as much as possible. Function before form is my moto as that is what gets the work done. I found that by taking the top and cutting it apart, allowed the right side to become the left and the left side got flipped and moved to the right. The two lower foam pieces were also reversed. The glue holding them together was non existent. One hole got filled with foam and I cut out the track area for the stops I made, and drilled holes (Drill press at the highest speed setting) for the track joiners. I wanted to leave the end caps on the rods, so the two upper foam ends got cut off also.
Since the set also requires a #3 Phillips I took one of the included 1/4" drivers that come with Simpson structural screws, cut the top off, then welded a small piece of metal to the driver bit. A #3 bit pressure fits into the homemade tool with some masking tape to keep it there (It is actually a 1/4" driver not a bit holder, but it is FREE!). Another hole drilled on the right side of the Systainer stores the #3 Phillips.
One of the other things I did was to make a couple of stops out of some scrap aluminum left over after making a new front door sill. I haven't had a chance to fully test them over multiple setup and take downs, but my assumption is I can dial the stops in and instead of having to calibrate every time (Or marking the tracks) I can just butt them up and run em' with some consistency. If it works I need to make another set for my metric rails.
")
This is a great idea. I think i will be doing this gauge block idea next weekend.
Similar threads
- Replies
- 0
- Views
- 250
- Replies
- 0
- Views
- 326
- Replies
- 19
- Views
- 6K
- Replies
- 16
- Views
- 7K