PaulMarcel
Member
I've been building too many drawers and trays for my sad kitchen to make it much more functional. Existing cabinet drawer fronts and cabinet doors were pulled and tossed. Existing cabinets gutted to the "cube" with the new drawers/trays installed: so much nicer.
But, I have a cabinet with a stack of ovens (micro/convec and Anova Precision) on a side wall. Want to put the cabinet back where it belongs (behind the couch) and put a cabinet that matches the rest of the sad kitchen. So I built the box that will have 4 wide trays on slides and 2 drawers. But, needed a top surface. The rest of the kitchen has a gorgeous granite countertop (more gorgeous than sad kitchen should really have tbh), but the small offcut of those slabs I have isn't enough...
But the colors of the granite are black, gold, and white. I've replicated this color mix with scorching pine when I made people handstand canes and blocks. Ah, there's a story there... 'nuther day
So I'll give it a try with $14.83 of carefully selected 2x4 stock from the big orange box...
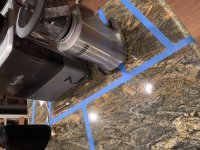
First up, the nicer-than-should-be-in-sad-kitchen granite... including blue-tape lines modeling the top of a future cabinet beside the island for shown coffee stuffs...
View attachment 1
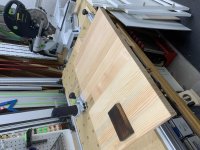
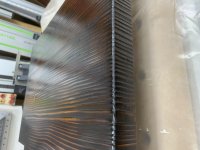
The tubafor slab with the bevel edge and bevel waterfall piece. The chunk of Beech is to keep that end-grain piece straight. Wait, some people told me kiln-dried meant it would never move! smh...
View attachment 2
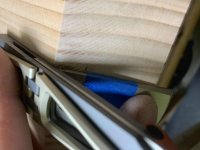
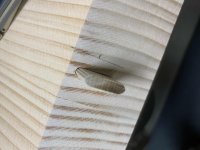
Close-up of Domino placement. You want it this way for long-grain-to-long-grain (okay, crossed at 45º...) glue joint. The usual in-the-manual way puts the Domino in a hole absolutely full of end-grain. Only good for alignment, but this is cranky Orange-box tubafor so it needs more "insistence":
View attachment 3
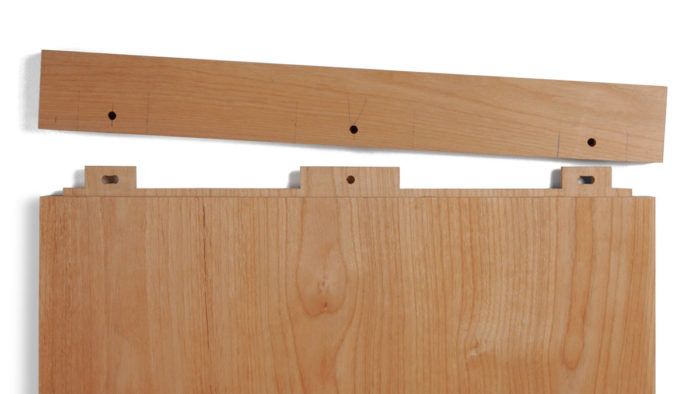
How to mark the baseline and centerline: saddle-square and blue-tape (this is a recurring theme):
View attachment 4
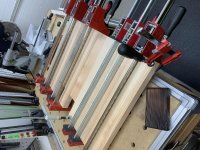
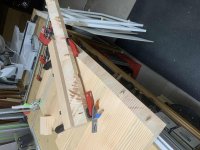
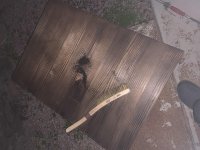
I bandsawed off the excess from the waterfall after Dominoing the mortises. Here's the clamp-up with a handstand block I torched in the past. I think I can make the colors work well with sad-kitchen (tm):
View attachment 5
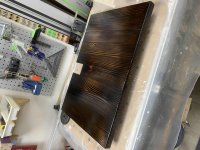
The resulting pre-torching waterfall edge. It will get cut to width and have all edges sanded to a small radius round-over before torching. I'll post photos of that when it happens later this week with some finish details:
View attachment 6
But, I have a cabinet with a stack of ovens (micro/convec and Anova Precision) on a side wall. Want to put the cabinet back where it belongs (behind the couch) and put a cabinet that matches the rest of the sad kitchen. So I built the box that will have 4 wide trays on slides and 2 drawers. But, needed a top surface. The rest of the kitchen has a gorgeous granite countertop (more gorgeous than sad kitchen should really have tbh), but the small offcut of those slabs I have isn't enough...
But the colors of the granite are black, gold, and white. I've replicated this color mix with scorching pine when I made people handstand canes and blocks. Ah, there's a story there... 'nuther day
So I'll give it a try with $14.83 of carefully selected 2x4 stock from the big orange box...
First up, the nicer-than-should-be-in-sad-kitchen granite... including blue-tape lines modeling the top of a future cabinet beside the island for shown coffee stuffs...
View attachment 1
The tubafor slab with the bevel edge and bevel waterfall piece. The chunk of Beech is to keep that end-grain piece straight. Wait, some people told me kiln-dried meant it would never move! smh...
View attachment 2
Close-up of Domino placement. You want it this way for long-grain-to-long-grain (okay, crossed at 45º...) glue joint. The usual in-the-manual way puts the Domino in a hole absolutely full of end-grain. Only good for alignment, but this is cranky Orange-box tubafor so it needs more "insistence":
View attachment 3
How to mark the baseline and centerline: saddle-square and blue-tape (this is a recurring theme):
View attachment 4
I bandsawed off the excess from the waterfall after Dominoing the mortises. Here's the clamp-up with a handstand block I torched in the past. I think I can make the colors work well with sad-kitchen (tm):
View attachment 5
The resulting pre-torching waterfall edge. It will get cut to width and have all edges sanded to a small radius round-over before torching. I'll post photos of that when it happens later this week with some finish details:
View attachment 6