AstroKeith
Member
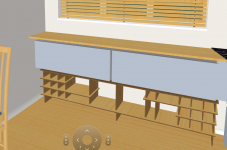
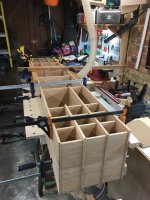
I'm about to embark on making a unit to fit under a flight of suspended cabinets. CAD image below. It will be 2m wide, 300mm deep, and 400mm tall. Material 10mm thick solid oak.
As you can see its a mix of 'pockets' many to store wine. Lots of end panel joints.
I will also have to make up the basic 300mm wide panels from 150mm planks. More joining.
Some might say 10mm is thin, but it will suit the rest of the room. I figure with all the sections, each of which are relatively small, it will be stable enough. Simple bending calculations say it will take the weight. It wont have a back, except for in the wine storage sections. It will have a substantial side to side runner underneath.
So what are my options for joining? My usual route would be to biscuit join the 150mm planks to each other. Then dowel (6mm) all the other joins. I would have liked to have tried sliding dovetails or dados, but I reckon it will weaken the panels too much.
I don't have a Domino, and would love the excuse to buy one, but it looks like it wont work on panels this thin?
I have a table saw, table router, OF1400, Kapex
[attachimg=1]