You are using an out of date browser. It may not display this or other websites correctly.
You should upgrade or use an alternative browser.
You should upgrade or use an alternative browser.
Beginners, you don't know what you don't know!
- Thread starter ChuckS
- Start date

Kickbacks hurt but aren't the only worry here. The SawStop will prevent serious injury to the middle finger in the case of kickback and/or the finger/hand charging into the spinning blade. People shouldn't mistaken the SawStop as a safety feature against kickbacks, and they have never claimed to offer such protection.
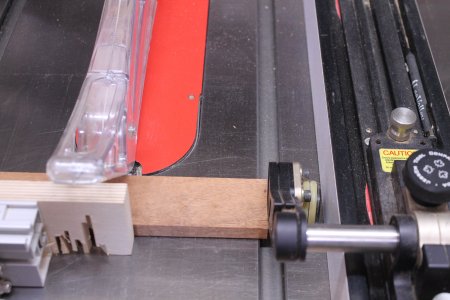
For rip cuts, the JessEm stock guides offer one of the best kickback prevention for table saws.
For rip cuts, the JessEm stock guides offer one of the best kickback prevention for table saws.
Last edited:
- Joined
- Oct 16, 2015
- Messages
- 5,686
That is just plain foolishness. Even with a SawStop, it is asking for trouble.
There are more than a few safe ways to do that, from fancy (metal) tenoning jigs, to any of several designs of shop-made ones.
There are more than a few safe ways to do that, from fancy (metal) tenoning jigs, to any of several designs of shop-made ones.
Packard
Member
I am self-taught in woodworking.
From magazine articles, I knew about kick-back, about narrow strips getting caught between the blade and the fence.
But no one ever warned me about short pieces doing the same, or even kicking up.
While it is self-evident that we should not put our body-parts in contact with a spinning blade, there is nothing intuitive about kick-backs or kick-ups.
The kick-up I experienced sent me to the ER. Minor, but painful: I ripped the fingernail off of the pointer finger on my right hand.
But I was totally shocked that it happened at all. I felt like I had been ambushed.
Wherever possible, I try to rip to width first and then cut to length, minimizing the possibility of kick-up.
Also, I design and make my own push sticks that both hold down the stock and push them forward.
Be forewarned: Those bright yellow plastic push sticks are risky. The can catch on the tip of the blade, bend and then explode when the plastic exceeds the modulus of elasticity (engineer speak for “can’t bend anymore bro—gonna explode..”
Wood, MDF and Particle board make superior push sticks, as the blade will grind away material instead of storing energy. Mine are large triangular pieces that both hold down and press forward the stock.
They are all made from scrap, work better and are safer to use than the commercial versions. I recommend you make your own.
Also, once I was “invested” in the process of making the push blocks, push sticks, etc. I found I was using them more frequently, and when I was not, I would design a new one to work better in that situation.
Packard
Member
This fellow needed a trip to the ER because of a kick-up that you talked about in your post:
I rarely use the stick-type push sticks. I will post an image of what I use, probably in the morning.
luvmytoolz
Member
I've never had a kickback at the bandsaw, but did have a pants staining moment cutting a log that I thought was securely held until the blade ripped it out my hands and started spinning it wildy!Kickbacks can happen at the bandsaw, too:
It was a very quick hands in the air and jump back!
Last edited:
Packard
Member
Catch the tip of a chainsaw and it will fly back in your face. A tree surgeon friend of mine told me once, when I asked for advice on what saw to buy, “pick the engine size, and then buy one with the longest bar length.”
For amateurs, the new saws come with a safety plastic tip cover. Less useful, but safer. If you intend to remove the tip,buy the longest bar version.
For amateurs, the new saws come with a safety plastic tip cover. Less useful, but safer. If you intend to remove the tip,buy the longest bar version.
onocoffee
Member
My father worked in the hospital and was always down on chainsaws. One day he finally told me: when he was starting out, a guy came into the ER with a chainsaw kickback, as you describe, and a gash across his face where the chain tore it up.Catch the tip of a chainsaw and it will fly back in your face. A tree surgeon friend of mine told me once, when I asked for advice on what saw to buy, “pick the engine size, and then buy one with the longest bar length.”
For amateurs, the new saws come with a safety plastic tip cover. Less useful, but safer. If you intend to remove the tip,buy the longest bar version.
No wonder my 8" DeWalt Pruning Saw has that annoying thing on the tip.
Packard
Member
Professionals often take that tip off; the rest of us should leave it in place.My father worked in the hospital and was always down on chainsaws. One day he finally told me: when he was starting out, a guy came into the ER with a chainsaw kickback, as you describe, and a gash across his face where the chain tore it up.
No wonder my 8" DeWalt Pruning Saw has that annoying thing on the tip.
Professionals like a short bar when they are trimming high up in a tree. Most of us don’t do that, so a long bar is safer.
As an aside, but referencing the “stored energy” that plastics can have.
My friend, the tree surgeon, was taking down a tree that was too near to the homeowner’s house. So he tied a length of nylon rope to the upper limbs as they were making a cut and attached it to the pintle hook on his truck. He intended to pull just enough to ensure that the tree did not fall on the house. Instead, the rope snapped, the end hit a picture window in the front of the house, knocked over a tall breakfront china cabinet and made a complete mess of the dining room.
Plastics can store energy, either to release it as it explodes into pieces, or when it returns to its original shape. Just not an ideal material for a push-stick or push block.
I am not sure how widely known this is in areas like North America, but this is how it’s taught as best practice here:
Think a 45 degrees line from the tip of the saw blade towards the parallel fence. Then move the fence forward so that it stops at this point.
The 45 degrees is a rule of thumb. The smaller the cut, the further forward the fence comes. This dramatically reduces kickback potential. The fence of the CSC SYS can be adjusted that way. And pretty much every European style sliding table saw. Pieces simply can’t be pinched between the blade and the fence that way.
Packard
Member
When I rip narrow pieces, I slide the fence back towards me so that leading end of the fence is lined up with the first tooth of the blade. That way the fence cannot trap the material, and it provides enough support to make the cut. I always worry that the very end of the cut will be unsupported, but it never seems to be an isssue.I am not sure how widely known this is in areas like North America, but this is how it’s taught as best practice here:
Think a 45 degrees line from the tip of the saw blade towards the parallel fence. Then move the fence forward so that it stops at this point.
The 45 degrees is a rule of thumb. The smaller the cut, the further forward the fence comes. This dramatically reduces kickback potential. The fence of the CSC SYS can be adjusted that way. And pretty much every European style sliding table saw. Pieces simply can’t be pinched between the blade and the fence that way.
Another point to remember is never use the fence and the miter gage at the same time. Or if you do, make sure that the fence is moved well back from the first tooth of the blade. (That is another non-intuitive risky move, but happily one that was covered in an article I had read.)
But keep in mind that you can get some appalling advice from magazines and books (and the Internet). One piece of advice was about ripping large amounts of narrow stock. The suggestion was to mount two rip blades with a spacer between them. Then using the fence and the twin blades, you could cut two strips at a time. (But trap one of the strips between the twin rotating blades. As a beginner, I did not need to rip a lot of narrow stock. Later on, I recognized that suggestion as ill-conceived.
Packard
Member
I have posted this image before. Similar to the ones I make (but usually out of MDF). It allows downward pressure (preventing kick-up) and forward pressure. Mine are simplified. Just a large triangle with a heel at the end. Works the same though. When mine gets chewed up, I trim off the messy bit, and start over.

You can safely use the sliding table and the parallel fence together when you move the fence forward like you described. This is how it's intended to make repeatable crosscuts on the CSC SYS.Another point to remember is never use the fence and the miter gage at the same time. Or if you do, make sure that the fence is moved well back from the first tooth of the blade.
I am personally not a fan of this design, the hand is pretty close to the blade. And it makes it harder to stand on the left side of the blade instead of directly behind it.I have posted this image before. Similar to the ones I make (but usually out of MDF). It allows downward pressure (preventing kick-up) and forward pressure. Mine are simplified. Just a large triangle with a heel at the end. Works the same though. When mine gets chewed up, I trim off the messy bit, and start over.
I prefer the design Felder sells for example. Wood is a good material for it. But high quality plastic push sticks like the ones Altendorf sells are also good. It’s a specific plastic that doesn’t splinter but is sort of "chewed" away in case of contact with the blade. Two of those sticks can be used together where the stick in the left hand makes sure the piece has contact with the fence (like a feather board) and the second stick moves the piece forward through the cut.
The push stick that moves the piece forward must not be too close to the fence, that would rotate the piece towards the blade which can cause kickback.
(Blade guards help mitigate kickback risks as well. Blade guards cover the top portion of the blade above the workpiece, preventing fingers or hands from accidentally slipping into the cut path—a frequent secondary injury during kickbacks. They also block launched wood to some extend from striking the operator’s face or upper body if the material lifts off the table.)
Similar threads
- Replies
- 14
- Views
- 369
- Replies
- 0
- Views
- 115
- Replies
- 10
- Views
- 971