Bookshelves for the job with the cone shaped corners

Crazyraceguy

Member
Joined
Oct 16, 2015
Messages
4,901
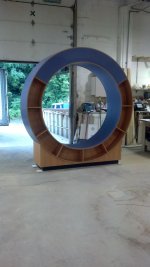
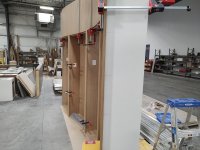
We are finally nearing the end of a job that was initially bid and contracted 2 years ago. Most of the items to this project have been produced in quantities of at least 8, some over 50. This one is unique in the fact that there is only one. Two of the units are missing the backs because of a shipping delay of the material. It came late in the day Friday and I did get them cut out and kerfed. There wasn't enough time to get this broken down to install them though. The whole thing fits into an alcove. I'm not entirely sure why, but most of the cabinetry on this project have these really high soffit-type caps? I assume they have high ceilings to keep the large rooms from feeling cramped? Instead of framed and drywalled soffits, they get matching units.
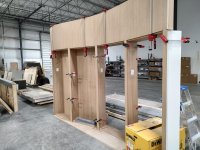
The white squares are the identifying stickers that come from the CNC area, when the parts are cut out. I normally don't peel them off until the final clean-up.  Personally, I would rather see them have a fixed shelf in the middle, but that's not in my power.
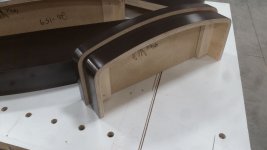
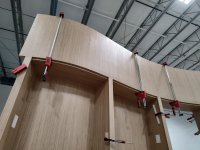
The Dewalt saw was a handy counterweight too stabilize the unit. It's rather top-heavy and that furnace blows hard enough to make it sway slightly. The cabinets will ship separately and that cap is also in 2 pieces, as it is over 12 feet long. The styles cover the edges and will be permanently attached, in the field, with 5mm Dominos and Lamello Zeta Tenso clips. They are just sitting there with the Dominos at this point, with the cabs just clamped.
 

Attachments

  • TVlibrary.jpg
    TVlibrary.jpg
    316.3 KB · Views: 318
  • TVlibrary2.jpg
    TVlibrary2.jpg
    308.7 KB · Views: 252
  • TVlibrary3.jpg
    TVlibrary3.jpg
    276.6 KB · Views: 286
  • TVlibrary4.jpg
    TVlibrary4.jpg
    242.2 KB · Views: 266
I know it's a professional cabinet shop, but i'm astonished by the amount of space you have.
The curved top piece to the book cases looks great.

Regards
bob
 
The entire shop is 60k square feet, more than triple the space we moved from. The old place was something like 17k-18k? The area where I am in control of is about 60' x 60'. Sometimes it gets encroached upon with in-coming materials, but I don't always need it either. The bundles behind it are an example of that. It's some kind of mounting brackets that go to the same job.
 
Yeah, absolutely beautiful work!
The curves must have been a challenge throughout a project of that size, no? :-)
 
MikkelF said:
Yeah, absolutely beautiful work!
The curves must have been a challenge throughout a project of that size, no? :-)

Not really anymore. In days past, this would have been done with bending ply, usually 2 layers. That stuff is really poor quality and hard to work with. Then you have to do it twice, after spreading glue between the layers. Sanding and filling the cracks and other imperfections comes in there too.
As it is now, I do this by the kerf bending method. It is made very easy because of a very expensive computerized panel saw. All I have to do is program the depth and step-over of the grooves, hit the button and walk away. It is totally automatic at that point.
The soffit panels are plywood. They were kerfed and then glued/stapled from the front, then laminated over that. The cabinet backs are done the opposite way. The laminate is applied to the sheet first, then the whole thing gets applied to the cabinet from behind. They are surface mounted 3/4" thick backs, in this case. Laminating curved pieces takes a bit of practice, but this is a pretty gentle bend/radius.
For the most part, the things I build are large. Reception desks, nurses stations, teller walls, bars, bookcases, display cases, etc. for commercial buildings.
Actually, the most difficult part of this kind of job is edgebanding the radiused shelves, unless you have a Conturo or similar machine. Doing it by hand without something like that is quite tedious.
 
what laminate is that? it looks good.  I know what you are saying about the bending ply being sh1t. however do you run into any issues with the segments telegraphing or are you tightly spacing the kerfs every 1/4" or so. do you have a go to kerf spacing and depth you find works with most of what you do.  I know it will vary but figured you have a starting point of what works and doesnt
 
afish said:
what laminate is that? it looks good.  I know what you are saying about the bending ply being stuff. however do you run into any issues with the segments telegraphing or are you tightly spacing the kerfs every 1/4" or so. do you have a go to kerf spacing and depth you find works with most of what you do.  I know it will vary but figured you have a starting point of what works and doesnt

It's a WilsonArt laminate called Landmark Wood (7981). The spacing of the kerfs is largely based on the radius, but the depth of cut comes into it too. A deeper the groove adds to the telegraphing as much as the spacing.
With a big radius like this, spacing of 1" and a depth of cut at .670 works well. This particular ply is almost the full 3/4" and that depth just barely cuts into the last layer before the outer veneer. It bends easily buy is not floppy. 1" is my go-to and if needs to be tighter, I go with 3/4" next. One of these will work for most of what I do.
Normally, even if there is some slight flat spotting, it can be sanded enough to blend it away.
I have had to cut them a lot closer together, but the beauty of that is that it's on a much tighter radius, so it doesn't have to be as many cuts, maybe only 10-15 rather than the 46 or so here.
The really tight ones, you may have to make the grooves wider too, so the back edges don't contact first. Ultimately, it would be great if the kerfs closed exactly at the point of the radius is met, but it doesn't have to.
 
I've managed to get the kerfs closed once using bending ply but as CRG says that material leaves a lot to be desired otherwise.

I don't think it's practical to try to get closed kerfs using regular ply.

For example, making a convex radius of 12" in 3/4" ply.
To remove only enough wood to close 1/8" kerfs requires 19 kerfs out of a panel thats about 36" long.
At that quantity the kerfs are about 2" apart, and regular ply won't bend enough at that spacing to get the radius.
You'd probably need at least three times as many kerfs to have a chance.
 
there is actually an online calculator that will give you spacing and depth for kerfs being closed for any given radius. However it doesnt take into account flat spots. otherwise its a pretty cool calculator.
 
In this particular case three of the four units have the kerfs are on the outside of a concave shape, so they are actually wider than when they were cut.
As I see it, the only time it is really necessary for the kerfs to close completely is if the piece is unsupported in any other way, like a free panel or a door. That way it could hold its shape.
 
agreed, its not required very often and there are some limitations if you are trying to avoid flat spots. works best on tight radi. 6 inches and under or so. otherwise the kerfs are far apart and it would be segmented.  It wouldnt work for your situation pictured.  tighter radius where edge is seen would be more ideal. its pretty cool to be able to choose a radius, kerf width (straight or tapered) and it spits out the spacing. I havent messed with much kerf bending but its on my list.

On the side that is laminated over the kerfs do you fill them with bondo or anything first?
 
[member=73094]afish[/member] in this particular case, I didn't laminate over the kerfs. These were pre-laminated panels that were layed-up with cold-press glue, rather than laminated by me with contact adhesive. I should have taken a pic of the back side of them, just didn't think of it, and they are long gone. They left the next day.
The big machine can't do the tapered ones. It can however do a groove that is wider than the kerf of the blade itself. It is aware of the blade thickness and can do multiple passes to widen the groove.
The tapered kerfing was done by hand with a jig that I purpose-built for the TS55 and that specific job.

I have laminated over kerfs for other jobs, usually for drawer fronts. Those do indeed get filled and sanded into shape before laminate is applied.
It's a lousy pic, but that how these drawers were done.
the second pic was done with bending ply, probably 5 years ago? maybe more
The little shelves were done with bending ply too, just over a year ago. I did them over a form in the vacuum press. This is an example of a case were the bending ply works better. That apron is essentially un-supported and would be weak with kerfs.
 

Attachments

  • Hand Stone 1a.jpg
    Hand Stone 1a.jpg
    100.4 KB · Views: 88
  • Bookcase.jpg
    Bookcase.jpg
    165.1 KB · Views: 93
  • rad aprons2.jpg
    rad aprons2.jpg
    124.2 KB · Views: 100
Back
Top