- Joined
- Nov 3, 2007
- Messages
- 5,092
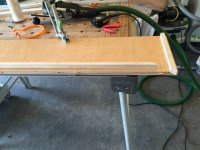
You might try double stick tape on a sacrificial surface to hold the disappearing disk.
Tom
Tom
Jamie_MA said:I never knew PVC could sound so good [tongue]
The Linkwitz Crossover has been on my build list for awhile now!
JT
Tom Bellemare said:You might try double stick tape on a sacrificial surface to hold the disappearing disk.
Tom
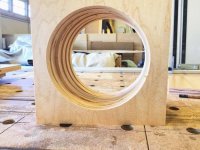
I always wanted to make some big holes.Dogberryjr said:You tackle the most interesting projects.
iamnothim said:Jamie_MA said:[eek]
Also, can't believe there are other Festoolians out there that love hand tools + tww + Roubo + diyaudio [big grin]
JT
It's Festusians...
"Come on Marshall Halle! The Dewalt brothers are hiding out in the canyon."
[attachimg=1]
iamnothim said:I always wanted to make some big holes.Dogberryjr said:You tackle the most interesting projects.
It's so easy with the MFS400.
The hose and cord don't get in the way because the router never turns. It's slick
Tom Bellemare said:You might try double stick tape on a sacrificial surface to hold the disappearing disk.
Tom
tjbnwi said:Tom Bellemare said:You might try double stick tape on a sacrificial surface to hold the disappearing disk.
Tom
What Tom said, or leave the last 64th of an inch uncut, pop the slug out by tapping the piece towards the hole.
The tape route is better, use the 3M morning tape (white), not the 3M VHB (black). A few strips across the back of the piece, stick it to the work surface, route away.
Tom
iamnothim said:tjbnwi said:Tom Bellemare said:You might try double stick tape on a sacrificial surface to hold the disappearing disk.
Tom
What Tom said, or leave the last 64th of an inch uncut, pop the slug out by tapping the piece towards the hole.
The tape route is better, use the 3M morning tape (white), not the 3M VHB (black). A few strips across the back of the piece, stick it to the work surface, route away.
Tom
Toms
Will the tape mung up the router bit?
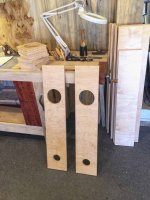
Wuffles said:Clamp a larger piece of wood underneath (obviously outside the diameter of the cut) instead of tape and you're golden.
iamnothim said:Wuffles said:Clamp a larger piece of wood underneath (obviously outside the diameter of the cut) instead of tape and you're golden.
It is important to secure the hole cutout. I didn't before Tom's post.
iamnothim said:tjbnwi said:Tom Bellemare said:You might try double stick tape on a sacrificial surface to hold the disappearing disk.
Tom
What Tom said, or leave the last 64th of an inch uncut, pop the slug out by tapping the piece towards the hole.
The tape route is better, use the 3M morning tape (white), not the 3M VHB (black). A few strips across the back of the piece, stick it to the work surface, route away.
Tom
Toms
Will the tape mung up the router bit?
")