Closet assembly question

waynew

Member
Joined
Feb 12, 2007
Messages
69
Hi,

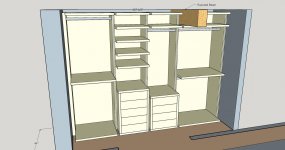
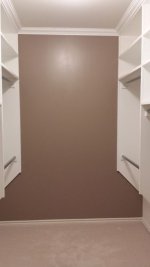
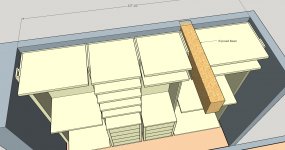
I'm designing our new bedroom closet and would appreciate some ideas about installation. The space will be tight and I'm not sure of the best way to install this given the tight fit. There is a 2" gap between the ceiling and the top of the closet. There will probably be 1/4" on either side or less. Each section will be constructed independently. The two boxes of draws will just drop in between each set of gables. Notice there is a structural exposed ceiling beam which has to be worked around so I'm thinking that corner is probably a good place to begin.

Thanks.

NB. there are walls, which I've left out for clarity, on either side of the entrance. The opening extends about 8" shy of the ceiling.

[attachimg=1]

[attachimg=2]
 

Attachments

  • Closet - Front View.jpg
    Closet - Front View.jpg
    106.7 KB · Views: 800
  • Closet - Top View.jpg
    Closet - Top View.jpg
    424.2 KB · Views: 656
Two things I've noticed that is different than what I'm use to seeing and it's the gables.  I'm use to seeing the gables sit on top of the bottom piece and underneath the top piece.  Secondly, the gables typically extend out the same as the shelves or a little beyond the shelves.

You might have to assembly the boxes inside the closet.
 
Yes, the design is somewhat minimalist.

Assemby inside the closet seems like my only alternative, although the last unit would be difficult. Also I'm not sure of the best approach to hide the screws going into the walls and gables. The shelves will be fixed.
 
Wayne are you putting closet doors on the opening?  If not, here is an 8'x8' cabinet I built.  I made 3 32" face framed cabinets, cut the opening to that dimension then slid them in.  I have since added pull down garment rods in the cabinets so it can function as a bedroom closet, however, it is in my wife's sewing room and has shelves in the uppers.  The drawers are 5/8" dovetailed and raised panel drawer fronts.
 

Attachments

  • DSC_0004.JPG
    DSC_0004.JPG
    360.1 KB · Views: 589
Beautiful job Bill, I'm sure that your wife is very happy with those.

I haven't yet decided whether I'll put a sliding door on. If I do it will probably be a glass door, mainly to keep out the dust etc.

Perhaps I need to lower the height of the cabinets  by 1.5" That would enable the cabinets to be built outside of the small enclosure because they would be small enough to lift up (on edge) without hitting the ceiling.

These cabinets will be constructed from two sheets of 3/4" black walnut ply sandwiched together, making a final thickness of 1.5". As you can see from the Sketchup diagram in the first post I haven't yet worked out how to apply the walnut edging to the center gables because they are fitted together in the closet itself. So the edge banding would have to be completed once the cabinets are installed. These are the types of issues I was hoping others here have encountered and found solutions for.

Attached another picture making it clear where the front walls are.

Many thanks.

[attachimg=1]
 

Attachments

  • Closet - Front View Xray.jpg
    Closet - Front View Xray.jpg
    269.5 KB · Views: 517
For what it's worth, I've now done six closets using Easy Rails.  With that system, you hang the rails horizontally, screwing them to studs about six feet off the floor, and you then hang vertical members from them.  I've done them with high/low closet poles, shelves, and drawers.  You can see my latest one under "Member Projects" as "A Closet for David", where I also included info on the jig I designed for hanging the verticals as well as my drawer construction technique.
 
In the semi-custom closet industry, the partitions are 14" deep, with the closet pole set at 11-1/4" from the back of the closet.  The partitions are hung from rails (as Sandy mentioned) usually set at 82" AFF when the ceiling is 8' or greater.  If you're planning on using the LR 32 to line-bore the system holes in the partitions, you'll need to remember to run a line at 83mm from the front of the partitions to accommodate hanging goods, plus the normal 37mm from the front and from the back of the partitions to support shelves.  In your drawing, you show the shelves extending past the front of the partitions.  I'd recommend that you rethink this.  If you're planning on using the normal shelf pins to locate the shelves, they're going to be very tippy, plus with the side walls as they are, you're going to have a challenge getting in to see what's there, never mind get to it. 

 
I would hide the mounting screws in between each boxes at the hanging rail location and drop in drawer boxes locations.

[attachimg=1]

You could leave enough space between the ceiling and top of the boxes so that you could install them, and cover them with a crown molding.

[attachimg=2]

And I would use two spacer boards at the same thickness of the cabinet plywood on each end and fasten them onto the wall before installation, that will provide the same thickness at the side all around, and also provide the variable mounting option of the side cabinets.

Hope that helps.


Attachments

  • F3AZ5RUHLFV0Y9X_MEDIUM.jpg
    F3AZ5RUHLFV0Y9X_MEDIUM.jpg
    10.4 KB · Views: 386
  • F539A4OHLFV0YB6_MEDIUM.jpg
    F539A4OHLFV0YB6_MEDIUM.jpg
    14.3 KB · Views: 384
Back
Top