CMS Feather Boards, Twin Angle Stop Fence, Table Extensions

Joined
Oct 25, 2013
Messages
431
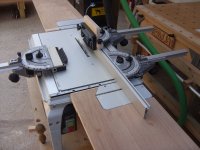
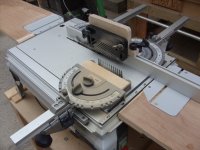
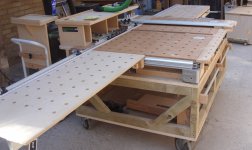
CMS table saw with vertical and horizontal feather boards. The feather boards are UJK brand and were purchased from Axminster for just over a tenner for a pair.

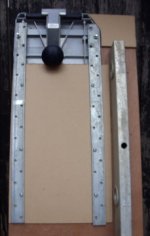
The rip fence is locked in place with two Festool angle stops instead of one so it is absolutely rigid.

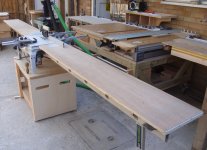
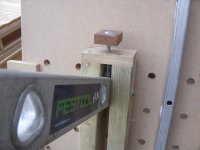
The table extensions were made using two Kapex crown stops, two 6' lengths of plywood and an unused ladder which is a great source of aluminium box section and the grippy rubber foot on the ladder is ideal for a leg. Total length of the entire set up is 14' so there's plenty of material support for longer pieces and because everything attaches to the CMS V-grooves it can all be assembled very quickly. Great for ripping or rebating long narrow pieces and with the CMS OF module and 2200 it's also a great router table too. With a DIY base for the CMS it is totally rock solid. All it needs now is a micro-adjust for the rip fence...


Attachments

  • SDC13116.JPG
    SDC13116.JPG
    1.7 MB · Views: 5,329
Extra photos of same topic...
 

Attachments

  • SDC13118.JPG
    SDC13118.JPG
    1.7 MB · Views: 5,369
  • SDC13115.JPG
    SDC13115.JPG
    2.6 MB · Views: 4,586
Don't put side feather board across the blade, you'll pinch it. Move it forward.
 
I would like to know what was used for the legs of the extensions. Please?
 
Video tour of the shop PLEASE!

I need a closer look at the workbench. 

Absolutely, brilliant.  I have a piece of crap ladder perfect for this project.  And I've ran into needing wider wings than the UG Stand and something more sturdy than the UG Stand.

I second the vote for pics of the legs.
 
After further thought and a hint about micro adjustment for the table fence, you are going to use the Kapex Crown attachments and the Incra Wonder fence to create the fence for the Table Saw.  Brillant!

I ran into a problem recently with my CMS table.  I wanted to use the CMS to route a dado, but the fence capacity was too small.  This would extend the rip capacity without sacrificing repeat ability and accuracy.
 
The legs work in the same way the Kapex UG extensions do with a bolt with a capped nut bearing down on the leg to lock it in place when flush with the CMS. The Kapex crown stop makes a much better connection to the CMS than the Kapex UG extension wings. These DIY table extensions are surprisingly sturdy, however this is got to be all due to the CMS and MFT being used on a very firm workshop built base. I've been using the same extension tables for maybe 2 years on my MFT and they've never given me any problems whatsoever in all that time and many projects later.

Photo of the leg assembly.


Attachments

  • SDC12859.JPG
    SDC12859.JPG
    1.7 MB · Views: 1,938
Please show more detail of how the Kapex crown stop connects to the 6' plywood piece.

thanks
 
Please show more detail of how the Kapex crown stop connects to the 6' plywood piece.

On the Kapex crown stop there is 2 holes next to the t-slot - I know I had to countersink them but I can't remember if I had to drill them all the way through as well. CS bolts go through the holes and attach to metal strips about 18" long which also attach to the plywood. I'll take a photo of the underside when my camera batteries are charged, but in the meantime here's a photo of the crown stop showing where the 2 bolts are on the crown stop.


Attachments

  • SDC13121.JPG
    SDC13121.JPG
    1.7 MB · Views: 4,107


[member=8811]richk[/member]

Kapex crown stop attached to DIY extension table for CMS
 

Attachments

  • SDC13129.jpg
    SDC13129.jpg
    36.1 KB · Views: 1,749
The Kapex crown stops aren't that expensive at £46 each when you consider the tiny extension table for the CMS is £130+, that it's awkward to put on and offers very little extension to just the one side on the CMS.

The crown stops are the only real expense here as everything else was all leftovers/unused ladder. Easy and quick to attach to the CMS and more than enough support that's at both the in and out ends of the CMS. When the table extensions are not required they take up very little space stored stood on end.

Roller stands are fine with a mitre saw where the piece stays still but for a table saw or router table where the wood gets fed through roller stands are a massive pain in the
 

Attachments

  • SDC12663.JPG
    SDC12663.JPG
    484.4 KB · Views: 580
W/W You definitely out did your self this time. I swear you guys here are the cleaverest folks I met...

Wish I was that cleaver
 
[member=9136]CarolinaNomad[/member]
Video tour of the shop PLEASE!
I need a closer look at the workbench. 
[/quote]

I haven't got video equipment, but I can take as many photos as necessary.
Which workbench? There's 3 if you include the CMS, then there's an MFT and an 8'x4' bench for sawing, clamping, assembly etc. etc. which converts to an 8'x8' bench or two 8'x4' benches.
 
jobsworth said:
W/W You definitely out did your self this time. I swear you guys here are the cleaverest folks I met...

Wish I was that cleaver

Thank you Ron, but it's actually all very simple stuff that's all very easily done and for as few £'s as possible. I've never intended for any of it to be a pretty beauty contest winner, just practical and ideally, inexpensive.
After all I think I've spent plenty enough money on the Festool parts of it.

NOTE to (all workshop based) CMS and MFT owners -

1.) Fold the legs underneath so the rubber feet in each corner are on a flat surface. A flat floor will do.
2.) Now try pushing it about or wobbling it.
3.) You can't.
4.) Now build a base.
5.) Try raising and lowering your OF2200 or see how square and stable the MFT/3 can be and will remain so...

 
And 6.) I bet you decide to leave your CMS or MFT on the workshop built base. In which case remove the legs altogether.
 
Behind the CMS are 2 mft attached together.  The accessories added to the mft are quite nice.

The setup is exactly what I'm striving for  but in a mobile fashion. 

 
CarolinaNomad said:
Behind the CMS are 2 mft attached together.  The accessories added to the mft are quite nice.

The setup is exactly what I'm striving for  but in a mobile fashion.

The MFT is only for workshop use as it's 13' 5" long in total and everything that's cut or routed on it then gets assembled/clamped/glued on another bench that's 8'x4' so there's no way I could ever take both to a job site. It's for building completed units that is then taken to site for installation.

I assume by accessories you mean the table extensions but I've never tried them on a standard MFT so I have no idea how well they would work. Because this MFT has a very firm base and the table extensions are securely attached to it the entire thing remains stable enough for large pieces to be easily worked on. For mobile use I think it would be worth trying some DIY extensions on a standard MFT as it works out many hundreds of £s cheaper than buying lots of additional MFT/3s when all they will be doing is providing material support.

Even if this was on the original Festool legs it would be a huge nuisance to move/set up/calibrate frequently.
 

Attachments

  • SDC13089.JPG
    SDC13089.JPG
    547.9 KB · Views: 1,408
Your setup has given me ideas of how I can make it mobile to fit my needs.  My workshop is setup inside the garage of the new house and parked for months.  So my thought would be to have the mft's sit on top of diy sysports.  I can roll the sysports out of the trailer and place them at the locations of the legs.  Usually the garages are one car wide.  So I have room for one big work top.  My thoughts have always lead to placing two mft as shown and then my CMS and table saw beside each other at one end of the mfts.  ( Where you have your wings).  And Interconnect them/locking all of them together by the v groove.  Those v grooves come in handy when expanding the surface temporarily.

Are you expanding your CMS ts55 with the incra wonder fence?  If so. I'm interested in hearing your plans.

Hope I'm not stealing your thread.  You have a nice setup.
 
Back
Top