You are using an out of date browser. It may not display this or other websites correctly.
You should upgrade or use an alternative browser.
You should upgrade or use an alternative browser.
CMS router table fence improvements ( micro adjust using crown stop) "updated"
- Thread starter Benjamin
- Start date

cabissi
Member
- Joined
- Jun 19, 2017
- Messages
- 2
Does anyone know how to remove the knurled knob from the Micro Adjust and how the 4” wheel attaches? Woodpecker told me that it could not be removed. Pictures would be greatly appreciated.
Any explanation at all would be helpful. I am rather new to woodworking, but I would very much like to complete the enhanced CMS modification described to Benjamin’s post. [smile]
Any explanation at all would be helpful. I am rather new to woodworking, but I would very much like to complete the enhanced CMS modification described to Benjamin’s post. [smile]
CADru
Member
- Joined
- Dec 8, 2015
- Messages
- 99
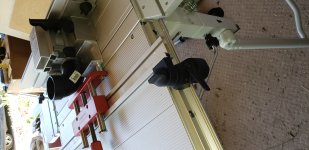
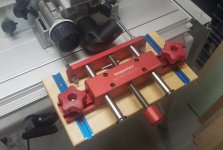
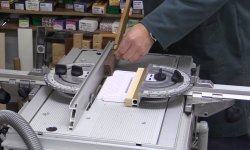
Finished my version of the Woodpecker Micro-Adjust mod for my Festool CMS Router table.
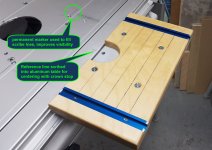
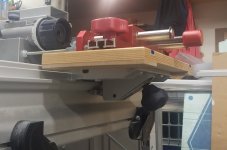
The 3/4” Baltic Birch seat bolts to the crown stop which provides the major adjustment feature of the micro adjust via integrated T-tracks. Once I had my crown stop set, I scribed a small reference into the top for alignment with centering protrusion on crown stop. This will help when re-attaching in the field. I filled all the scribe (reference) layout marks on the aluminum top with a black permanent sharpie. This greatly improves visibility.
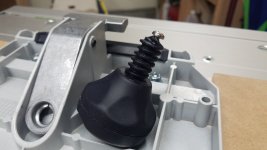
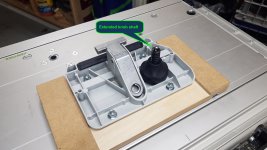
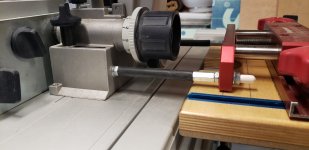
Did not agree with the crown stop connection being fixed tightly enough (the knob bottoms out too soon) so I extended the threaded shaft. I drilled and tapped the plastic thread shaft to accept a 10-32 x 5/8” pan head machine screw. This screw bottoms out on the end of the center bolt within the knob. I set this screw in epoxy. The additional 1/4” gives me a tighter crown stop to V-rail connection without the knob bottoming out.
Threaded rods are 1/4-20, was thinking I’d up it to 5/16” if the 1/4” rod flexed to much after assembly. By default, the Woodpecker Micro Adjust fence section accepts the 1/4-20 rod. I think the 1/4” rod is stable enough.
To provide for a smooth (minimal resistance) micro adjust movement I set elevations for crown stop plywood seat to accept a spacer between top of (blue) T-track and underside of the Woodpecker T-track. The moving fence section (when micro adjusting) does not slide/ride contact the plywood seat.
The lines on the plywood seat are on 1” centers and are simply for a parallel reference when making a major adjustment of fence. Used a marking knife to score the lines. Traced the knife marks with a pencil then applied a couple coats of spar poly via spray can.
For transport my break down point is at the end of the threaded rod where it connects to micro adjust fence. The jam-nut system on the Festool fence side of the threaded rod is set with Loctite Permatex Red (them babies aren’t moving). This keeps the micro adjust fence parallel to the Festool router table fence for disassembly/assembly.
Thank you [member=24885]Benjamin[/member] for this upgrade idea, works great!
The 3/4” Baltic Birch seat bolts to the crown stop which provides the major adjustment feature of the micro adjust via integrated T-tracks. Once I had my crown stop set, I scribed a small reference into the top for alignment with centering protrusion on crown stop. This will help when re-attaching in the field. I filled all the scribe (reference) layout marks on the aluminum top with a black permanent sharpie. This greatly improves visibility.
Did not agree with the crown stop connection being fixed tightly enough (the knob bottoms out too soon) so I extended the threaded shaft. I drilled and tapped the plastic thread shaft to accept a 10-32 x 5/8” pan head machine screw. This screw bottoms out on the end of the center bolt within the knob. I set this screw in epoxy. The additional 1/4” gives me a tighter crown stop to V-rail connection without the knob bottoming out.
Threaded rods are 1/4-20, was thinking I’d up it to 5/16” if the 1/4” rod flexed to much after assembly. By default, the Woodpecker Micro Adjust fence section accepts the 1/4-20 rod. I think the 1/4” rod is stable enough.
To provide for a smooth (minimal resistance) micro adjust movement I set elevations for crown stop plywood seat to accept a spacer between top of (blue) T-track and underside of the Woodpecker T-track. The moving fence section (when micro adjusting) does not slide/ride contact the plywood seat.
The lines on the plywood seat are on 1” centers and are simply for a parallel reference when making a major adjustment of fence. Used a marking knife to score the lines. Traced the knife marks with a pencil then applied a couple coats of spar poly via spray can.
For transport my break down point is at the end of the threaded rod where it connects to micro adjust fence. The jam-nut system on the Festool fence side of the threaded rod is set with Loctite Permatex Red (them babies aren’t moving). This keeps the micro adjust fence parallel to the Festool router table fence for disassembly/assembly.
Thank you [member=24885]Benjamin[/member] for this upgrade idea, works great!
Attachments

DynaGlide
Member
- Joined
- May 16, 2017
- Messages
- 1,588
CADru
Member
- Joined
- Dec 8, 2015
- Messages
- 99
Nice job [member=65062]DynaGlide[/member] cool design [big grin]. Ditto on swapping reducing ring. Slight upgrade to my version. Sleeved the exposed threads on the all-thread with 1/4" rubber vacuum hose. Also added caps to the rod ends. I had white in stock, need to get some black ones [big grin].DynaGlide said:Makes swapping the reducing ring out easier.
It's a positive improvement to the router table. I have put it to use on a couple projects and dialing in the setup is much easier now.
Attachments
CADru
Member
- Joined
- Dec 8, 2015
- Messages
- 99
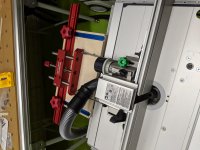
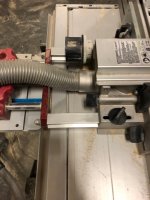
Well played [member=65062]DynaGlide[/member] ...hmmm where have I seen that color green before [big grin] Do share part numbers/info on knob and what did you use for your fence hose adapter? Looks like you are using the stock extraction hose setup keeping the 36mm end at the fence. I switched out the 27mm straight with a 90 deg fitting and used the anti slip guide rail material as gasket on the fence out port. Now my 36mm hose section connects to router. Would like to get the 36mm back to the fence.DynaGlide said:Got the hose hooked up and an easier to use lock down knob. Green for adjustable. [big grin]
DynaGlide
Member
- Joined
- May 16, 2017
- Messages
- 1,588
[member=59578]CADru[/member]
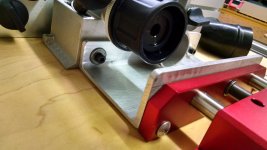
Unfortunately the knob itself is 3D Printed. It was intended to be used with a 3d printed fence dog. It and the dog were made by a member here [member=14226]sprior[/member] but for this application I don't think it would be cost effective. I already had it and I wasn't using it and it just happened to have the correct M6 size hex for capturing either an M6 nut or hex bolt head. I painfully broke apart the Festool supplied knob to get the M6 stud out and with a pair of M6 nuts made myself the one you see. They sell M6 star knobs on Amazon, McMaster Carr, etc. Could easily make something up for yourself.
The hose adapter was mentioned earlier in this thread. It's a 1.5"x1.5" Fernco 90 degree elbow from Home Depot. It's a rubber material and fits nicely inside the CMS Fence. The 36mm hose end you have to shove into the other end of the elbow but it stays put. About $7 and they stocked it at my store. Link
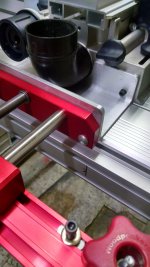
I do like being able to quickly undo the green knob and the Woodpecker knobs and slide the fence out to change bits/insert rings and get it back to where it was without much fuss.
Unfortunately the knob itself is 3D Printed. It was intended to be used with a 3d printed fence dog. It and the dog were made by a member here [member=14226]sprior[/member] but for this application I don't think it would be cost effective. I already had it and I wasn't using it and it just happened to have the correct M6 size hex for capturing either an M6 nut or hex bolt head. I painfully broke apart the Festool supplied knob to get the M6 stud out and with a pair of M6 nuts made myself the one you see. They sell M6 star knobs on Amazon, McMaster Carr, etc. Could easily make something up for yourself.
The hose adapter was mentioned earlier in this thread. It's a 1.5"x1.5" Fernco 90 degree elbow from Home Depot. It's a rubber material and fits nicely inside the CMS Fence. The 36mm hose end you have to shove into the other end of the elbow but it stays put. About $7 and they stocked it at my store. Link
I do like being able to quickly undo the green knob and the Woodpecker knobs and slide the fence out to change bits/insert rings and get it back to where it was without much fuss.
As [member=65062]DynaGlide[/member] mentioned, the knob was 3D printed and is one of the designs I shared here on Thingiverse. The 3Dprinter filament was Neon Green from Makerbot, but they're crazy expensive these days and I'd use instead eSun Peak Green.
Attachments
DynaGlide
Member
- Joined
- May 16, 2017
- Messages
- 1,588
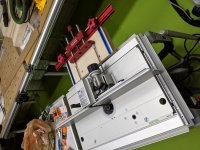
As I get cozier with the CMS during a shutter project I'm finding more problems to work around. Today I'm routing some beading and one of the boards has a hefty bow to it. The CMS plastic featherboard doesn't provide nearly enough pressure to keep the board flat to the fence for routing. I have some spare MFT parts and gutted a miter gauge so the little slotted pieces that normally go into the MFT fence are no longer there. It's just a nice flat surface now. I used this to set a more robust featherboard.


Roachmill
Member
- Joined
- Jun 11, 2015
- Messages
- 297
Can't remember where I saw it (I duly ripped off the idea lickety-split!) and screwed a couple of pieces of incra track on to a pair of featherboards. The track slips right on to a protractor giving you adjustable horizontal pressure as and when needed ")
DynaGlide
Member
- Joined
- May 16, 2017
- Messages
- 1,588
rst said:That's a great fix Dynaglide...just get some UHMW to attach to that fence and it will be heavenly. UHMW is slippery and as surface hard as stainless.
I think I'll do just that. Thank you for the idea.
Sparktrician
Member
DynaGlide said:rst said:That's a great fix Dynaglide...just get some UHMW to attach to that fence and it will be heavenly. UHMW is slippery and as surface hard as stainless.
I think I'll do just that. Thank you for the idea.
Woodcraft and Highland Woodworking both sell UHMW. [smile]
GarryMartin
Member
- Joined
- Jun 11, 2011
- Messages
- 1,939
Roachmill said:Can't remember where I saw it (I duly ripped off the idea lickety-split!) and screwed a couple of pieces of incra track on to a pair of featherboards. The track slips right on to a protractor giving you adjustable horizontal pressure as and when needed
It was our dear friend [member=11196]Peter Parfitt[/member] I believe?http://festoolownersgroup.com/festool-tool-problems/cms-ge-feather-board/msg373870/#msg373870
[attachimg=1]
Attachments
Roachmill
Member
- Joined
- Jun 11, 2015
- Messages
- 297
GarryMartin said:Roachmill said:Can't remember where I saw it (I duly ripped off the idea lickety-split!) and screwed a couple of pieces of incra track on to a pair of featherboards. The track slips right on to a protractor giving you adjustable horizontal pressure as and when needed
It was our dear friend [member=11196]Peter Parfitt[/member] I believe?http://festoolownersgroup.com/festool-tool-problems/cms-ge-feather-board/msg373870/#msg373870
[attachimg=1]
No, can't have been him. My featherboards are black
") Oh well, belated thanks to Peter and you, GarryMartin, for that ever impressive memory of yours!
Oh well, belated thanks to Peter and you, GarryMartin, for that ever impressive memory of yours!Similar threads
- Replies
- 24
- Views
- 3K
- Replies
- 4
- Views
- 801