Custom Foam Inserts for Systainers

mikeneron

Member
Joined
Apr 29, 2009
Messages
217
-Cut a piece of 1/4" hardboard to fit in the systainer.  I didn't worry about the irregular shape and just cut it rectangular to make things simple.
-Lay out items on hardboard the way you want.
-Trace around all items.  I found you want to keep the line fairly tight to the item as you want the items to fit snug in the foam.
-Use a forstner bit (I used a drill press) to make some holes on the hardboard for finger notches and also as a place to start your jigsaw cuts.
-Use a jigsaw and cut out the tracings on the hardboard.
-Use double-sided tape and attach the hardboard template to a piece of foam.  I like to use a decent sized piece of foam to make working with the router more stable and safe.  I also mark the foam at the edges of the hardboard template so I can cut it later.
-Use a router with a template bit and start removing foam.
-Cut the foam on the markings you made earlier.
-Place foam in systainer and then place items in their appropriate spots.  I also just put the hardboard template underneath in case I ever needed to use it again.

The smallest router template bit I could find was 1/2" in diameter so would have been nice if there is a smaller diameter bit for some of the smaller items.  Also the cutting depth of the bit was 1", so for some of the shallower items, I used some 1/2" pieces of MDF along with more double-sided tape to prop up the hardboard to make shallower passes with the router.  Another piece of 1/2" foam would have probably worked better for this though.

Would be pretty cool to see what a CNC router could do though  [big grin]

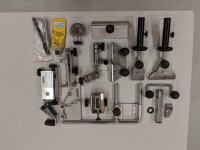
Networking Tools in Tanos T-Loc Systainer I
[attachthumb=#1]
[attachurl=#1]

Computer Duster in Mirka Systainer II
[attachthumb=#2]
[attachurl=#2]

Misc Tools in Mini Systainer
[attachthumb=#3]
[attachurl=#3]
 
Hey thats' pretty slick !    What sort of time is involved for making them?  Any trouble withthe foam chipping , fracturing or burning while routing?

Seth
 
I guess time depends on the person.  I for one am very methodical so you guys can probably have them done in half the time  [wink]

The foam routed very nicely.  I used a slower speed on the router, but I think it will depend more on the type of foam you are using.  I am using Owens Corning Foamular Rigid Foam Insulation as I have a bunch of leftover pieces from insulating my basement.  It's not exactly cheap, but I think your mileage will vary with the cheaper brands of foam.
 
Are those PicQuic drivers I see, Mike?

If so, how do you like them?

Tom
 
They are PicQuic actually.  I think I won them at a social at one time so I didn't know what you meant at first.  Had to Google it  ;)
 
Ive heard that coating foam with a truck bed liner/undercoating type of spray can be a good idea as it creates a protective coating. Ive also heard that wrapping a tool in plastic food wrap then spray foaming the box can create a custom tool holder.

Hey SRSemenza let us know how it goes  [big grin] there's gotta be one sys that you havent totally tricked out.
 
I was just about to post a question about this when I stumbled on this old thread.  I have big Milwaukee fixed speed drill that I need a storage solution for.  Given its size it needs some good support inside a sys 3 or 4 or I'm worried it might break the systainer.  I could use a bunch of layers of Kaizen foam or pick foam but, like [member=11879]Dogwood[/member] I had the idea of wrapping the drill in plastic wrap and filling the systainer with spray foam.

Has anyone ever tried this before?  Any hints/tricks would be greatly appreciated.

Thanks in advance for the help!
 
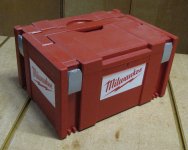
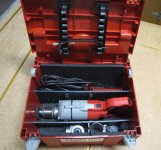
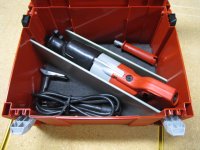
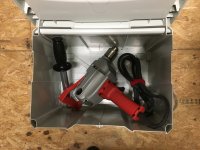
Here is my Systainer for a large  Milwaukee drill. And another for a Sawzall.

  The drill Sys has Tanos dividers and foam in select spots to fill space and immobilize the drill.

  The Sawzall has home made dividers.

      [attachimg=1]      [attachimg=2]        [attachimg=3] 

Seth


Attachments

  • IMG_0950.JPG
    IMG_0950.JPG
    884.2 KB · Views: 2,739
  • IMG_0952.JPG
    IMG_0952.JPG
    420.8 KB · Views: 2,533
  • IMG_3473.JPG
    IMG_3473.JPG
    125.7 KB · Views: 2,483
Really nice job [member=1619]SRSemenza[/member] !!

How did you attach the dividers to the sides of the Systainer?  Are they glued in place so they can't shift? 

Thanks!
 
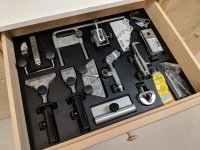
I saw mention of a couple of things above.  The first was what could be done with a CNC, and the second was how would using vehicle underbody coating work out.  Well I tried just that earlier this year for a drawer organizer.  I traced the Tormek accessories onto paper and then took a picture with a ruler in the frame.  Brought that into Fusion 360 (a CAD program) and calibrated to the ruler then traced the accessories.  I then created a 3D model and carved it on my X-Carve CNC out of MDF.  I then sprayed it a couple of times with vehicle underbody coating.

The result looks good though the underbody coating isn't puffy like I was hoping for.  I think the result looks like Batman's sock drawer.  I haven't done anything similar for a systainer yet.
 

Attachments

  • 28828605_10158070369381509_1468461196023314698_o.jpg
    28828605_10158070369381509_1468461196023314698_o.jpg
    488.5 KB · Views: 855
  • 28515995_10158070369286509_1044882977087481883_o.jpg
    28515995_10158070369286509_1044882977087481883_o.jpg
    441.4 KB · Views: 704
jbasen said:
Really nice job [member=1619]SRSemenza[/member] !!

How did you attach the dividers to the sides of the Systainer?  Are they glued in place so they can't shift? 

Thanks!

Yes, glued in place with super glue.

Seth
 
Personally, I think the underbody coating looks great!! [thumbs up]

Unfortunately I don't have the resources or experience with CAD programs to duplicate your efforts. 

My drill barely fits in a sys 3.  From the Chuck to the rear D handle of the drill it can fit lengthwise in the Systainer but the handle is so long it will only fit with the drill in the front of the Systainer and the handle canted to the back top edge. There is also a long pipe handle that unscrews from the drill.  When attached it forms a T with the handle. All in all it is an awkward fit.  Hence my idea for using spray foam to create a tight fit given the awkward angles

Again nice job
 
SRSemenza said:
jbasen said:
Really nice job [member=1619]SRSemenza[/member] !!

How did you attach the dividers to the sides of the Systainer?  Are they glued in place so they can't shift? 

Thanks!

Yes, glued in place with super glue.

Seth

Thanks Seth
 
jbasen said:
Personally, I think the underbody coating looks great!! [thumbs up]

Unfortunately I don't have the resources or experience with CAD programs to duplicate your efforts. 

My drill barely fits in a sys 3.  From the Chuck to the rear D handle of the drill it can fit lengthwise in the Systainer but the handle is so long it will only fit with the drill in the front of the Systainer and the handle canted to the back top edge. There is also a long pipe handle that unscrews from the drill.  When attached it forms a T with the handle. All in all it is an awkward fit.  Hence my idea for using spray foam to create a tight fit given the awkward angles

Again nice job

Get a Sys Midi.
 
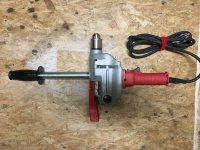
The drill is a Milwaukee 1660-6.  I use it for cutting tenons on hickory logs for rustic hickory furniture.  Here are some pictures of the drill and what it is like to try and stuff into a Sys 3.

Thanks

[attachimg=1]

[attachimg=2]
 

Attachments

  • IMG_1019.JPG
    IMG_1019.JPG
    2.6 MB · Views: 2,829
  • IMG_1018.JPG
    IMG_1018.JPG
    1.9 MB · Views: 2,424
Hmmmm, yeah.......................

  I too would suggest a Midi- Sys. But the extra space won't really help with the multi-directional angling problem. How about going to a Sys-IV and placing the drill vertically with a divider set up like a large slot for the drill. Use the added space for more accessories or a second tool?

Seth

 
Now you see my pain [smile]

I have this empty sys 3 laying around so I've been trying to make use of it.  Also a sys 4 is just so damn big.  The weird angles are what drove me to think of a way to use spray foam and my original question to see if anyone else has tried it

Next week I'm going to make a trip to "the big city" where I can wander into different big box stores. I may just take the drill with me and see if it fits into a competitive box from DeWalt, Ridgid, etc.  I don't need to stack it with other Systainers, I just need a decent storage solution as Milwaukee didn't supply anything with the drill; not even a holder so you don't lose the chuck key.

Thanks again for your help

 
FWIW...I believe Milwaukee offered a steel case as an accessory for this drill, it may still be available from Milwaukee. The number would be in the form of, 48-55-xxxx.
The reason I know is because I own an 1854 model and while trying to locate a case for the 1854, I stumbled upon a case for the 1660. The steel cases are real nice and allow extra room inside for accessories. They may rust and dent but they'll never crack. [big grin]
 
Back
Top