-Cut a piece of 1/4" hardboard to fit in the systainer. I didn't worry about the irregular shape and just cut it rectangular to make things simple.
-Lay out items on hardboard the way you want.
-Trace around all items. I found you want to keep the line fairly tight to the item as you want the items to fit snug in the foam.
-Use a forstner bit (I used a drill press) to make some holes on the hardboard for finger notches and also as a place to start your jigsaw cuts.
-Use a jigsaw and cut out the tracings on the hardboard.
-Use double-sided tape and attach the hardboard template to a piece of foam. I like to use a decent sized piece of foam to make working with the router more stable and safe. I also mark the foam at the edges of the hardboard template so I can cut it later.
-Use a router with a template bit and start removing foam.
-Cut the foam on the markings you made earlier.
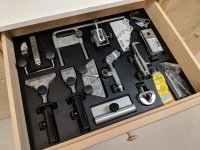
-Place foam in systainer and then place items in their appropriate spots. I also just put the hardboard template underneath in case I ever needed to use it again.
The smallest router template bit I could find was 1/2" in diameter so would have been nice if there is a smaller diameter bit for some of the smaller items. Also the cutting depth of the bit was 1", so for some of the shallower items, I used some 1/2" pieces of MDF along with more double-sided tape to prop up the hardboard to make shallower passes with the router. Another piece of 1/2" foam would have probably worked better for this though.
Would be pretty cool to see what a CNC router could do though [big grin]
Networking Tools in Tanos T-Loc Systainer I
[attachthumb=#1]
[attachurl=#1]
Computer Duster in Mirka Systainer II
[attachthumb=#2]
[attachurl=#2]
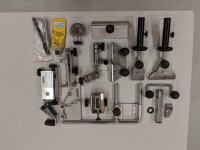
Misc Tools in Mini Systainer
[attachthumb=#3]
[attachurl=#3]
-Lay out items on hardboard the way you want.
-Trace around all items. I found you want to keep the line fairly tight to the item as you want the items to fit snug in the foam.
-Use a forstner bit (I used a drill press) to make some holes on the hardboard for finger notches and also as a place to start your jigsaw cuts.
-Use a jigsaw and cut out the tracings on the hardboard.
-Use double-sided tape and attach the hardboard template to a piece of foam. I like to use a decent sized piece of foam to make working with the router more stable and safe. I also mark the foam at the edges of the hardboard template so I can cut it later.
-Use a router with a template bit and start removing foam.
-Cut the foam on the markings you made earlier.
-Place foam in systainer and then place items in their appropriate spots. I also just put the hardboard template underneath in case I ever needed to use it again.
The smallest router template bit I could find was 1/2" in diameter so would have been nice if there is a smaller diameter bit for some of the smaller items. Also the cutting depth of the bit was 1", so for some of the shallower items, I used some 1/2" pieces of MDF along with more double-sided tape to prop up the hardboard to make shallower passes with the router. Another piece of 1/2" foam would have probably worked better for this though.
Would be pretty cool to see what a CNC router could do though [big grin]
Networking Tools in Tanos T-Loc Systainer I
[attachthumb=#1]
[attachurl=#1]
Computer Duster in Mirka Systainer II
[attachthumb=#2]
[attachurl=#2]
Misc Tools in Mini Systainer
[attachthumb=#3]
[attachurl=#3]
")