ear3
Member
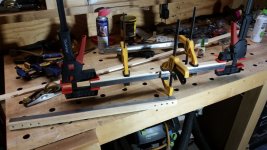
For keeping panels flat under clamping pressure when edge joining multiple boards, I have used my bow clamps before. But these can be a bit fussy to set up, and since I only have one pair each at the 2, 3 and 4 ft. lengths, I was coming up short on these 16" panels I had to make.
So I decided to make my own set.
Started with a 4 ft. piece of square steel tubing sourced from Home Depot, cut it in half, then drilled 4 mating holes on each side with the drill press (done while bars were stacked on top of each other so holes would line up)
View attachment 1
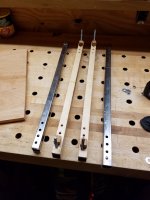
Notice I ground a distinguishing mark on each side/face of the pair to ensure correct alignment when clamping.
Then I planed down some scrap pine to about 3/8th, and crazy glued a strip to the inside face of each metal bar (one bar of each pair ultimately ended up with scrap on either side, as I initially glued the scrap incorrectly to outside face)
View attachment 2
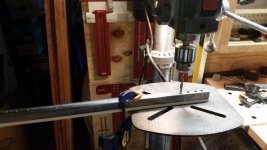
Then drilled out the through holes on the wood.
View attachment 3
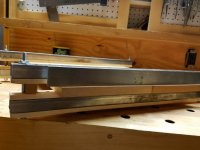
The purpose of the wood skin is two fold. It protects the piece being clamped from the metal, and I'm also able to attach with a pin nailer a small block of scrap the same thickness as the panel so the edges don't get dented, as you can see here from the picture of the completed clamps, where the 5/16th threaded rods have been added.
View attachment 4
I used a nylon locking nut btw on the bottom of the post to make screwing it down easier.
If I were to do them over, or make another pair, I might instead attach the wood skin with countersunk self tapping screws instead of CA glue, so they can be easily replaced as needed. I also might use something more robust than pine, which has already gotten a little beat up after only one project. I was just concerned about using a harder wood that might crimp the edges of the piece being clamped.
But in the end you actually don't have to apply that much pressure to make them work. Just three taps on the impact driver was enough.
Here they are applied to a board that I had already done
View attachment 5
Keeping the panel perfectly flat according to the Starrett straightedge
View attachment 6
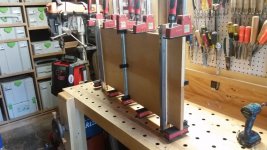
And as long as you do your cuts of the original tube stock reasonably square, and align the ends when drilling the holes for the threaded rod, they will stand up on edge even when the panel is clamped up (that panel is being supported by the panel clamps themselves, which protrude further from the edge of the stock than the Bessey clamps.
View attachment 7
All in all very happy with them, and I plan on making a few more pairs. Altogether, the components came out to around $25 (4 ft. square tube, 4 threaded rods, package nylon locking nuts, package regular hex nuts), which is still less than the cost of one prefab panel clamp you might get from Damston or Lee Valley:
http://www.rockler.com/damstom-38-in-panel-clamp-blue
http://www.leevalley.com/us/wood/page.aspx?p=31181&cat=1,43838
So I decided to make my own set.
Started with a 4 ft. piece of square steel tubing sourced from Home Depot, cut it in half, then drilled 4 mating holes on each side with the drill press (done while bars were stacked on top of each other so holes would line up)
View attachment 1
Notice I ground a distinguishing mark on each side/face of the pair to ensure correct alignment when clamping.
Then I planed down some scrap pine to about 3/8th, and crazy glued a strip to the inside face of each metal bar (one bar of each pair ultimately ended up with scrap on either side, as I initially glued the scrap incorrectly to outside face)
View attachment 2
Then drilled out the through holes on the wood.
View attachment 3
The purpose of the wood skin is two fold. It protects the piece being clamped from the metal, and I'm also able to attach with a pin nailer a small block of scrap the same thickness as the panel so the edges don't get dented, as you can see here from the picture of the completed clamps, where the 5/16th threaded rods have been added.
View attachment 4
I used a nylon locking nut btw on the bottom of the post to make screwing it down easier.
If I were to do them over, or make another pair, I might instead attach the wood skin with countersunk self tapping screws instead of CA glue, so they can be easily replaced as needed. I also might use something more robust than pine, which has already gotten a little beat up after only one project. I was just concerned about using a harder wood that might crimp the edges of the piece being clamped.
But in the end you actually don't have to apply that much pressure to make them work. Just three taps on the impact driver was enough.
Here they are applied to a board that I had already done
View attachment 5
Keeping the panel perfectly flat according to the Starrett straightedge
View attachment 6
And as long as you do your cuts of the original tube stock reasonably square, and align the ends when drilling the holes for the threaded rod, they will stand up on edge even when the panel is clamped up (that panel is being supported by the panel clamps themselves, which protrude further from the edge of the stock than the Bessey clamps.
View attachment 7
All in all very happy with them, and I plan on making a few more pairs. Altogether, the components came out to around $25 (4 ft. square tube, 4 threaded rods, package nylon locking nuts, package regular hex nuts), which is still less than the cost of one prefab panel clamp you might get from Damston or Lee Valley:
http://www.rockler.com/damstom-38-in-panel-clamp-blue
http://www.leevalley.com/us/wood/page.aspx?p=31181&cat=1,43838
Attachments
-
 metal bars with holes.jpg180.7 KB · Views: 756
 -
 attaching wood.jpg222.1 KB · Views: 606
 -
 through holes.jpg172.3 KB · Views: 474
 -
 completed clamps.jpg385.8 KB · Views: 763
 -
 straightedge check.jpg262.6 KB · Views: 6,414
 -
 straightedge check closeup.jpg186.7 KB · Views: 734
 -
 clamps in action on end.jpg220.4 KB · Views: 1,082