Does anyone really use/need Guide Bushings (Copy Rings) anymore?

smorgasbord

Member
Joined
Jan 7, 2022
Messages
1,367
Like 30 years ago palm routers were called "laminate trimmers," because you'd chuck in a ¼" shank ½" dia bottom bearing bit in them to trim Formica. Heck, offset bases to help trim in place were a thing, too. There were basically two bearing bits: a 1" long straight and a 15º or so bevel to get that Formica chamfered edge look.

Today, we have tiny ¼" diameter bits with bearings, giant 2" diameter bits with bearings, bearings on the top, bearings on the bottom, bearings on top AND bottom. Heck, there's even bits with a bearing in the middle:
Screenshot 2025-09-20 at 9.51.59 AM.png
(OK, maybe that's not a ball bearing, but you get the idea). And then to top it off, we have CNCs and the Shaper Origin. And, these bits are available with spiral cutters, helix cutting angles, even replaceable inserts.

So, why does anyone still need guide bushings today?

I can think of only two situations:
A) To work with commercial templates designed/made to support hardware they're selling you - decades ago.
B) To be able to make multiple depth passes, deeply.

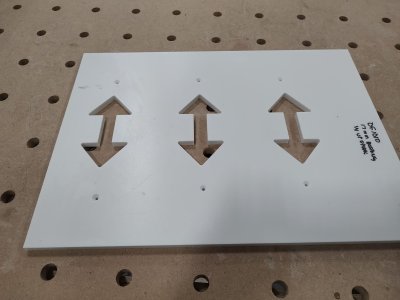
An example of both would be Soss Hinges. Which, perhaps not coincidentally, is the last time I can recall using guide bushings. I made my own template rather than spend the money on Soss's:
Soss#218.jpg
Ignore the groove, this was made from scrap plywood. You can't see it here, but I even drilled holes from the sides to reduce the length for the deeper center passes.
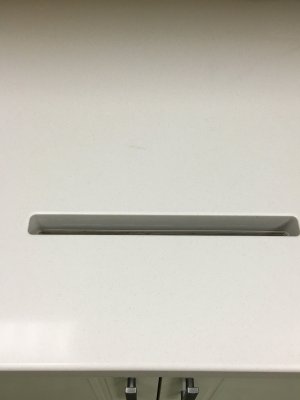
Heck, it looks like I even had to fine-tune the fit by adding some teflon tape on the inside:
Soss#218B.jpg

I suspect a lot of us have shop-made templates that we used once, but still have them hanging on the walls - some for decades. I should probably throw this one away. If I needed it again, I'd probably make something on my CNC that was the exact size of the hinge, and then use a pattern (top bearing) bit. And, I could even do multiple depth passes since deeper ones would simply register off the previous ones. And, I have a pattern bit with two top bearings on the shank, too.

So, why use Guide Bushings today? Maybe because you're doing a tight inlay and using small diameter bits for which there isn't a bearing version?

I ask all this because I'm making YARSB (Yet Another Router Sub-Base) for my self-refurbished mid-sized Bosch 1613EVS, and it's got Bosch's proprietary bushing mechanism (snap lock instead of threaded) in the metal base. While that design uses a larger hole than the PC bushing (50+mm outer diameter versus 1&3/16") so that it doesn't restrict bit choice as much, but it is still a restriction for some bits I'd like to use in that router. Bosch realized this too, as a later version of the router (1613AEVS) went with a much larger hole in the base, and then the snap-lock mechanism screws to the metal base, but I don't have that router. For small routers, the 1&3/16" hole isn't a limitation, and besides almost all of those have interchangeable bases.

Back to YARSB, since I had a base damaged already, I decided to chuck in a 2" diameter surfacing bit and plunged it through the metal base (it's an aluminum alloy). That worked just fine, but now I can't use guide bushings with that base, which got me thinking that the last time I used a guide bushing was decades ago to cut mortises for those Soss hinges. That was last century, btw.

For laughs, here's Ron Paulk on "Understanding pattern routing":


Yes, he makes a template to make a template to route the rectangular openings. Just keep adding ⅛".... 🤪

So, can anyone give me a good reason not to enlarge the opening the metal base of my Bosch router? The best reason is that I should actually get an OF2200 for the bigger than 48mm diameter bits the Bosch can handle today. But, that's a $1200 expense that I'm postponing until I need it. That said, what keeps happening is that when I need it, I find another way to do the task instead of taking the time to order and wait for the router. So, maybe I'll never spend that $1200?

Anyway, unless someone here comes up with something I haven't thought of (likely, but probably not a common case), I hereby declare the death of Template Guide Bushings (Festool Copy Rings).
 
Just because there are more popular methods and or newer tooling/techniques doesn't totally de-value methods that work with the right setup. It's true that using guide bushings was more prevalent years ago compared to now, but that technique could certainly be a "problem solver" in some situations (I'm not going to speculate on what) and as you note, folks who use certain fixtures, such as for dovetails will still have that need.

The availability of tooling with various bearing configurations has certainly kicked up the use of templates plus table routing for taking things to final contour in a noticeable way these days.
 
Yeah, the dovetail jigs are probably the strongest use case for keeping guide bushings. But, then I keep reading about bushing alignment issues affecting resulting joint quality. Has anyone created bits with bearings built-in so you don't need bushings? And, I assume that Shaper Origin can do everything a Leigh D4 jig can, right?

Another potential advantage for bushings is that alignment can be done before the bit is plunged through the template. You do have to be careful with inside routing to have the router positioned so that it won't rout the template before the bearing reaches template depth.
 
Anyone fitting kitchen worktops with postform joints is using copy rings/guide bushes as far as I know.
Thats damn nearly all of the kitchens with a corner on the worktop in the UK.
 
  • Like
Reactions: P_K
Yes of course.

Imagine routing out the space for a door lock (european style). Ik you the go lower depth for the other two holes of the 3-point closing mechanism... your bearing would disappear above the router base. Tell me what's easier; the ring, switching out bits and re-setting the depth settings every cut or using a fatso template that raises the whole router up?
 
Yes, they are still in use. I have cut literally thousands of pockets with a template like the one below. There is another with circular ends to, but I don't seem to have a pic handy. The round one is for a countertop fastener called "Tite-Joint"
The pointed ones just use a 1/4"-20 bolt and some rectangular washers. They can be purchased, in bulk, by the thousands, fat less costly than the brand-name ones.
Because of the need to have a router set up to use this, it is simply easier to make other templates, that use the same bushing and bit.
Sure the Origin could do this, throw down the Plate, anywhere, but why take the risk? My Makita compact router is just as ready. Eventually, I did make a few other templates, that work with OF1010. It was mostly for larger areas, where the bigger base was helpful. The superior dust collection helps too.
 

Attachments

  • Dogbonetemp.jpg
    Dogbonetemp.jpg
    168.1 KB · Views: 8
Another potential advantage for bushings is that alignment can be done before the bit is plunged through the template. You do have to be careful with inside routing to have the router positioned so that it won't rout the template before the bearing reaches template depth.
You also have to remember to "un-plunge" before you remove the router too.
Over the years, I have seen several guys forget, or pull away, with the motor still slowing down. Since that cut is 1/2" deep, the template (at minimum) gets a big gash in the side. Most of them only do it once.....most lol
 
Anyone fitting kitchen worktops with postform joints is using copy rings/guide bushes as far as I know.
Sure, that falls into the "buy the template from the company making the hardware" category I listed in the thread starter. If you do a variety of things, the Shaper Origin comes into play:

Imagine routing out the space for a door lock (european style).
Do you mean something like this?

If you the go lower depth for the other two holes of the 3-point closing mechanism... your bearing would disappear above the router base. Tell me what's easier; the ring, switching out bits and re-setting the depth settings every cut or using a fatso template that raises the whole router up?
I think what you're referring to is that these door lock mechanisms need a deep mortise (couple/few inches) in the door edge for the center and top/bottom locking mechanisms, plus a shallow channel also in the door edge for the metal strips that connect them to each other, right? I actually have GU versions of these on my 5 exterior doors that I mortised myself using just an edge guide, but sure, pros doing this all the time will want templates.

And if I'm correct, then the issue is that to rout the shallow channel you can't have a deep cutting bit. With, say, a ½" thick template the bit's cutting depth couldn't be more than about ¾", or 1" with a ¾" thick template. But, then those aren't great for cutting the 2" or so deep mortises for the lock mechanisms, right?

I haven't seen templates for these door locks - are they a single template that spans the height of the door to cut the 3 mortises and the connecting channel? I've seen templates for cutting the individual locking mechanisms. At any rate, pros doing this would just have two routers. A mid-size or larger for the deep mortises and an easy to handle trim router (fixed depth even) for the shallow connecting channel. DIYers like myself wouldn't pay for the expense of buying a template (as I didn't for my 5 doors).

EDIT: Here's Spencer Lewis showing off his double-digit router collection without bragging about it:


But, at any rate, we're back, again, in the commercial template for commercial hardware category.
 
Last edited:
I have cut literally thousands of pockets with a template like the one below.
That's a commercial-bought template, right?

If you were going to make your own template, wouldn't it be easier to make one that's the exact size of the hardware, instead of making a template that's exactly 1/16" (or whatever) larger than the hardware all the way around?

The superior dust collection helps too.
Don't you find that the guide bushings get in the way of effective dust collection? It's been decades, but I do kind of recall having that issue with my Soss template - but of course my routers then didn't have any dust collection connections. Today, I would think that even the dust collection hoods on the top of the base, surrounding the bit, would work better with just a bit than a bit inside of template guide.

BTW, in case it wasn't obvious, I was being tongue-in-cheek about "the death of Template Guide Bushings." But, I am serious in thinking that I'd be willing to sacrifice the use of those for the advantages of larger base holes (which I acknowledge Festool solved with the various sub-bases and attachments they make for their routers). I would probably be totally content with restricting my template use, if any, to my trim router.
 
I use guide bushing with my MFS all the time. Simple math, you can set the MFS to the exact size you need for your bushing/bit combo.

I also use the Shaper Origin negating the need for guide bushings or bearing bits, go figure……

Tom
 
I use guide bushing with my MFS all the time.
I've seen the Chinese clones of that everywhere between $46 and under $100, like:
or

But, can't think of how often I'd use them. Cutting board juice grooves I guess. What else? How is the MFS better?
 
And, lol (literally, I laughed out loud), here's another Spencer Lewis video where he's touting a router bit that acts like a template guide, saying it's faster to set up and more accurate:


Not a dig on Spencer, just yet another way to look at doing things.
 
Do you mean something like this?
Yes.
I think what you're referring to is that these door lock mechanisms need a deep mortise (couple/few inches) in the door edge for the center and top/bottom locking mechanisms, plus a shallow channel also in the door edge for the metal strips that connect them to each other, right?
The top and bottom mortise is not as deep as the center one. That alone.
I actually have GU versions of these on my 5 exterior doors that I mortised myself using just an edge guide, but sure, pros doing this all the time will want templates.

And if I'm correct, then the issue is that to rout the shallow channel you can't have a deep cutting bit. With, say, a ½" thick template the bit's cutting depth couldn't be more than about ¾", or 1" with a ¾" thick template. But, then those aren't great for cutting the 2" or so deep mortises for the lock mechanisms, right?

I haven't seen templates for these door locks - are they a single template that spans the height of the door to cut the 3 mortises and the connecting channel? I've seen templates for cutting the individual locking mechanisms. At any rate, pros doing this would just have two routers. A mid-size or larger for the deep mortises and an easy to handle trim router (fixed depth even) for the shallow connecting channel. DIYers like myself wouldn't pay for the expense of buying a template (as I didn't for my 5 doors).
There are different templates available. For the metal plate you can use something like the Festool OF-FH (or just a single or two parallel guides) and then a template for just the three mortises. There are also half-length templates for everything, like this;


This won't fly with bearing bits as the template would need to be fatter for the cuts that are less deep. But that won't work.

Conclusion is simply that the guide bushings are the best solution for some jobs.
 
That's a commercial-bought template, right?

If you were going to make your own template, wouldn't it be easier to make one that's the exact size of the hardware, instead of making a template that's exactly 1/16" (or whatever) larger than the hardware all the way around?


Don't you find that the guide bushings get in the way of effective dust collection? It's been decades, but I do kind of recall having that issue with my Soss template - but of course my routers then didn't have any dust collection connections. Today, I would think that even the dust collection hoods on the top of the base, surrounding the bit, would work better with just a bit than a bit inside of template guide.

BTW, in case it wasn't obvious, I was being tongue-in-cheek about "the death of Template Guide Bushings." But, I am serious in thinking that I'd be willing to sacrifice the use of those for the advantages of larger base holes (which I acknowledge Festool solved with the various sub-bases and attachments they make for their routers). I would probably be totally content with restricting my template use, if any, to my trim router.
No, those are shop-made, out of scrap Corian, on the CNC, though Origin can do it too.
Once you have a pattern, changing the offset is easy, but easy is not the point. The offset allows for plunging. It can be done with a template bit, but not exactly advisable. There are a few reasons. First is depth of cut. You would a lot of different cut-length bits, to deal with different depth pockets, since they all have to go deep enough to hit the bearing.
Second is about control. Freely plunging into a workpiece, before you get deep enough to touch the bearing, can cause a loss of control. The width of the pocket vs diameter of the bit could also be a clearance problem too.
As far as dust extraction, yes, there is some restriction, but it's not that bad. A lot of it has to do with the size/ shape of the pocket.
As I said before, I have semi-permanent setups, with both compact and OF1010.
I passed "double digits" in router count years ago. Heck, that's only half.....lol
 
I do heaps of template work and for anything large I still find it easier and less likely to stuff up inadvertently using guide rings, but on occasion I'll just rely on a bearing router bit.

For smaller inlay work though I only ever use guides as it's so much more reliable and likely to get a good result every time.
 
The top and bottom mortise is not as deep as the center one. That alone.
Well, as I said above "could even do multiple depth passes since deeper ones would simply register off the previous ones." That is you choose the pattern bit that can cut the shallower mortises and then you just lower the bit for subsequent passes, and that's OK since the bit, if not riding on the template, rides on the previously cut walls, which are the same as the template.

Conclusion is simply that the guide bushings are the best solution for some jobs.
No real argument from me, except that those jobs aren't ones that I'm doing, as my multi-decade non-use of guide bushings shows. From what I'm gathering, the two main uses are:

1) Router dovetail jigs, which I don't use because the router shank forces a too-large minimum pin width that I don't personally find attractive.
2) Mortising for hardware. But that's primarily for pros who will get multiple use of templates, and even there the pros probably also go to multiple dedicated routers pre-setup for these repeat tasks to further streamline the work. In watching some of Lewis' videos his use of the ⅝" bearing, ½" wide pattern bits instead of guide bushings comes up surprisingly frequently. He did have one template with a movable bar that was thin and so wouldn't work the bearing (and it was damaged so maybe he had tried that, lol). He mostly complains about guide bushing centering setup time.
3) Plunging into the mortise in tight quarters.

I still think that most cases where guide bushings are used, other methods are just as good, if not better. That's especially true if you're making your own template, as well as if you've already purchased a Shaper Origin. Looking up the program for hardware mortising has got to be better than drawers full of templates, or templates hanging on walls.

EDIT: Added #3, above.
 
I've seen the Chinese clones of that everywhere between $46 and under $100, like:
or

But, can't think of how often I'd use them. Cutting board juice grooves I guess. What else? How is the MFS better?
Can’t answer your question, I’ve never used the knock off.

Tom
 
What do you use the MFS for? Some examples, please.
Before I got the Shaper Origin it was used to make anything that needed a template, including circles.

The job I’m at right now I used it a couple of weeks ago to let in countertop steel supports into the island cabinets. Set the size of the opening, set the stops, moved it from location to location to route the cabinet rails and back.

I actually have two MFS’s, one is set up, the other is wrapped up and put away.

Something I do have pictures of. I made these tops (about 40 of the for the job).

This slot is where the plans spec it, the red tape is where the owners of the property want it.

IMG_0996.jpeg

The MFS sized and laid loosely in place. The witness marks allowed me to accurately align the MFS.

IMG_0998.jpeg

Happy with the location clamped in place.
IMG_0997.jpeg

The MFS secured using hot glued blocks and clamps. Notice the 3D printed corners. These and changing bushings will allow me to make the insert without resizing the MFS.

IMG_0999.jpeg

IMG_1001.jpeg

Routed down 0.500”, the adhesive will leave the inlay about 0.002 tall.

IMG_1003.jpeg

The inlay ready to be routed.

IMG_1005.jpeg

The completed job.

IMG_1010.jpeg

I don’t have a picture, I think the first bushing was a 20mm, the pictured bushing is a 10mm.


Tom
 

Attachments

  • IMG_0995.jpeg
    IMG_0995.jpeg
    1 MB · Views: 9
  • IMG_0993.jpeg
    IMG_0993.jpeg
    1.2 MB · Views: 7
Back
Top