You are using an out of date browser. It may not display this or other websites correctly.
You should upgrade or use an alternative browser.
You should upgrade or use an alternative browser.
Does anyone really use/need Guide Bushings (Copy Rings) anymore?
- Thread starter smorgasbord
- Start date


luvmytoolz
Member
demographic
Member
- Joined
- May 9, 2015
- Messages
- 859
You do know that bearing guide router bits with the bearing at the end of the cutter closest to the collet are significantly weaker and consequently more dangerous to do deep cuts (even if in small increments) dont you?
Anyone Ive ever seen and anytime Ive done postform joints on UK kitchen worktops has used a factory made postform jig with a guide bush, this allows the 40 or so mm deep cut to be completed quickly, using a reasonably lightweight jig and not having to register off previous cuts using a increasingly wobbly cutter that has the bearing on the collet enddo I have to explain about the bearing thinning the cross section and therefore the rigidity of the cutter? Ahh, looks like I just did.
This thread seems to show that the use of guide bushes is completely dead for a limited number of people in a fairly limited set of circumstances.
Well, I for one and glad we cleared that up.
Ahem.
- Joined
- Oct 16, 2015
- Messages
- 5,824
The part that really sucks about this, would be routing that slot, back where the client wants it.
It would be even worse, if they require the buildup too.
Me, the jerk that I am, would be very upset about this. "Who the hell is paying for this?"
40 of them? all installed? .......oh, hell no!
IMHO, this is 100% the client's fault. They are the ones who approved the drawing. If that information turns out to be wrong later.....There is no way the fabricator could know that.
Fault and problem are different words for a reason. This is the client's fault, but they don't see it as their problem.
They just want it fixed. The person the "problem" lands on, is the one who has to fix it, even though it wasn't his fault.
I have run into this dozens of times, it makes me mad every time. The bosses always say, "it pays the same" (effectively meaning "get over it")
I never see it that way. I was doing something. If I have to stop that, to fix this, now I'm behind, on that job.
Sure, it pays the same, but this has to cost someone up-stream, they might not do it next time.
Personally, I would have questioned that original placement, especially over 40 of them. Even taking it to the actual project manager, if the engineers don't give satisfactory answers. They will generally confirm, with someone, on the other end. Sometimes, it still happens.....
Over the years, I have seen a drastic decline in people's ability to understand the drawing, in front of them. Even "designers" fall into this. They have a "look, in their minds" but don't not understand how it looks in shop drawings.
Sorry, unsolicited rant off
Great job Tom. It looks good.

No as the lenght of the bit would result in the bearing being above the router base for the shallow cuts.Well, as I said above "could even do multiple depth passes since deeper ones would simply register off the previous ones." That is you choose the pattern bit that can cut the shallower mortises and then you just lower the bit for subsequent passes, and that's OK since the bit, if not riding on the template, rides on the previously cut walls, which are the same as the template.
In fact the required length bits with bearing above don't even exist.
Like I said; the bushings are the best solution for some jobs. If you don't do those that's perfectly fine too but still doesn't diminish that fact.
Last edited:
smorgasbord
Member
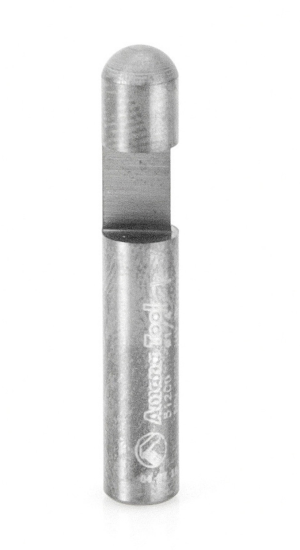
How are such bearings assembled? Specifically, how is a bearing with, say, a ⅜" center hole slipped over the ½" shank to reach the thinner cross-section of the shank?You do know that bearing guide router bits with the bearing at the end of the cutter closest to the collet are significantly weaker and consequently more dangerous to do deep cuts (even if in small increments) dont you?...
I have to explain about the bearing thinning the cross section and therefore the rigidity of the cutter? Ahh, looks like I just did.
I don't think they exist. A ½" shank pattern bit has a bearing that has a ½" center hole.
Sure, you might end up choosing a ¼" shank pattern bit when a ½" shank straight bit in a guide bushing would make the same cut, but you know that's happening. And, as we've discussed above, with pattern bits for mortises, you're not choosing ones with long cutting edges because you might have to take a too-deep first pass (unless you used an extra thick template, as discussed above).
Cheese
Member
Very nice job on the Dutchman Tom... ") ...is it visible at all?
...is it visible at all?
How did the slot become so far removed from where the client wanted it?
Love the printed corners, did you print them yourself or are they commercially available?
...is it visible at all?How did the slot become so far removed from where the client wanted it?
Love the printed corners, did you print them yourself or are they commercially available?
smorgasbord
Member
No, you just use shorter cut length bits. There are plenty of pattern bits with a cutting length under ¼", for instance. Great for door-hinge mortises. For many circumstances, you can choose a pattern bit with a cut-length of around ⅞"- that will enable routing at a shallow ⅛" depth with a ¾" thick template, or lower the bit and cut deeper. At some point, of course, your router's maximum depth of cut is reached, so you remove the template and use the previously cut walls as the template. At some depth point, however, your only option with bearings is to switch to a longer bit. So, switching bits for deep mortises is a downside for pattern bits, weighed against aligning the guide bushings with a single long enough bit that can be retracted for shallow cutsNo as the lenght of the bit would result in the bearing being above the router base for the shallow cuts.
So, the trade-off might be:
1) Mortising (inside routing):
• Pattern bit: Might need more passes, might need to swap bits for deep mortises, and later passes reference off previously cut walls so might have a slight inaccuracy.
• Guide bushing: Need to align the bushing in the router base and, if making your own template, need to account for the bit/guide distance offset.
2) Contour forming (outside shape routing) hand-held:
• Pattern/Flush-trim bit: No issues I can see
• Guide bushing: Need to align the bushing in the router base and, if making your own template, need to account for the bit/guide distance offset, AND can approach from one direction only
3) Contour forming (router table):
• Pattern/Flush-trim: No issues I can see
• Guide bushing: Need to align the bushing in the table and, if making your own template, need to account for the bit/guide distance offset, AND can only approach from one direction only
The "approach from one direction only" thing matters if you're trying to reduce tear-out by routing with the grain. If you've got both a pattern bit and a flush-trim bit, you can just flip the template/workpiece assembly (double-sided taped) over and use the other bit to approach the cut from the other direction. You can't do this with guide bushings since they're always "at the top."
Except for routing where 8mm shanks aren't robust enough, a Shaper Origin would be "better," albeit a lot more expensive, for those few cases where pattern or flush-trim bits aren't better in the first place.the bushings are the best solution for some jobs.
Cheese
Member
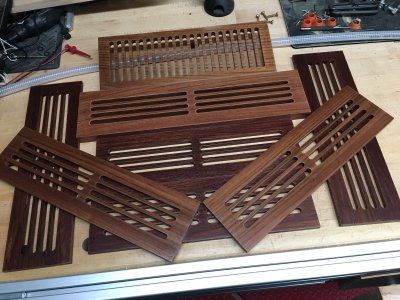
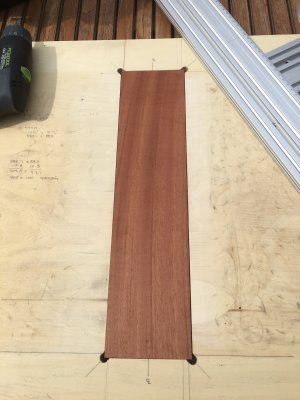
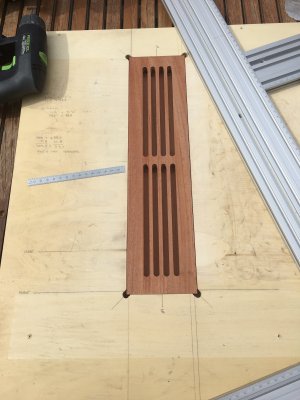
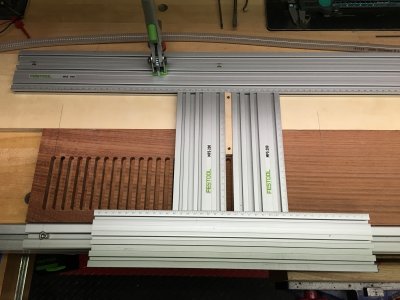
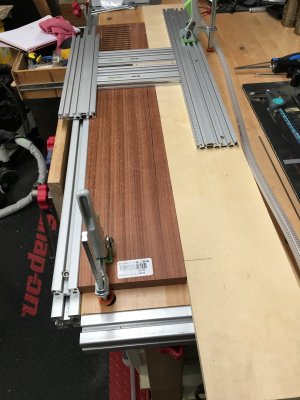
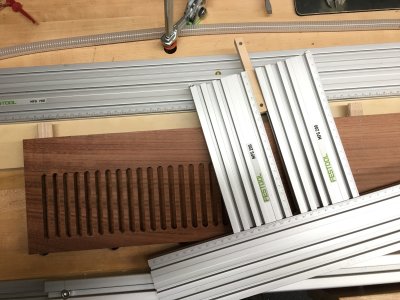
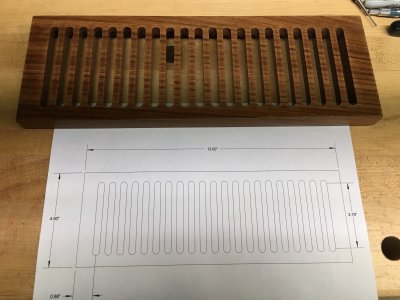
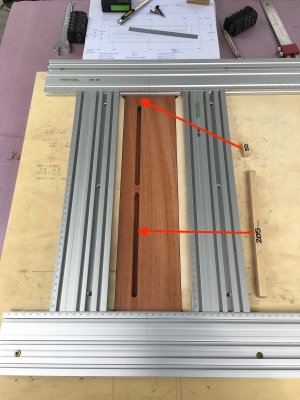
I've made lots of custom size HVAC grills from Jatoba to match the Jatoba border on a maple floor.What do you use the MFS for? Some examples, please.
Attachments
smorgasbord
Member
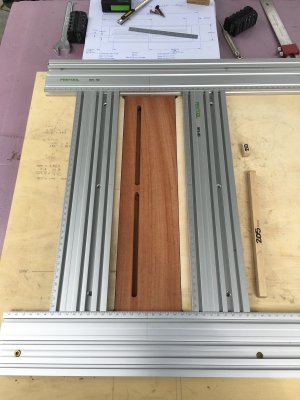
Very nice. For the first grille, with the length-wise slots, did you have some sort of stop system in place to get that middle piece uniform?I've made lots of custom size HVAC grills
I'd use my small CNC for something like that. Repositioning the MFS for each cut seems a pain. And yes, I would not want to undertake those with a pattern bit in a hand-held router.
Funny enough, this video dropped today
(another bearing the middle bit)
That looks completely terrible and it's $70 at Tools Today. A 1/4" single flute bit in a cordless trimmer would be about 1000x faster.
Attachments
Cheese
Member
Ya, those are the small plywood stops shown in photo 3. Put them in place and route the upper groove, remove and swap them around and route the lower groove.Very nice. For the first grille, with the length-wise slots, did you have some sort of stop system in place to get that middle piece uniform?
Attachments
smorgasbord
Member
Got it.Ya, those are the small plywood stops shown in photo 3.
I understand using the long stop for the middle stop, but why not set the MFS so that the outside ends are limited without that small stop? Just curious.
smorgasbord
Member
Faster? No way. He's trimming laminate that is on BOTH the top and bottom faces in one pass. For 95 sheets, he's saving enough time to warrant the bit cost.That looks completely terrible and it's $70 at Tools Today. A 1/4" single flute bit in a cordless trimmer would be about 1000x faster.
Cheese
Member
There was a reason (I certainly hope so) but I can't remember it 8 years later.Got it.
I understand using the long stop for the middle stop, but why not set the MFS so that the outside ends are limited without that small stop? Just curious.
smorgasbord
Member
I'm going to speculate that you had a bunch of these to do and:There was a reason (I certainly hope so) but I can't remember it 8 years later.
1) For same-size grille blanks you could affix the MFS to the grille-holding template and just swap blanks in/out without changing alignment.
2) Even for different sized grilles, you would simply re-adjust the MFS to the size of the blank, and by using the same small stop you'd always get the same slot end distance from the end of the grille no matter what the blank size, rather than having to calculate it (with bushing offset) for each.
Ring a bell?
Cheese
Member
Bell rung thanks.
demographic
Member
- Joined
- May 9, 2015
- Messages
- 859
A common size for cutters is 1/2" diameter, and that for doing kitchen worktops has a 1/2" diameter shank. Thats pretty rigid, nice and safe to use.How are such bearings assembled? Specifically, how is a bearing with, say, a ⅜" center hole slipped over the ½" shank to reach the thinner cross-section of the shank?
I don't think they exist. A ½" shank pattern bit has a bearing that has a ½" center hole.
Sure, you might end up choosing a ¼" shank pattern bit when a ½" shank straight bit in a guide bushing would make the same cut, but you know that's happening. And, as we've discussed above, with pattern bits for mortises, you're not choosing ones with long cutting edges because you might have to take a too-deep first pass (unless you used an extra thick template, as discussed above).
So try this with a bearing guided cutter at the same cutter diameter, the bearings usually going to be 1/2" external diameter and maybe pressed onto a quarter of an inch shank. Thats significantly less rigid, not as safe to use. Especially on the reconstituted crap that makes kitchen worktops up.
You seem to not use guide bushes, thats fine, nobody is forcing you to do it.
But, you seem incapable of understanding that other peoples usage differs from yours and as such their techniques differ.
Its absolutely not rocket science to remove a copy ring and slap a big bit in yer router, go for it but unless you routinely do some things that some of us do then its maybe a tad arrogant to assume you know how the best way is to do something is.
In other words, don't judge a man til youve walked a mile in their shoes that way theyre a mile away and youve got their shoes.
smorgasbord
Member
Yes, that's what I said:So try this with a bearing guided cutter at the same cutter diameter, the bearings usually going to be 1/2" external diameter and maybe pressed onto a quarter of an inch shank.
Sure, you might end up choosing a ¼" shank pattern bit when a ½" shank straight bit in a guide bushing would make the same cut, but you know that's happening.
No, you're apparently not reading everything I'm writing.But, you seem incapable of understanding that other peoples usage differs from yours and as such their techniques differ.
Similar threads
- Replies
- 11
- Views
- 744
- Replies
- 85
- Views
- 2K
- Replies
- 3
- Views
- 1K