Stan Tillinghast
Member
- Joined
- Mar 18, 2007
- Messages
- 292
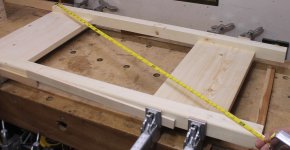
I’m finishing up my first serious woodworking project since we left Maui; it’s just a bathroom cabinet for storing toilet paper and the like; but I wanted to use all the tools and techniques I will need for other cabinets. It’s a Euro style cabinet with Euro hinges and solid plywood doors. It has a loose 6 mm melamine back panel in dadoes routed into the top, bottom and side panels.
The cabinet was racked about 1/8 inch to the left.
I used dominoes (5 x 30 x 3 per joint) but did not check for square as I clamped up the cabinet. Yeah, silly.
That was 2 days ago. Now I am able to rack the cabinet square with clamps angled on one side front and back.
Needless to say, the doors did not fit properly; but they are perfectly square, the cup holes seem to be aligned properly (done with LR32).
There is a 3/4 inch space behind the loose panel for a French cleat. Potentially I could use some 3/4 inch ply in a triangle on two sides on the bottom, screw to sides, bottom and to loose panel. Would leave screws showing on inside of panel.
My questions are:
1. Will the cabinet return to out of square when I remove the clamps ( suspect so)?
2. How long should I leave the clamps on?
3. Can I make a permanent correction with this cabinet?
3. How to avoid this in the future? Don’t use loose back panel with Euro cabinets?