Domino M5 threads in base

jbarr

Member
Joined
Mar 27, 2021
Messages
68
I'm in shock.
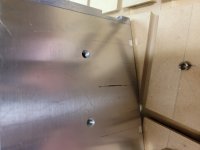
I tried screwing in the support that attaches to the base and a small internal thread came out. See bottom of picture. I thought these two threads in the base were solid but they're not. They contain a small insert. I can't use the Domiplate or any accessory that relies on those 2 threads
How do I get that back in (I've tried everything) or should I contact Festool as its only a few months old
 

Attachments

  • M5 threads.jpg
    M5 threads.jpg
    735.4 KB · Views: 526
That's called a Helicoil. It is there to prevent the fine thread in aluminium stripping out as you screw into it. You need one that has the small piece that is used to drive it into the hole. This piece is snapped off when the Helicoil is fitted and the lip that is left should prevent the coil from coming out. You can replace it yourself if you have a new one and the tool to fit it.

Contact Festool and they will fix the problem.
 
Thanks for the explanation. Makes sense
Its ironic that this is my first Festool product and it has developed a small fault only after a few months.
Anyway I have contacted Festool and my dealer (Total Tools) so the process is off and running but I am annoyed at the inconvenience of all of this.
 
If you don't want to wait for Festool to fix it, you can do this yourself.  You will need an M5 screw or bolt, two M5 nuts, an M5 flat washer and some blue or red threadlocker.

1.  Put the nuts on the screw a bit farther than the length of the helicoil insert. Tighten the two nuts into each other so they do not spin freely on the screw.

2.  Put the flat washer on the screw so it contacts the nut.  If the face of the nut is flat, you can leave off the flat washer.

3.  Put helicoil insert on the screw and then snug it up to the flat washer.

4.  Apply a small drop of threadlocker to the helicoil.  Don't use too much, as a little goes a long way.  At this point, you will have to act fast since the threadlocker will likely seep between the coils and could bond the screw to the helicoil.

5.  Insert the helicoil into the base plate and snug it up using the top nut.

6.  While holding the screw or bolt head from moving, back off the first and second nuts so the screw is free to move.

7.  Remove the screw from the newly inserted helicoil before the threadlocker cures.
 
Thanks Mike but couldn't do it. The helicoil kept squashing out of shape. I couldn't get it started no matter what I did.
I'll leave it up to Mr. Festool
 
jbarr said:
Thanks Mike but couldn't do it. The helicoil kept squashing out of shape. I couldn't get it started no matter what I did.
I'll leave it up to Mr. Festool

That's because Helicoils need to be "wound up" to be inserted in the hole, that's one of the reasons for the tang on the bottom. Once "wound up" it will thread easily into the tapped hole and will then expand. Then the tang is broken off and the combination of broken tang end, which is sharp and the expanded Helicoil insert, digs into the aluminum to prevent it from coming back out.
 
Thanks "Oldwood" (and others), happy ending. After your post and a bit of googling I found a very similar kit at the same very place I bought my Domino. Not only did they sell me the kit they even installed the new helicoil for me and the best part is Festool won't have my domino for a week or two.
 
"the best part is Festool won't have my domino for a week or two."

I find taking a tool in for service is a sure way to get a job the next day that you absolutely need the tool for ;)

Good to hear you got it sorted out. Mine has never given any trouble since the repair.
 
Back
Top