Dust Collection Pipe System

Mario Turcot

Member
Joined
Nov 26, 2017
Messages
1,288
Open to suggestion**

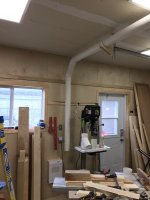
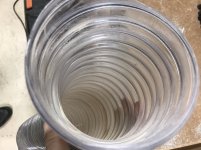
I start working on my dust collection system last weekend. I was tired of tripping on the flex hose that was running on the floor that connects on the table saw and band saw.

Everything start on that corner. Pipes are supported on French cleat. I'm using 45deg avoiding straight 90deg.
[attachimg=1]
I know my bag is full  [tongue]

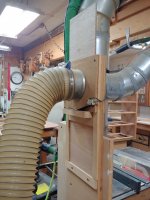
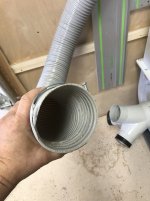
Here I capped one end and switch directly to the table/band saws. Those tools are in the middle of the shop and both mobile.
[attachimg=2]
Please disregard the plastering. I had a friend that came to help last summer and he offer to do it. It didn't last long before I asked him to move on something more important  [eek]

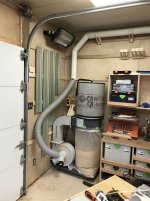
First question, I have to put two blast gates or else for the two tools. Because the tools are mobile what height should I put them?
[attachimg=3]
Again disregard the plastering  [embarassed]

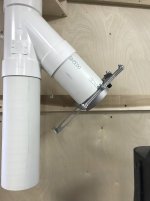
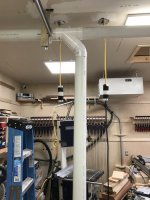
The pipes is supported here on the garage door rails. Not nice but effective  [big grin] Here is the last drop for the drill press and a floor sweep.
[attachimg=4]
and another picture of where the drill press blast gate for the drill press will be.
[attachimg=5]

There is no glue on the pipes yet. I was planning to use alum duct tape for easy removal, once I'm totally done. I am looking for a cad file for blast gate that I can run on my CNC, something similar to
[attachimg=6]

Any comment and suggestion is welcome.
 

Attachments

  • DC-Corner.jpg
    DC-Corner.jpg
    188.9 KB · Views: 17,560
  • DC-Saws (1).jpg
    DC-Saws (1).jpg
    116.6 KB · Views: 12,453
  • DC-Switching (1).jpg
    DC-Switching (1).jpg
    137.2 KB · Views: 12,171
  • DC-Drill (1).jpg
    DC-Drill (1).jpg
    92.6 KB · Views: 11,916
  • DC-Gate (1).jpg
    DC-Gate (1).jpg
    68.1 KB · Views: 11,867
  • blast-gate.jpg
    blast-gate.jpg
    7.4 KB · Views: 11,693
Sometimes with a layout like yours with the dust collector located in a corner it's better to run your main line diagonally across the shop ceiling and branch out from there. You can often eliminate a few fittings and some pipe footage which affect system overall performance more than anything else except maybe undersizing your pipe or joint leaks. And if you plan your branch connections so you use WYEs in place of combos you'll have even less restriction and significantly reduce the chance of a clog from the occasionally long silver that gets sucked up.

Also remember that running your pipe on the ceiling means everything must be pulled up to whatever your ceiling height is which takes work and further reduces your systems effectiveness. Not so bad with dust from a sander, table saw, band saw but for a planer or jointer with larger, heavier chips it might be. For those tools with the larger, heavier debris try locating them closer to the DC, so they have shorter pipe runs and therefore more suction. This may mean rearranging your shop tools or the DC. If neither work out with your situation then reducing the number of bends and overall pipe footage becomes even more important.

Try laying it out on paper with a diagonal main line across your shop and 45 off to each tool or a couple tools if they are close.
 
[attachimg=1]

[attachimg=2]

[attachimg=3]

[attachimg=4]
 

Attachments

  • DC-Gate.jpg
    DC-Gate.jpg
    68.1 KB · Views: 11,991
  • DC-Drill.jpg
    DC-Drill.jpg
    92.6 KB · Views: 12,158
  • DC-Switching.jpg
    DC-Switching.jpg
    137.2 KB · Views: 12,258
  • DC-Saws.jpg
    DC-Saws.jpg
    116.6 KB · Views: 13,900
:-)

You can get a great tool for manipulating your images for free from Microsoft. That tool is MS Office Picture Manager which used to be included with MS-Office up until Office 2013. You can get it now as part of SharePoint Designer, the trick is to just install Picture Manager by choosing Custom Installation during setup. It's all explained in the link below and very easy.

Picture Manager let's you batch resize, rename, adjust exposure, rotate, and more.

Follow the instructions here from Microsoft.
https://support.office.com/en-ie/ar...-manager-58837c3e-34db-4904-95e8-4eca7b7c5730
 
Thank you Bob & Peter. This is the first time this happen and I know why. A new phone  [embarassed] The thing is I open them in MS Paint to reduce the size and they were just fine.  [mad]

Bob, I understand your explanation about going diagonal and I thank you for taking the time to explain. You see this is why I planned to only use tapes for the joints  [big grin]. Yesterday I did a test with two ends 4" open and the further end was sucking debris like a champ  [smile]. One of the reason I went square with the wall is because I have my CNC on the north wall close to the corner (pict 3) it usually sit right under the air cleaner. I plan to make an enclosure for it and have the two extraction system work together for direct and ambient suction. This is a "concept" to be proven.

Bigger debris, funny that you mention that. I am looking at a combo Hammer A3 31 with mobile base. If you look at my extractor the fan has a 5" outlet that split in 3x4" and will be moving the power tool right next to it using one of the extra 4" outlet  [big grin]

Thanks again to you both  [thumbs up]

Now I really need to get on that blast gate design  [crying]
 
Here are my comments regarding blast gate height. You want to be able to see them from all around your shop. You will leave them open sometimes and being able to scan your shop to find which are open before moving on to the next machine is handy. I like mine somewhat low when possible so that the flex hoses can drop or stay level. The flex hoses really steal cfm  from the collector so keeping them as short as possible and not at steep inclines will help performance. If they need to be higher to stay out of the way make sure that they are high enough to not hit your head on them. Mine are metal and they would take a chunk out of my noggin if I let them.
 
[member=66185]Alanbach[/member] , thank you for your input. This is exactly what I was affraid. Put the blast gates high enough to not get hurt by walking into them or having shorter flex hoses.

When you say flex steal CFM, I believe you but I would like tyo know why? Is it because of "collapsing" effect?

Alanbach said:
Here are my comments regarding blast gate height. You want to be able to see them from all around your shop. You will leave them open sometimes and being able to scan your shop to find which are open before moving on to the next machine is handy. I like mine somewhat low when possible so that the flex hoses can drop or stay level. The flex hoses really steal cfm  from the collector so keeping them as short as possible and not at steep inclines will help performance. If they need to be higher to stay out of the way make sure that they are high enough to not hit your head on them. Mine are metal and they would take a chunk out of my noggin if I let them.

Some updates: I visit my local L.V. this morning with a piece of 4" sewer pipe & fittings to check how their blast gates and fittings fit.  The 4" self cleaning blast gates (L) have a pretty snug fit but the flange is a bit short (3/4") for my taste. The 4" to 2 1/2" reducer (F) is snug as well but the sweep floor (M) is too loose. It has a taper fit inside the pipe but the flange will go in by a shy 1/2".

[attachimg=1]
 

Attachments

  • LVfittings.jpg
    LVfittings.jpg
    30.7 KB · Views: 12,428
I believe the problem with the corrugated flex hose is the inside on most is not smooth and that creates turbulence in the hose.
 
Bob D. said:
I believe the problem with the corrugated flex hose is the inside on most is not smooth and that creates turbulence in the hose.

Make sense, I'll keep em short  [smile] thank you.
 
I wish that I could give you a proper technical / scientific answer. I can only tell you that over the years I have had many conversations by phone with the good people at Oneida and they have taught me a lot about techniques to improve the efficiency of my system as my shop has evolved. The issue of significantly greater cfm loss in flex duct vs. smooth piping has come up many times. Now I wish I had asked them for a chart of cfm loss on a part by part basis. They can rattle it off for you, unfortunately I cannot. For example when I switched from a Unisaw to a Sawstop a year or so ago they calculated the cfm loss in 18’ of flex duct vs. 2 long radius 90’s, fifteen feet of straight duct and three feet of flex duct and it resulted in 100 more cfm at the saw and greatly improved results. I definitely think that  the ridges on the inside of the flex duct create turbulence that reduces flow but I can’t back that up with the proper technical explanation. I hope this helps.
 
Those 'self-cleaning' blast gates are position sensitive. I have 6 of them around the shop. The ones mounted in drops (vertical) pipe seem to do better than those in runs (horizontal). One is in a 45V drop to my bandsaw and I have the gate withdraw to the bottom because it's easier to reach and it cleans out the track each time I close it. If it was installed with the gate coming out the top then each time you close it sawdust will get packed into the corners and eventually you won't be able to fully close the gate. I had that problem with one of mine and had to reorient the gate to mitigate the problem. Maybe the newer plastic gates lie this don't have that problem, but those in your photo look just like mine that are 15 years old.

On my DW735 stand as I mentioned in another thread I closed in the bottom of the stand to act as a chip collector. Where my planer is in the shop it sits near the TS and the jointer near the center of the shop floor. The box has four ports; one for the DW735, one for the jointer, one for the TS, and the fourth goes out to the DC. They all have gates on them. The jointer and planer gates are side-by-side with the gates facing each other and spaced so that when one is opened the other is closed by the same motion. But, they are NOT tied together, that's not necessary and would not allow for both to be closed when running the TS or using the planer outside the shop. The box also has a pair of flaps on the top with a furnace filter installed under the flaps. The flaps are configured so that they will seal under vacuum but open and vent under pressure such as when using the planer without external suction and relying on the chip ejector in the DW735 to expel the chips from the machine. It has worked quite well for over 10 years. I tried to get ShopNotes (sent them a short writeup and photos) interested in it as a years ago but they didn't see it as a viable project, not a wide enough appeal I guess.

As usual I have stayed off topic somewhat but to bring it back those 4 blast gates are all mounted so the gates withdrawal from the side, on one I had a problem with it clogging up and what I did was cut the corners off at the bottom of the gate travel with about a 1/2" x 1/2" chamfer on only the one side. If you look close one side is flat and the other is formed to create a space for the gate to ride in, that raised half is all you want to cut. I used a hacksaw blade and did it by hand. I can take a photo if you need it to understand what I am saying.
 
Let me first state that I am a cheapskate. I made all of my blast gates from scrap plywood. And I'm very happy with them. Each has a micro switch that when opened will turn on the cyclone. Fairly simple to make and if the cyclone in ON I know there's an open blast gate somewhere. This is one on my planer in the closed position:

[attachimg=1]

There's just a piece of steel strapping that makes contact with the micro switch which in turn sends 24V to the motor starter for the cyclone. This last pic is with the port open:

[attachimg=2]

Maybe just some food for thought? Good luck with your system.


Attachments

  • 20190429_082746.jpg
    20190429_082746.jpg
    213.7 KB · Views: 12,197
  • 20190429_082805_HDR.jpg
    20190429_082805_HDR.jpg
    204.1 KB · Views: 11,986
Mario, a general rule of thumb is that each short 90º elbow is the equivalent of 10' of straight smooth tubing.

And 10' of corrugated hose is the equivalent of 20' of straight smooth tubing.
 
[member=61023]BarneyD[/member] That;s very smart  [wink] I will keep in mind that process and the use of micro switch  [big grin] Thank you for the pictures.

[member=60461]Bob D.[/member]  & [member=66185]Alanbach[/member] Honestly that make a lot of sense. I have two different kind of flex hoses. One that came with the DC that I hate because it's stiff and one I bought from L.V. that claim to be xtra flexible.

The one blast gate I bought to test the fit with my pipes
[attachimg=1]
Note: There is actually no glue, everything on that picture is snug fit  [smile]

Here a picture of the extra flex hose I was planning to use. Reinforced with metal brush making the ridges bigger.
[attachimg=2]
And here a picture of the hose that came with the DC. Seems to create more static inside but a lot more smooth then the extra flex.
[attachimg=3]

[member=44099]Cheese[/member] That's an easy way to calculate, thank you. So far I have 28' of pipes. The drill press setup (pict 1) will probably end up with a short 2-3' of 2 1/2" flex.

Now I am debating to perm connect the table saw and band saw using a Y and two blast gates or... one blast gate for both and switching the flex that comes from both machines. I have to sit and analyse both options.

I have some magport I can use
IMG_8096sm_250x250@2x.jpg

but at the end I want the most efficient not necessarily the less expensive.

About the Magports, they are strong, they never disconnect on me. Very easy to install and made in St-Louis  [big grin]. I highly recommend their products. I ordered the starter kit and it took about 6 days to get to me  [wink]
 

Attachments

  • drillpressgate.jpg
    drillpressgate.jpg
    106.5 KB · Views: 12,630
  • extraflex.jpg
    extraflex.jpg
    159.1 KB · Views: 11,629
  • stiffflex.jpg
    stiffflex.jpg
    136.3 KB · Views: 11,729
Mario if you can keep the flex hose to 18" or less, the internal loss isn't that great.

I like the MagPorts a lot. I use them for all my connections.  [big grin]
 
Cheese said:
Mario if you can keep the flex hose to 18" or less, the internal loss isn't that great.

I like the MagPorts a lot. I use them for all my connections.  [big grin]

Perhaps, it was YOU that introduce me to Magport on one of your post/reply [eek] who knows  [tongue]
 
I like the Magports but have not bought any yet. Most of my stuff stays connected, but I can think of one place where the Magport would be handy.
 
I hadn’t seen the MagPorts.  I use Dryer Dock connectors, which perform the same function, but with a plastic interlock. Rough handling will break a tab, though.

I recently re-did half of my network using the clear 4” tubes from busybeetools.com, and replaced my plastic gates with metal. I really like the clear tube, even though getting them to the US was expensive (busy bee doesn’t export). I’ve written to LV asking that they consider stocking them; if you’re interested, join in!  I plan to re-do the other half later this year.
 
Back
Top