Fabricating 1 a KERDI-BOARD shower niche

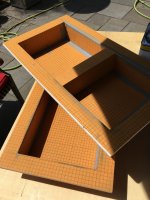
Thanks for posting the photos of your shop made shelf and the factory version.

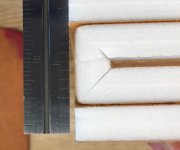
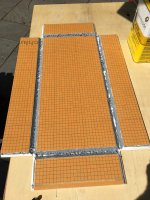
I know your cut the miters with a V shaped router bit so they are 45 degrees on each side. The factory version has overcut miters so there is no interference when folding the Kerdi board. They probably run the Kerdi through a pair of knives (rotary?) to avoid producing dust.

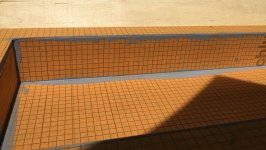
Another interesting feature of the factory version is that the inner fold if shorter than the surrounding Kerdi board so the outer panels will be tight to the wall when glued.
 
Michael Kellough said:
Another interesting feature of the factory version is that the inner fold is shorter than the surrounding Kerdi board so the outer panels will be tight to the wall when glued.

You're right  [not worthy]  and one end of the outer wrap is 1/16" wider so that when it's attached to the niche, it will rest at a 2º angle for drainage. Check out the photo.

I made mine in the very same manner and after I glued up the inner fold, I test fitted it with the outer fold before gluing just to make sure everything was copacetic.
However, when I glued them together, I think I clamped them too tightly which caused the 2 pieces of KERDI to slip relative to each other and also caused a slight bulge in the inner folded foam. Thus removing the clearances I had built in. [crying] [crying]

I'm planning on building another shelf, it was pretty easy and I've got some KERDI left.
 

Attachments

  • 5468.jpg
    5468.jpg
    1.1 MB · Views: 491
In this final build, I'm taking the machined KERDI-BOARD, folding it up, placing it in the front frame and securing every joint with KERDI-FIX.

Photo 1:
A small bead of KERDI-FIX is applied to each side of a joint.

Photo 2:
The joint is opened and closed several times thus spreading a fairly uniform layer of sealant on all surfaces.
As a note, this stuff is almost as bad to work with as Vulkem. [eek]  Vulkem is the best for outdoors but it sticks to everything and has to be removed with toluene. This KERDI-FIX can be removed with mineral spirits.

Photo 3:
Two small beads of sealant are placed on the front flange.

Photo 4:
The box is folded and then placed within the recess of the front flange. Even pressure is applied to the back of the box which will produce a fairly even amount of squeeze-out along the seams. Excess sealant is cleaned/smoothed with a putty knife and/or mineral spirits.

Photo 5:
The 2 completed custom sized 10" x 22" shower niches ready for installation.
 

Attachments

  • 5523.JPG
    5523.JPG
    3 MB · Views: 1,882
  • 5524.JPG
    5524.JPG
    3.3 MB · Views: 547
  • 5525.JPG
    5525.JPG
    2.2 MB · Views: 1,072
  • 5526.jpg
    5526.jpg
    2.6 MB · Views: 435
  • 5527.JPG
    5527.JPG
    2.8 MB · Views: 701
Back
Top