woodferret
Member
Sounds good. Just a quick check, everyone's sliding table is flat using a ruler check edge to edge? The thinner bevel side of mine seems to be flared up a tiny bit.
luvmytoolz said:I really like that in the email today announcing the unveiling of this new saw to the OZ market, one of the features is that it's more precise than a yard stick!
[member=72072]woodferret[/member] Very grateful for this. Out of curiosity, is everything you disassembled in line with what the manual says you can touch/do?woodferret said:I got antsy and disassembled mine.ElectricFeet said:Edit to add: there’s no way I’m going to experiment with mine though. That’d be a pretty big warranty-voiding act [eek]
") ). I don’t see why they couldn’t have done this here.
). I don’t see why they couldn’t have done this here. ElectricFeet said:[member=72072]woodferret[/member] Very grateful for this. Out of curiosity, is everything you disassembled in line with what the manual says you can touch/do?woodferret said:I got antsy and disassembled mine.ElectricFeet said:Edit to add: there’s no way I’m going to experiment with mine though. That’d be a pretty big warranty-voiding act [eek]
It’s surprising that they didn’t include a way to calibrate this part. When I completely stripped down my OF CMS router fence, I was impressed by just how perfectly orthogonal, straight and parallel I could get it to be (though I wasn’t impressed that it wasn’t like that when I bought it :
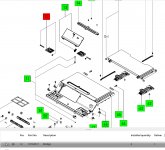
I’m intrigued by those plastic / risers / plates or “wedges” as Ekat describes them (under which you placed your shims). The bolts are easily accessible without dismantling anything, yet the manual makes no reference to them. Any clues as to what they are and why they are not used for adjusting the front / back tilt?
[attachimg=1]
Ah, missed that. Thanks.woodferret said:The plastic wedges and screws is referenced in the section titled "12.2 Adjusting the sliding table height [18]" They can be totally used for front-back tilt. Xeres and my issue was lateral tilt (because the underbody is formed tilted ever so minutely in our case).
ElectricFeet said:So which screws did you remove to disassemble down to the wedges?


woodferret said:ElectricFeet said:So which screws did you remove to disassemble down to the wedges?
The ones under the caps 18-1, 18-2. Don't know what EKAT part no they were.
woodferret said:I should point out that the black one is a small torx bit. It's far enough down that I thought it was a hex until I got it out.


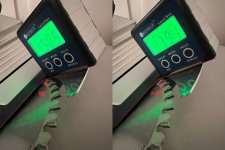
Xere said:Where those 0.7° come from...
I’ve been using it for months and it’s great.Vondawg said:I’m just confused as to why there is a reason to tear apart a brand new saw?
Is festool selling an inferior product ? Is this a saw that can’t be used right out of the box ?
Vondawg said:I’m just confused as to why there is a reason to tear apart a brand new saw?
Is festool selling an inferior product ? Is this a saw that can’t be used right out of the box ?