Festool TS55 Bevel Stop

Having the same problem here. It's as if the -1 degree setting is the default. If I were doing a 180 sided piece, I could leave it set as is, flipping each component as I cut, and all would come out right, full circle.  [wink]

When I want a square cut, it's not so easy. Why no adjustment possibilities for the REQ?  [mad]

Len
 
mprzybylski said:
Please do let me know how your saw comes back. I'd be interested to see if they fixed the problem as I've read some threads where someone sent it back twice and it didn't get fixed :/

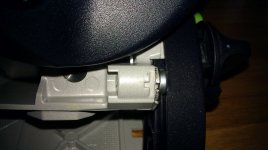
I got the saw back. At first I thought I still had the same problem. After talking to Service for direction on adjusting the stop and starting to adjust it myself, I found that the stop was as close as it could get to 90 degrees. For me, the problem resulted from securing the front bevel lock knob first rather than the rear lock knob. When I secured the rear knob first I didn't have angle or 90 degree cut problems. The stop was dead-on no matter what method I used to determine if it was a square cut.

When I secured the front bevel lock knob first, I tended to put some stress on the saw via the handle, thus slightly deforming the base of the saw. This slight pressure and bending of the base (or possibly the "sub-base") resulted in securing the saw slightly off of the intended position or, in the case of the default stop, off of 90 degrees enough to make a noticeable difference. Since the bevel stop and mechanism is essentially in the rear, securing the rear knob first eliminated the possibility I would put any stress on the saw itself while locking it down in position with the knobs. Then, just securing the front knob last without touching the saw kept it in position.

This seems to have eliminated my problem. Hope it eliminates yours. If not, I feel sending it back to Service to permit them to reset the default stop was not a bad thing since it gave me peace of mind at this point. I will leave it to Service to provide direction on the steps to set the stop, but it isn't hard. It invokes loosening the stop plate in the rear (two screws) and slightly moving it to fix the problem if it really exists). One thing you will need is a torx head driver (T25 I think) long enough to reach a recessed screw securing the stop plate.

I will keep watch on my cuts for awhile to be sure things don't change but, for now, I'm satisfied.

Oh, by the way, Shane and Service were very patient with me and provided what I needed.
 
Thanks for the update.  I called service the other day myself and they told me the same thing about loosening the two torx screws to adjust it but I haven't had a chance to do it yet.  I did notice the same thing as you, if I tighten the rear knob first and then the front knob then I don't have a "rocking" problem on my rail.  Kind of odd how this all works but that fixed that issue for me.

Where in IL are you by the way?
 
I just had to figure this out...

There are two T25 torx screws holding a bracket at the back pivot.

There's one here:

[attachimg=#1]

and one here:

[attachimg=#2]

Once they are slightly lose, using a wide blade screwdriver, the bracket can be fine-tuned. Put the screwdriver spanning the slots in the casting and the bracket and twist to adjust. Leaving the screws snug to hold the bracket's position makes it easier to then retighten the screws.

[attachimg=#3]

Tom
 

Attachments

  • IMAG0730.jpg
    IMAG0730.jpg
    308.5 KB · Views: 3,781
  • IMAG0731.jpg
    IMAG0731.jpg
    317.2 KB · Views: 3,638
  • IMAG0732.jpg
    IMAG0732.jpg
    338.4 KB · Views: 3,647
That's it. I feel stupid that I didn't think to tilt the saw to get at the second screw when my torx bit didn't go all the way in. Fortunately it stopped me from doing it when I think I really didn't have to make the adjustment.
 
Tom Bellemare said:
I just had to figure this out...

There are two T25 torx screws holding a bracket at the back pivot.

There's one here:

[attachimg=#1]

and one here:

[attachimg=#2]

Once they are slightly lose, using a wide blade screwdriver, the bracket can be fine-tuned. Put the screwdriver spanning the slots in the casting and the bracket and twist to adjust. Leaving the screws snug to hold the bracket's position makes it easier to then retighten the screws.

[attachimg=#3]

Tom

My brand new req had the same issue. I was going to call festool but now I dont have to. Thanks Tom!

Mike
 
Although I did further testing with my saw and found the cut to be only off square by less than a hair, I tried to adjust and believe I got it even closer. It is very hard to get it exact though. A third hand would be a big help. The big discovery for me was still that tightening the back bevel lock knob first locks the saw in at the true default. If you lock the front knob first you run the risk of deflecting it at least slightly.
 
Thanks Tom.
I had that issue with my TS55REQ also.
I calibrated as per your instructions and all is fine now.

Regards

Tom Bellemare said:
I just had to figure this out...

There are two T25 torx screws holding a bracket at the back pivot.

There's one here:

[attachimg=#1]

and one here:

[attachimg=#2]

Once they are slightly lose, using a wide blade screwdriver, the bracket can be fine-tuned. Put the screwdriver spanning the slots in the casting and the bracket and twist to adjust. Leaving the screws snug to hold the bracket's position makes it easier to then retighten the screws.

[attachimg=#3]

Tom
 
Thank you Tom for the fine explanation on this. I find it difficult to believe that Festool would rather have the customer send back the whole unit for this adjustment, versus coming out with the instructions you did. Mine was off by 1 degree, and with the above instructions I was able to dial it in to perfect. All I needed to was loosen the 2 screws and move the bracket to the left until it stopped. That ended up having my pointer right at the 0 Degree mark. Thanks again Tom!

Scott
 
Thanks Tom from me too. After reading this thread I checked my new TS 55 and discovered it is about 0.5 degrees out.  I look forward to fixing this as soon as I locate my Torx bits!
 
I had adjusted mine by trial & error method. It is close enough that I cannot see any problem when ripping and butting a couple of 1/2" pieces. I do see a very slight difference when butting a couple of 5/4 or 6/4 pieces together.  I have to flip one piece to make my cut if i want a flat result and matching grain patterns, even with 3/4" when it is close enough I cannot see the difference without my reading glasses. 

Thanks, Tom, for the explanation of how to set.  I will be trying that when I get into shop later today. Is it the same for the old ATF 55.  I have always tightened that at the front first and had a devil of a time keeping it square.  I had to recheck nearly every time i used the saw. Now that i have the REQ, it is a real pleasure to use.  I still keep the ATF to use outdoors when i cut down sheet lumber or rough cut to length dimension lumber to bring down into the shop where i do the precision cutting.

As i type right now, i am recalling that one responder mentioned the saw rocking on the guide rail after adjustment.  I have had that problem with my ATF for a long time.  I just laid that problem to the discovery that Newton was correct in his determination of the cause for falling ATF's, or some such hard goods.
Tinker
Tinker
 
My TS 55 REQ rocked right out of the box after the recall return. I put it on a flat granite slab and it rocked slightly.

I loosened the bevel locks. It relaxed and was then flat. Somehow, it had gotten in a bind during return shipping.

Tom
 
Thank goodness I found this.  I was very frustrated with the performance of the saw and mystified that quality control does not carefully check stops, particularly when there was no documentation on owner adjustment (certainly at $600 + per saw it SHOULD be done).  My saw was more than a degree out of perpendicular and always having to correct it was tedious.  It is somewhat tricky to get the stop adjusted, there is no way to easily and precisely move the steel plate.  Seems like the older saw with screws would be much easier to adjust.  I appreciate the photos.  Thanks.
 
I have been working sporadically on a trestle table thru this winter.  The top and bottom sections of the legs are 5/4 Walnut glued together with mortice cut in center for the leg tendons t go thru.  I have worked on several other smaller projects in between and since i found out about the proper sequence to adjusting the bevel on the TS 55, the saw has stayed perfectly square so far all winter.  In the past, I was checking and readjusting almost everytime i used the saw where ever two edges had to match perfectly.
Tinker
 
For the first time in a long time I cut something thicker than 20mm, (closer to 45mm) and noticed that my blade was significantly off square from the stops, and from from the markings. It needed to be set at around 1 degree on the marking scale in order to cut square.

I sent it in for a warranty adjustment and got it back in 2 working days. Now it has been set to be accurate to the marking scale, but when it is against the stops it is still a little off.

I've been monitoring this thread (and the related ones) for a while but can't recall - can the physical stops be set in relation to the marking scale so that all 3 (blade, scale, stop) are aligned?

 
My understanding is that the scale cannot be adjusted. I think the best you can do is to set the stops so they are exactly at 90 degrees through test cuts and then note where the marker is on the scale for reference. The pointer on my scale just happened to be right on the 0 mark when I got the stops set at 90 degrees. I have heard that is not always true.
 
I spent about an hour tuning my saw in today, but I feel like it wasn't time particularly well spent.  After all is said and done, I feel like I got the stop to within 0.25 degrees of 0, but the deflection in the entire saw itself has to be 1-2 degrees.

It seems like you have to dial the saw in every time you change the bevel if you want real accuracy.
 
clutzer said:
I spent about an hour tuning my saw in today, but I feel like it wasn't time particularly well spent.  After all is said and done, I feel like I got the stop to within 0.25 degrees of 0, but the deflection in the entire saw itself has to be 1-2 degrees.

It seems like you have to dial the saw in every time you change the bevel if you want real accuracy.

So far, that hasn't been my experience. Did you change bevel stop in back? My biggest problem with zero degree setting was that there is no real instruction in the TS55REQ manual (unless there is a new one I haven't downloaded) concerning setting the stop. Also, based on quite a bit of feedback from owners and my own experience, it's clear to me that you must secure the back bevel knob first and, when tightening the front knob, leave your hands off the saw completely; just tighten it. Putting even light weight on the saw tends to move the front out of alignment from zero degrees. So, once the bevel stop in back is set and you are sure the saw cuts a true 90 degrees, the procedure for returning to that is tighten the back knob first, remove your hands from the saw, then tighten the front knob. It should be easier and less touchy than that, but it isn't. The previous version of the saw seems to have addressed the adjustment of the stop better and in a more straightforward way. The REQ's adjustment is difficult to get perfect and needlessly finicky; not really an improvement over the original.
 
grbmds said:
It should be easier and less touchy than that, but it isn't.
I think we're on the same page--I can let the saw rest against the stop, tighten the back, then the front and I'm square, it's just if you touch the saw while tightening it can deflect.  I almost wish there were set screws in the base itself that allowed a rock solid return to zero--I really don't personally care about -1 degree.  But then I'm a noob and I don't know what I don't know.
 
Back
Top