Festool Vac System

I could see a contractor using a couple of these to put on his/her tailgate of their pickup truck to hold an object too.
 
robtonya said:
I could see a contractor using a couple of these to put on his/her tailgate of their pickup truck to hold an object too.

Hi,

  Yeah, that could be very handy for site work. And repairs what not, holding things that might be damaged by other clamps.

Seth
 
all you need is a flat piece of board or metal  with some 3/8 foam rubber on it.  cut some grooves [but not to the edges]  pull a vac in the grooves ant there you go less than 400.    we use a curve metal rubber set up to hold 4200 pound pipes,  using a 200 vau pump.
 
so after reading about the Vakuusyst post  (http://www.barth-maschinenbau.de/Produkte/Vakuusyst/video.php)
from our friend from the Netherlands above I wrote to the company and heard back from the rep in N.Y.
as to the price and availability.......

(save your Euros!)

his reply.....

"My name is Steve Riebling, I represent Barth and there equipment in the US
My office is in NY .

The vak system for basic suppor bar,2 vac cups and pump, with foot pedal sell for $ 3300.00
The vac system cart complete sells for $ 4400.00
Price FOB NY

Please let me know if you are interest, I have none in stock
but we have a container from Barth coming in, in 6 weeks
we could add it to the shipment."

hmmm, so 2 Festool Vac systems to hold a long part would cost how much?????

 
monte said:
so after reading about the Vakuusyst post  (http://www.barth-maschinenbau.de/Produkte/Vakuusyst/video.php)

Anyone know anything about that drill installed hinge pin in the video? After using a jig to drill holes in the edge of the door he is using a drill to set something that looks like a hinge pin just after the middle of the video.
 
Michael

is this what you mean?

200-inboor-paumelle.jpg


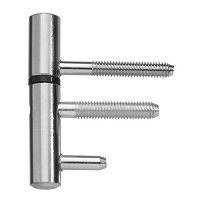
it's a drill in hinge. In dutch it is called "inboor paumelle"
 
2dv2aew.jpg


This is for doors that overlap the door frame. I hope the drawing makes that clear. You can see the shape of the door in the vid
 
johne said:
2dv2aew.jpg


This is for doors that overlap the door frame. I hope the drawing makes that clear. You can see the shape of the door in the vid

Thanks for the illustration johne. It is neat design, holds the door open and makes the passageway a little larger than when conventional hinges are used. Is this only for interior doors?

However, my question concerns the apparent need to put a nut on the threaded part of the pin portion of the hinge. You would need use a wrench in the position occupied by the "door frame" text in the illustration. What if you need to get access to that nut after the door casing in applied? You just have to take the casing off?
 
Michael,

This is the idea
r0thfp.jpg


One hole in the door to hold top part of hinge
2 holes in the doorframe, for the lower part of the hinge,one for the smooth stabilizing pin and one for the threaded pin
The threaded pin has a screw accesible from the front (see pic)
 
I don t really like the look of these doors. I think it is manily done to save a few bucks. Holes in the doors can be predrilled at the factory (as in vid)
and the doorframes mostly come predrilled too. So when installing all you have to do is screw in the two parts hang the door in and you re done.
 
johne said:
Michael,

This is the idea
r0thfp.jpg


One hole in the door to hold top part of hinge
2 holes in the doorframe, for the lower part of the hinge,one for the smooth stabilizing pin and one for the threaded pin
The threaded pin has a screw accesible from the front (see pic)

Thanks for the picture, it's even clearer now. I somehow failed to notice your indication that the door jamb screw was installed through the barrel of the hinge. It's really clever, but I'm starting to see some of the drawbacks you might not like. There is a large gap (the thickness of the hinge) the full length of the door when it's closed?.
 
Dave Rudy said:
How about the edgebander?  Any ideas on who makes it and (I Shudder to ask) is it AINA?

I have no idea who makes it, but that edgebanding the guy uses looks a lot like the thick pvc edgebanding you asked about in the other thread
 
Michael Kellough said:
johne said:
Michael,

This is the idea
One hole in the door to hold top part of hinge
2 holes in the doorframe, for the lower part of the hinge,one for the smooth stabilizing pin and one for the threaded pin
The threaded pin has a screw accesible from the front (see pic)

Thanks for the picture, it's even clearer now. I somehow failed to notice your indication that the door jamb screw was installed through the barrel of the hinge. It's really clever, but I'm starting to see some of the drawbacks you might not like. There is a large gap (the thickness of the hinge) the full length of the door when it's closed?.

No there is hardly any gap, if there is just tighten the screw on the lower part of the hinge to reduce it. I just dont like the look of a door overlapping a doorframe . I like a door with the traditional hinges better.
 
johne said:
No there is hardly any gap, if there is just tighten the screw on the lower part of the hinge to reduce it. I just dont like the look of a door overlapping a doorframe . I like a door with the traditional hinges better.

I think I  get it now. The door in your illustration is in the closed position? So, not only is there no gap there is a rabbeted overlap. This leaves the hinge attachment screw exposed when the door is shut?
 
Back
Top